OAuth 2.0 Resource Server
Spring Security supports protecting endpoints using two forms of OAuth 2.0 Bearer Tokens:
-
Opaque Tokens
This is handy in circumstances where an application has delegated its authority management to an authorization server (for example, Okta or Ping Identity). This authorization server can be consulted by resource servers to authorize requests.
This section provides details on how Spring Security provides support for OAuth 2.0 Bearer Tokens.
|
Working samples for both JWTs and Opaque Tokens are available in the Spring Security Samples repository. |
Let’s take a look at how Bearer Token Authentication works within Spring Security. First, we see that, like Basic Authentication, the WWW-Authenticate header is sent back to an unauthenticated client.
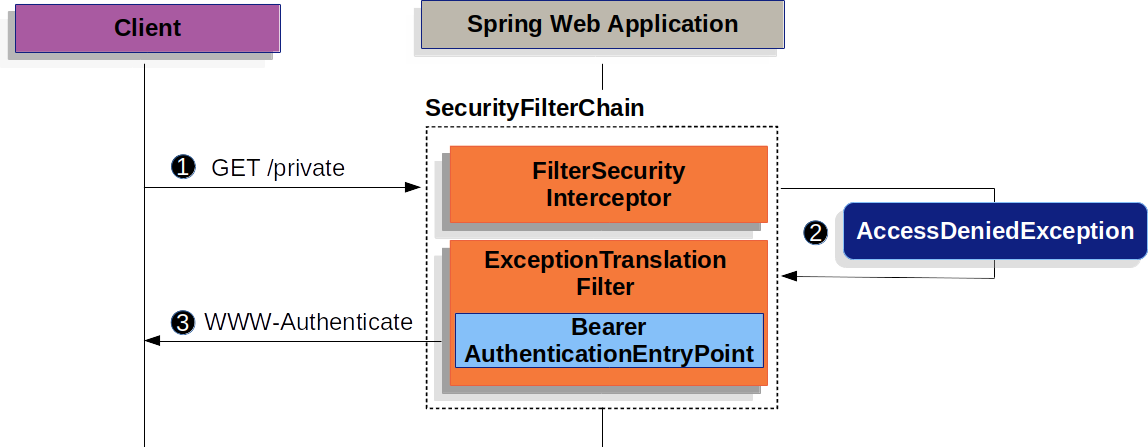
The figure above builds off our SecurityFilterChain diagram.
![]() First, a user makes an unauthenticated request to the resource
First, a user makes an unauthenticated request to the resource /private for which it is not authorized.
![]() Spring Security’s
Spring Security’s FilterSecurityInterceptor indicates that the unauthenticated request is Denied by throwing an AccessDeniedException.
![]() Since the user is not authenticated,
Since the user is not authenticated, ExceptionTranslationFilter initiates Start Authentication.
The configured AuthenticationEntryPoint is an instance of BearerTokenAuthenticationEntryPoint which sends a WWW-Authenticate header.
The RequestCache is typically a NullRequestCache that does not save the request since the client is capable of replaying the requests it originally requested.
When a client receives the WWW-Authenticate: Bearer header, it knows it should retry with a bearer token.
Below is the flow for the bearer token being processed.
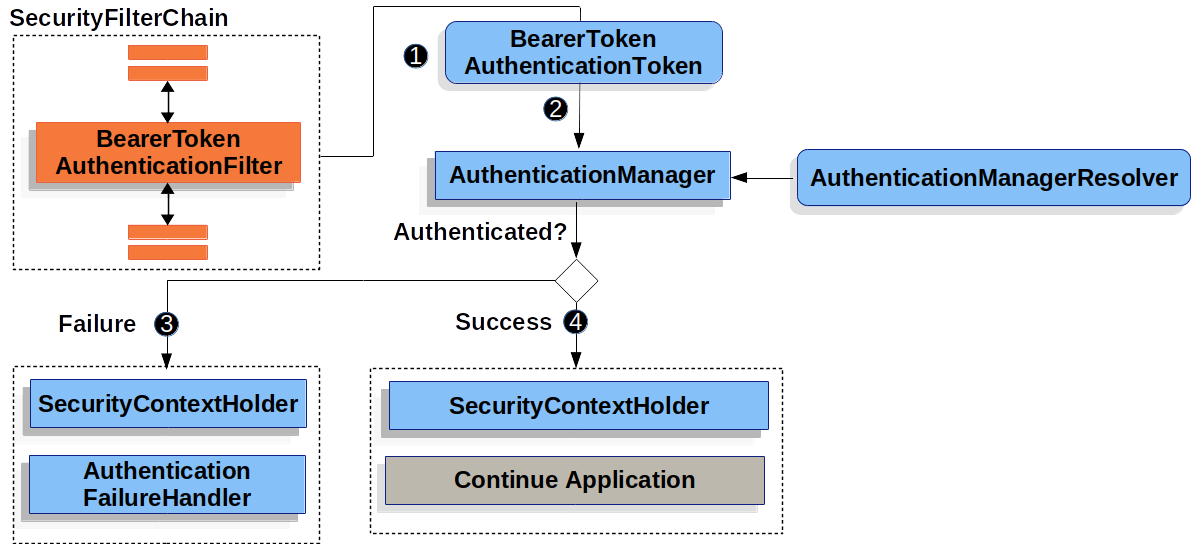
The figure builds off our SecurityFilterChain diagram.
![]() When the user submits their bearer token, the
When the user submits their bearer token, the BearerTokenAuthenticationFilter creates a BearerTokenAuthenticationToken which is a type of Authentication by extracting the token from the HttpServletRequest.
![]() Next, the
Next, the HttpServletRequest is passed to the AuthenticationManagerResolver, which selects the AuthenticationManager. The BearerTokenAuthenticationToken is passed into the AuthenticationManager to be authenticated.
The details of what AuthenticationManager looks like depends on whether you’re configured for JWT or opaque token.
![]() If authentication fails, then Failure
If authentication fails, then Failure
-
The SecurityContextHolder is cleared out.
-
The
AuthenticationEntryPointis invoked to trigger the WWW-Authenticate header to be sent again.
![]() If authentication is successful, then Success.
If authentication is successful, then Success.
-
The Authentication is set on the SecurityContextHolder.
-
The
BearerTokenAuthenticationFilterinvokesFilterChain.doFilter(request,response)to continue with the rest of the application logic.
Minimal Dependencies for JWT
Most Resource Server support is collected into spring-security-oauth2-resource-server.
However, the support for decoding and verifying JWTs is in spring-security-oauth2-jose, meaning that both are necessary in order to have a working resource server that supports JWT-encoded Bearer Tokens.
Minimal Configuration for JWTs
When using Spring Boot, configuring an application as a resource server consists of two basic steps. First, include the needed dependencies and second, indicate the location of the authorization server.
Specifying the Authorization Server
In a Spring Boot application, to specify which authorization server to use, simply do:
spring:
  security:
    oauth2:
      resourceserver:
        jwt:
          issuer-uri: https://idp.example.com/issuer
Where https://idp.example.com/issuer is the value contained in the iss claim for JWT tokens that the authorization server will issue.
Resource Server will use this property to further self-configure, discover the authorization server’s public keys, and subsequently validate incoming JWTs.
To use the issuer-uri property, it must also be true that one of https://idp.example.com/issuer/.well-known/openid-configuration, https://idp.example.com/.well-known/openid-configuration/issuer, or https://idp.example.com/.well-known/oauth-authorization-server/issuer is a supported endpoint for the authorization server.
This endpoint is referred to as a Provider Configuration endpoint or a Authorization Server Metadata endpoint.
|
And that’s it!
Startup Expectations
When this property and these dependencies are used, Resource Server will automatically configure itself to validate JWT-encoded Bearer Tokens.
It achieves this through a deterministic startup process:
-
Query the Provider Configuration or Authorization Server Metadata endpoint for the
jwks_urlproperty -
Query the
jwks_urlendpoint for supported algorithms -
Configure the validation strategy to query
jwks_urlfor valid public keys of the algorithms found -
Configure the validation strategy to validate each JWTs
issclaim againsthttps://idp.example.com.
A consequence of this process is that the authorization server must be up and receiving requests in order for Resource Server to successfully start up.
| If the authorization server is down when Resource Server queries it (given appropriate timeouts), then startup will fail. |
Runtime Expectations
Once the application is started up, Resource Server will attempt to process any request containing an Authorization: Bearer header:
GET / HTTP/1.1
Authorization: Bearer some-token-value # Resource Server will process this
So long as this scheme is indicated, Resource Server will attempt to process the request according to the Bearer Token specification.
Given a well-formed JWT, Resource Server will:
-
Validate its signature against a public key obtained from the
jwks_urlendpoint during startup and matched against the JWT -
Validate the JWT’s
expandnbftimestamps and the JWT’sissclaim, and -
Map each scope to an authority with the prefix
SCOPE_.
| As the authorization server makes available new keys, Spring Security will automatically rotate the keys used to validate JWTs. |
The resulting Authentication#getPrincipal, by default, is a Spring Security Jwt object, and Authentication#getName maps to the JWT’s sub property, if one is present.
From here, consider jumping to:
How JWT Authentication Works
Next, let’s see the architectural components that Spring Security uses to support JWT Authentication in servlet-based applications, like the one we just saw.
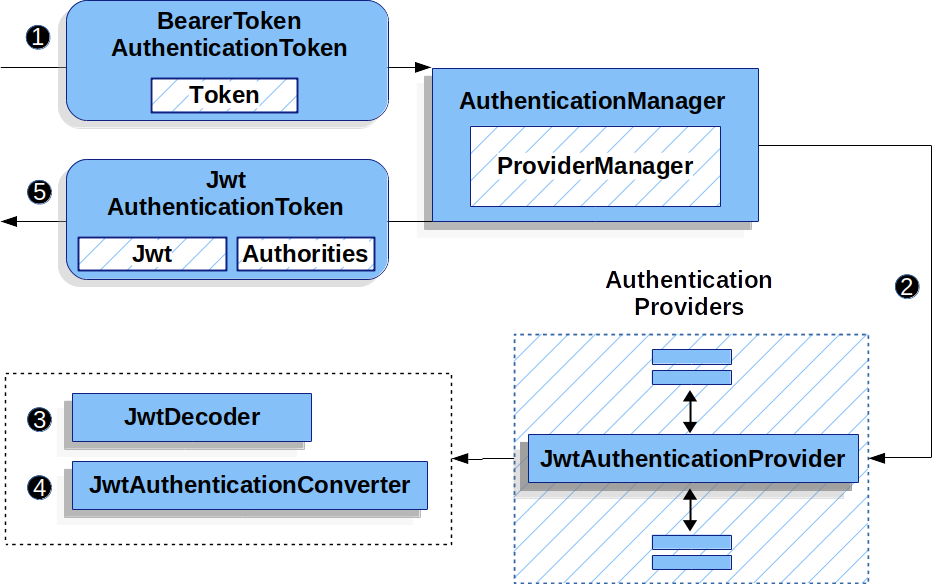
JwtAuthenticationProvider is an AuthenticationProvider implementation that leverages a JwtDecoder and JwtAuthenticationConverter to authenticate a JWT.
Let’s take a look at how JwtAuthenticationProvider works within Spring Security.
The figure explains details of how the AuthenticationManager in figures from Reading the Bearer Token works.
JwtAuthenticationProvider Usage![]() The authentication
The authentication Filter from Reading the Bearer Token passes a BearerTokenAuthenticationToken to the AuthenticationManager which is implemented by ProviderManager.
![]() The
The ProviderManager is configured to use an AuthenticationProvider of type JwtAuthenticationProvider.
![]()
JwtAuthenticationProvider decodes, verifies, and validates the Jwt using a JwtDecoder.
![]()
JwtAuthenticationProvider then uses the JwtAuthenticationConverter to convert the Jwt into a Collection of granted authorities.
![]() When authentication is successful, the
When authentication is successful, the Authentication that is returned is of type JwtAuthenticationToken and has a principal that is the Jwt returned by the configured JwtDecoder.
Ultimately, the returned JwtAuthenticationToken will be set on the SecurityContextHolder by the authentication Filter.
Specifying the Authorization Server JWK Set Uri Directly
If the authorization server doesn’t support any configuration endpoints, or if Resource Server must be able to start up independently from the authorization server, then the jwk-set-uri can be supplied as well:
spring:
  security:
    oauth2:
      resourceserver:
        jwt:
          issuer-uri: https://idp.example.com
jwk-set-uri: https://idp.example.com/.well-known/jwks.json| The JWK Set uri is not standardized, but can typically be found in the authorization server’s documentation |
Consequently, Resource Server will not ping the authorization server at startup.
We still specify the issuer-uri so that Resource Server still validates the iss claim on incoming JWTs.
| This property can also be supplied directly on the DSL. |
Overriding or Replacing Boot Auto Configuration
There are two @Beans that Spring Boot generates on Resource Server’s behalf.
The first is a WebSecurityConfigurerAdapter that configures the app as a resource server. When including spring-security-oauth2-jose, this WebSecurityConfigurerAdapter looks like:
protected void configure(HttpSecurity http) {
    http
        .authorizeRequests(authorize -> authorize
            .anyRequest().authenticated()
        )
        .oauth2ResourceServer(OAuth2ResourceServerConfigurer::jwt);
}fun configure(http: HttpSecurity) {
http {
authorizeRequests {
authorize(anyRequest, authenticated)
}
oauth2ResourceServer {
jwt { }
}
}
}If the application doesn’t expose a WebSecurityConfigurerAdapter bean, then Spring Boot will expose the above default one.
Replacing this is as simple as exposing the bean within the application:
@EnableWebSecurity
public class MyCustomSecurityConfiguration extends WebSecurityConfigurerAdapter {
    protected void configure(HttpSecurity http) {
        http
            .authorizeRequests(authorize -> authorize
                .mvcMatchers("/messages/**").hasAuthority("SCOPE_message:read")
                .anyRequest().authenticated()
            )
            .oauth2ResourceServer(oauth2 -> oauth2
                .jwt(jwt -> jwt
                    .jwtAuthenticationConverter(myConverter())
                )
            );
    }
}@EnableWebSecurity
class MyCustomSecurityConfiguration : WebSecurityConfigurerAdapter() {
override fun configure(http: HttpSecurity) {
http {
authorizeRequests {
authorize("/messages/**", hasAuthority("SCOPE_message:read"))
authorize(anyRequest, authenticated)
}
oauth2ResourceServer {
jwt {
jwtAuthenticationConverter = myConverter()
}
}
}
}
}The above requires the scope of message:read for any URL that starts with /messages/.
Methods on the oauth2ResourceServer DSL will also override or replace auto configuration.
For example, the second @Bean Spring Boot creates is a JwtDecoder, which decodes String tokens into validated instances of Jwt:
@Bean
public JwtDecoder jwtDecoder() {
    return JwtDecoders.fromIssuerLocation(issuerUri);
}@Bean
fun jwtDecoder(): JwtDecoder {
return JwtDecoders.fromIssuerLocation(issuerUri)
}
Calling JwtDecoders#fromIssuerLocation is what invokes the Provider Configuration or Authorization Server Metadata endpoint in order to derive the JWK Set Uri.
|
If the application doesn’t expose a JwtDecoder bean, then Spring Boot will expose the above default one.
And its configuration can be overridden using jwkSetUri() or replaced using decoder().
Or, if you’re not using Spring Boot at all, then both of these components - the filter chain and a JwtDecoder can be specified in XML.
The filter chain is specified like so:
<http>
    <intercept-uri pattern="/**" access="authenticated"/>
    <oauth2-resource-server>
        <jwt decoder-ref="jwtDecoder"/>
    </oauth2-resource-server>
</http>
And the JwtDecoder like so:
<bean id="jwtDecoder"
        class="org.springframework.security.oauth2.jwt.JwtDecoders"
        factory-method="fromIssuerLocation">
    <constructor-arg value="${spring.security.oauth2.resourceserver.jwt.jwk-set-uri}"/>
</bean>
Using jwkSetUri()
An authorization server’s JWK Set Uri can be configured as a configuration property or it can be supplied in the DSL:
@EnableWebSecurity
public class DirectlyConfiguredJwkSetUri extends WebSecurityConfigurerAdapter {
    protected void configure(HttpSecurity http) {
        http
            .authorizeRequests(authorize -> authorize
                .anyRequest().authenticated()
            )
            .oauth2ResourceServer(oauth2 -> oauth2
                .jwt(jwt -> jwt
                    .jwkSetUri("https://idp.example.com/.well-known/jwks.json")
                )
            );
    }
}@EnableWebSecurity
class DirectlyConfiguredJwkSetUri : WebSecurityConfigurerAdapter() {
override fun configure(http: HttpSecurity) {
http {
authorizeRequests {
authorize(anyRequest, authenticated)
}
oauth2ResourceServer {
jwt {
jwkSetUri = "https://idp.example.com/.well-known/jwks.json"
}
}
}
}
}<http>
<intercept-uri pattern="/**" access="authenticated"/>
<oauth2-resource-server>
<jwt jwk-set-uri="https://idp.example.com/.well-known/jwks.json"/>
</oauth2-resource-server>
</http>Using jwkSetUri() takes precedence over any configuration property.
Using decoder()
More powerful than jwkSetUri() is decoder(), which will completely replace any Boot auto configuration of JwtDecoder:
@EnableWebSecurity
public class DirectlyConfiguredJwtDecoder extends WebSecurityConfigurerAdapter {
    protected void configure(HttpSecurity http) {
        http
            .authorizeRequests(authorize -> authorize
                .anyRequest().authenticated()
            )
            .oauth2ResourceServer(oauth2 -> oauth2
                .jwt(jwt -> jwt
                    .decoder(myCustomDecoder())
                )
            );
    }
}@EnableWebSecurity
class DirectlyConfiguredJwtDecoder : WebSecurityConfigurerAdapter() {
override fun configure(http: HttpSecurity) {
http {
authorizeRequests {
authorize(anyRequest, authenticated)
}
oauth2ResourceServer {
jwt {
jwtDecoder = myCustomDecoder()
}
}
}
}
}<http>
<intercept-uri pattern="/**" access="authenticated"/>
<oauth2-resource-server>
<jwt decoder-ref="myCustomDecoder"/>
</oauth2-resource-server>
</http>This is handy when deeper configuration, like validation, mapping, or request timeouts, is necessary.
Exposing a JwtDecoder @Bean
Or, exposing a JwtDecoder @Bean has the same effect as decoder():
@Bean
public JwtDecoder jwtDecoder() {
    return NimbusJwtDecoder.withJwkSetUri(jwkSetUri).build();
}@Bean
fun jwtDecoder(): JwtDecoder {
return NimbusJwtDecoder.withJwkSetUri(jwkSetUri).build()
}Configuring Trusted Algorithms
By default, NimbusJwtDecoder, and hence Resource Server, will only trust and verify tokens using RS256.
You can customize this via Spring Boot, the NimbusJwtDecoder builder, or from the JWK Set response.
Via Spring Boot
The simplest way to set the algorithm is as a property:
spring:
  security:
    oauth2:
      resourceserver:
        jwt:
          jws-algorithm: RS512
          jwk-set-uri: https://idp.example.org/.well-known/jwks.json
Using a Builder
For greater power, though, we can use a builder that ships with NimbusJwtDecoder:
@Bean
JwtDecoder jwtDecoder() {
    return NimbusJwtDecoder.withJwkSetUri(this.jwkSetUri)
            .jwsAlgorithm(RS512).build();
}@Bean
fun jwtDecoder(): JwtDecoder {
return NimbusJwtDecoder.withJwkSetUri(this.jwkSetUri)
.jwsAlgorithm(RS512).build()
}Calling jwsAlgorithm more than once will configure NimbusJwtDecoder to trust more than one algorithm, like so:
@Bean
JwtDecoder jwtDecoder() {
    return NimbusJwtDecoder.withJwkSetUri(this.jwkSetUri)
            .jwsAlgorithm(RS512).jwsAlgorithm(ES512).build();
}@Bean
fun jwtDecoder(): JwtDecoder {
return NimbusJwtDecoder.withJwkSetUri(this.jwkSetUri)
.jwsAlgorithm(RS512).jwsAlgorithm(ES512).build()
}Or, you can call jwsAlgorithms:
@Bean
JwtDecoder jwtDecoder() {
    return NimbusJwtDecoder.withJwkSetUri(this.jwkSetUri)
            .jwsAlgorithms(algorithms -> {
                    algorithms.add(RS512);
                    algorithms.add(ES512);
            }).build();
}@Bean
fun jwtDecoder(): JwtDecoder {
return NimbusJwtDecoder.withJwkSetUri(this.jwkSetUri)
.jwsAlgorithms {
it.add(RS512)
it.add(ES512)
}.build()
}From JWK Set response
Since Spring Security’s JWT support is based off of Nimbus, you can use all it’s great features as well.
For example, Nimbus has a JWSKeySelector implementation that will select the set of algorithms based on the JWK Set URI response.
You can use it to generate a NimbusJwtDecoder like so:
@Bean
public JwtDecoder jwtDecoder() {
    // makes a request to the JWK Set endpoint
    JWSKeySelector<SecurityContext> jwsKeySelector =
            JWSAlgorithmFamilyJWSKeySelector.fromJWKSetURL(this.jwkSetUrl);

    DefaultJWTProcessor<SecurityContext> jwtProcessor =
            new DefaultJWTProcessor<>();
    jwtProcessor.setJWSKeySelector(jwsKeySelector);

    return new NimbusJwtDecoder(jwtProcessor);
}@Bean
fun jwtDecoder(): JwtDecoder {
// makes a request to the JWK Set endpoint
val jwsKeySelector: JWSKeySelector<SecurityContext> = JWSAlgorithmFamilyJWSKeySelector.fromJWKSetURL<SecurityContext>(this.jwkSetUrl)
val jwtProcessor: DefaultJWTProcessor<SecurityContext> = DefaultJWTProcessor()
jwtProcessor.jwsKeySelector = jwsKeySelector
return NimbusJwtDecoder(jwtProcessor)
}Trusting a Single Asymmetric Key
Simpler than backing a Resource Server with a JWK Set endpoint is to hard-code an RSA public key. The public key can be provided via Spring Boot or by Using a Builder.
Via Spring Boot
Specifying a key via Spring Boot is quite simple. The key’s location can be specified like so:
spring:
  security:
    oauth2:
      resourceserver:
        jwt:
          public-key-location: classpath:my-key.pub
Or, to allow for a more sophisticated lookup, you can post-process the RsaKeyConversionServicePostProcessor:
@Bean
BeanFactoryPostProcessor conversionServiceCustomizer() {
    return beanFactory ->
        beanFactory.getBean(RsaKeyConversionServicePostProcessor.class)
                .setResourceLoader(new CustomResourceLoader());
}@Bean
fun conversionServiceCustomizer(): BeanFactoryPostProcessor {
return BeanFactoryPostProcessor { beanFactory ->
beanFactory.getBean<RsaKeyConversionServicePostProcessor>()
.setResourceLoader(CustomResourceLoader())
}
}Specify your key’s location:
key.location: hfds://my-key.pubAnd then autowire the value:
@Value("${key.location}")
RSAPublicKey key;@Value("\${key.location}")
val key: RSAPublicKey? = nullUsing a Builder
To wire an RSAPublicKey directly, you can simply use the appropriate NimbusJwtDecoder builder, like so:
@Bean
public JwtDecoder jwtDecoder() {
    return NimbusJwtDecoder.withPublicKey(this.key).build();
}@Bean
fun jwtDecoder(): JwtDecoder {
return NimbusJwtDecoder.withPublicKey(this.key).build()
}Trusting a Single Symmetric Key
Using a single symmetric key is also simple.
You can simply load in your SecretKey and use the appropriate NimbusJwtDecoder builder, like so:
@Bean
public JwtDecoder jwtDecoder() {
    return NimbusJwtDecoder.withSecretKey(this.key).build();
}@Bean
fun jwtDecoder(): JwtDecoder {
return NimbusJwtDecoder.withSecretKey(key).build()
}Configuring Authorization
A JWT that is issued from an OAuth 2.0 Authorization Server will typically either have a scope or scp attribute, indicating the scopes (or authorities) it’s been granted, for example:
{ …, "scope" : "messages contacts"}
When this is the case, Resource Server will attempt to coerce these scopes into a list of granted authorities, prefixing each scope with the string "SCOPE_".
This means that to protect an endpoint or method with a scope derived from a JWT, the corresponding expressions should include this prefix:
@EnableWebSecurity
public class DirectlyConfiguredJwkSetUri extends WebSecurityConfigurerAdapter {
    protected void configure(HttpSecurity http) {
        http
            .authorizeRequests(authorize -> authorize
                .mvcMatchers("/contacts/**").hasAuthority("SCOPE_contacts")
                .mvcMatchers("/messages/**").hasAuthority("SCOPE_messages")
                .anyRequest().authenticated()
            )
            .oauth2ResourceServer(OAuth2ResourceServerConfigurer::jwt);
    }
}@EnableWebSecurity
class DirectlyConfiguredJwkSetUri : WebSecurityConfigurerAdapter() {
override fun configure(http: HttpSecurity) {
http {
authorizeRequests {
authorize("/contacts/**", hasAuthority("SCOPE_contacts"))
authorize("/messages/**", hasAuthority("SCOPE_messages"))
authorize(anyRequest, authenticated)
}
oauth2ResourceServer {
jwt { }
}
}
}
}<http>
<intercept-uri pattern="/contacts/**" access="hasAuthority('SCOPE_contacts')"/>
<intercept-uri pattern="/messages/**" access="hasAuthority('SCOPE_messages')"/>
<oauth2-resource-server>
<jwt jwk-set-uri="https://idp.example.org/.well-known/jwks.json"/>
</oauth2-resource-server>
</http>Or similarly with method security:
@PreAuthorize("hasAuthority('SCOPE_messages')")
public List<Message> getMessages(...) {}@PreAuthorize("hasAuthority('SCOPE_messages')")
fun getMessages(): List<Message> { }Extracting Authorities Manually
However, there are a number of circumstances where this default is insufficient.
For example, some authorization servers don’t use the scope attribute, but instead have their own custom attribute.
Or, at other times, the resource server may need to adapt the attribute or a composition of attributes into internalized authorities.
To this end, Spring Security ships with JwtAuthenticationConverter, which is responsible for converting a Jwt into an Authentication.
By default, Spring Security will wire the JwtAuthenticationProvider with a default instance of JwtAuthenticationConverter.
As part of configuring a JwtAuthenticationConverter, you can supply a subsidiary converter to go from Jwt to a Collection of granted authorities.
Let’s say that that your authorization server communicates authorities in a custom claim called authorities.
In that case, you can configure the claim that JwtAuthenticationConverter should inspect, like so:
@Bean
public JwtAuthenticationConverter jwtAuthenticationConverter() {
    JwtGrantedAuthoritiesConverter grantedAuthoritiesConverter = new JwtGrantedAuthoritiesConverter();
    grantedAuthoritiesConverter.setAuthoritiesClaimName("authorities");

    JwtAuthenticationConverter jwtAuthenticationConverter = new JwtAuthenticationConverter();
    jwtAuthenticationConverter.setJwtGrantedAuthoritiesConverter(grantedAuthoritiesConverter);
    return jwtAuthenticationConverter;
}@Bean
fun jwtAuthenticationConverter(): JwtAuthenticationConverter {
val grantedAuthoritiesConverter = JwtGrantedAuthoritiesConverter()
grantedAuthoritiesConverter.setAuthoritiesClaimName("authorities")
val jwtAuthenticationConverter = JwtAuthenticationConverter()
jwtAuthenticationConverter.setJwtGrantedAuthoritiesConverter(grantedAuthoritiesConverter)
return jwtAuthenticationConverter
}<http>
<intercept-uri pattern="/contacts/**" access="hasAuthority('SCOPE_contacts')"/>
<intercept-uri pattern="/messages/**" access="hasAuthority('SCOPE_messages')"/>
<oauth2-resource-server>
<jwt jwk-set-uri="https://idp.example.org/.well-known/jwks.json"
jwt-authentication-converter-ref="jwtAuthenticationConverter"/>
</oauth2-resource-server>
</http>
<bean id="jwtAuthenticationConverter"
class="org.springframework.security.oauth2.server.resource.authentication.JwtAuthenticationConverter">
<property name="jwtGrantedAuthoritiesConverter" ref="jwtGrantedAuthoritiesConverter"/>
</bean>
<bean id="jwtGrantedAuthoritiesConverter"
class="org.springframework.security.oauth2.server.resource.authentication.JwtGrantedAuthoritiesConverter">
<property name="authoritiesClaimName" value="authorities"/>
</bean>You can also configure the authority prefix to be different as well.
Instead of prefixing each authority with SCOPE_, you can change it to ROLE_ like so:
@Bean
public JwtAuthenticationConverter jwtAuthenticationConverter() {
    JwtGrantedAuthoritiesConverter grantedAuthoritiesConverter = new JwtGrantedAuthoritiesConverter();
    grantedAuthoritiesConverter.setAuthorityPrefix("ROLE_");

    JwtAuthenticationConverter jwtAuthenticationConverter = new JwtAuthenticationConverter();
    jwtAuthenticationConverter.setJwtGrantedAuthoritiesConverter(grantedAuthoritiesConverter);
    return jwtAuthenticationConverter;
}@Bean
fun jwtAuthenticationConverter(): JwtAuthenticationConverter {
val grantedAuthoritiesConverter = JwtGrantedAuthoritiesConverter()
grantedAuthoritiesConverter.setAuthorityPrefix("ROLE_")
val jwtAuthenticationConverter = JwtAuthenticationConverter()
jwtAuthenticationConverter.setJwtGrantedAuthoritiesConverter(grantedAuthoritiesConverter)
return jwtAuthenticationConverter
}<http>
<intercept-uri pattern="/contacts/**" access="hasAuthority('SCOPE_contacts')"/>
<intercept-uri pattern="/messages/**" access="hasAuthority('SCOPE_messages')"/>
<oauth2-resource-server>
<jwt jwk-set-uri="https://idp.example.org/.well-known/jwks.json"
jwt-authentication-converter-ref="jwtAuthenticationConverter"/>
</oauth2-resource-server>
</http>
<bean id="jwtAuthenticationConverter"
class="org.springframework.security.oauth2.server.resource.authentication.JwtAuthenticationConverter">
<property name="jwtGrantedAuthoritiesConverter" ref="jwtGrantedAuthoritiesConverter"/>
</bean>
<bean id="jwtGrantedAuthoritiesConverter"
class="org.springframework.security.oauth2.server.resource.authentication.JwtGrantedAuthoritiesConverter">
<property name="authorityPrefix" value="ROLE_"/>
</bean>Or, you can remove the prefix altogether by calling JwtGrantedAuthoritiesConverter#setAuthorityPrefix("").
For more flexibility, the DSL supports entirely replacing the converter with any class that implements Converter<Jwt, AbstractAuthenticationToken>:
static class CustomAuthenticationConverter implements Converter<Jwt, AbstractAuthenticationToken> {
    public AbstractAuthenticationToken convert(Jwt jwt) {
        return new CustomAuthenticationToken(jwt);
    }
}

// ...

@EnableWebSecurity
public class CustomAuthenticationConverterConfig extends WebSecurityConfigurerAdapter {
    protected void configure(HttpSecurity http) {
        http
            .authorizeRequests(authorize -> authorize
                .anyRequest().authenticated()
            )
            .oauth2ResourceServer(oauth2 -> oauth2
                .jwt(jwt -> jwt
                    .jwtAuthenticationConverter(new CustomAuthenticationConverter())
                )
            );
    }
}internal class CustomAuthenticationConverter : Converter<Jwt, AbstractAuthenticationToken> {
override fun convert(jwt: Jwt): AbstractAuthenticationToken {
return CustomAuthenticationToken(jwt)
}
}
// ...
@EnableWebSecurity
class CustomAuthenticationConverterConfig : WebSecurityConfigurerAdapter() {
override fun configure(http: HttpSecurity) {
http {
authorizeRequests {
authorize(anyRequest, authenticated)
}
oauth2ResourceServer {
jwt {
jwtAuthenticationConverter = CustomAuthenticationConverter()
}
}
}
}
}Configuring Validation
Using minimal Spring Boot configuration, indicating the authorization server’s issuer uri, Resource Server will default to verifying the iss claim as well as the exp and nbf timestamp claims.
In circumstances where validation needs to be customized, Resource Server ships with two standard validators and also accepts custom OAuth2TokenValidator instances.
Customizing Timestamp Validation
JWT’s typically have a window of validity, with the start of the window indicated in the nbf claim and the end indicated in the exp claim.
However, every server can experience clock drift, which can cause tokens to appear expired to one server, but not to another. This can cause some implementation heartburn as the number of collaborating servers increases in a distributed system.
Resource Server uses JwtTimestampValidator to verify a token’s validity window, and it can be configured with a clockSkew to alleviate the above problem:
@Bean
JwtDecoder jwtDecoder() {
     NimbusJwtDecoder jwtDecoder = (NimbusJwtDecoder)
             JwtDecoders.fromIssuerLocation(issuerUri);

     OAuth2TokenValidator<Jwt> withClockSkew = new DelegatingOAuth2TokenValidator<>(
            new JwtTimestampValidator(Duration.ofSeconds(60)),
            new JwtIssuerValidator(issuerUri));

     jwtDecoder.setJwtValidator(withClockSkew);

     return jwtDecoder;
}@Bean
fun jwtDecoder(): JwtDecoder {
val jwtDecoder: NimbusJwtDecoder = JwtDecoders.fromIssuerLocation(issuerUri) as NimbusJwtDecoder
val withClockSkew: OAuth2TokenValidator<Jwt> = DelegatingOAuth2TokenValidator(
JwtTimestampValidator(Duration.ofSeconds(60)),
JwtIssuerValidator(issuerUri))
jwtDecoder.setJwtValidator(withClockSkew)
return jwtDecoder
}| By default, Resource Server configures a clock skew of 60 seconds. |
Configuring a Custom Validator
Adding a check for the aud claim is simple with the OAuth2TokenValidator API:
OAuth2TokenValidator<Jwt> audienceValidator() {
    return new JwtClaimValidator<List<String>>(AUD, aud -> aud.contains("messaging"));
}fun audienceValidator(): OAuth2TokenValidator<Jwt?> {
return JwtClaimValidator<List<String>>(AUD) { aud -> aud.contains("messaging") }
}Or, for more control you can implement your own OAuth2TokenValidator:
static class AudienceValidator implements OAuth2TokenValidator<Jwt> {
    OAuth2Error error = new OAuth2Error("custom_code", "Custom error message", null);

    @Override
    public OAuth2TokenValidatorResult validate(Jwt jwt) {
        if (jwt.getAudience().contains("messaging")) {
            return OAuth2TokenValidatorResult.success();
        } else {
            return OAuth2TokenValidatorResult.failure(error);
        }
    }
}

// ...

OAuth2TokenValidator<Jwt> audienceValidator() {
    return new AudienceValidator();
}internal class AudienceValidator : OAuth2TokenValidator<Jwt> {
var error: OAuth2Error = OAuth2Error("custom_code", "Custom error message", null)
override fun validate(jwt: Jwt): OAuth2TokenValidatorResult {
return if (jwt.audience.contains("messaging")) {
OAuth2TokenValidatorResult.success()
} else {
OAuth2TokenValidatorResult.failure(error)
}
}
}
// ...
fun audienceValidator(): OAuth2TokenValidator<Jwt> {
return AudienceValidator()
}Then, to add into a resource server, it’s a matter of specifying the JwtDecoder instance:
@Bean
JwtDecoder jwtDecoder() {
    NimbusJwtDecoder jwtDecoder = (NimbusJwtDecoder)
        JwtDecoders.fromIssuerLocation(issuerUri);

    OAuth2TokenValidator<Jwt> audienceValidator = audienceValidator();
    OAuth2TokenValidator<Jwt> withIssuer = JwtValidators.createDefaultWithIssuer(issuerUri);
    OAuth2TokenValidator<Jwt> withAudience = new DelegatingOAuth2TokenValidator<>(withIssuer, audienceValidator);

    jwtDecoder.setJwtValidator(withAudience);

    return jwtDecoder;
}@Bean
fun jwtDecoder(): JwtDecoder {
val jwtDecoder: NimbusJwtDecoder = JwtDecoders.fromIssuerLocation(issuerUri) as NimbusJwtDecoder
val audienceValidator = audienceValidator()
val withIssuer: OAuth2TokenValidator<Jwt> = JwtValidators.createDefaultWithIssuer(issuerUri)
val withAudience: OAuth2TokenValidator<Jwt> = DelegatingOAuth2TokenValidator(withIssuer, audienceValidator)
jwtDecoder.setJwtValidator(withAudience)
return jwtDecoder
}Configuring Claim Set Mapping
Spring Security uses the Nimbus library for parsing JWTs and validating their signatures. Consequently, Spring Security is subject to Nimbus’s interpretation of each field value and how to coerce each into a Java type.
For example, because Nimbus remains Java 7 compatible, it doesn’t use Instant to represent timestamp fields.
And it’s entirely possible to use a different library or for JWT processing, which may make its own coercion decisions that need adjustment.
Or, quite simply, a resource server may want to add or remove claims from a JWT for domain-specific reasons.
For these purposes, Resource Server supports mapping the JWT claim set with MappedJwtClaimSetConverter.
Customizing the Conversion of a Single Claim
By default, MappedJwtClaimSetConverter will attempt to coerce claims into the following types:
Claim |
Java Type |
|
|
|
|
|
|
|
|
|
|
|
|
|
|
An individual claim’s conversion strategy can be configured using MappedJwtClaimSetConverter.withDefaults:
@Bean
JwtDecoder jwtDecoder() {
    NimbusJwtDecoder jwtDecoder = NimbusJwtDecoder.withJwkSetUri(jwkSetUri).build();

    MappedJwtClaimSetConverter converter = MappedJwtClaimSetConverter
            .withDefaults(Collections.singletonMap("sub", this::lookupUserIdBySub));
    jwtDecoder.setClaimSetConverter(converter);

    return jwtDecoder;
}@Bean
fun jwtDecoder(): JwtDecoder {
val jwtDecoder = NimbusJwtDecoder.withJwkSetUri(jwkSetUri).build()
val converter = MappedJwtClaimSetConverter
.withDefaults(mapOf("sub" to this::lookupUserIdBySub))
jwtDecoder.setClaimSetConverter(converter)
return jwtDecoder
}This will keep all the defaults, except it will override the default claim converter for sub.
Adding a Claim
MappedJwtClaimSetConverter can also be used to add a custom claim, for example, to adapt to an existing system:
MappedJwtClaimSetConverter.withDefaults(Collections.singletonMap("custom", custom -> "value"));MappedJwtClaimSetConverter.withDefaults(mapOf("custom" to Converter<Any, String> { "value" }))Removing a Claim
And removing a claim is also simple, using the same API:
MappedJwtClaimSetConverter.withDefaults(Collections.singletonMap("legacyclaim", legacy -> null));MappedJwtClaimSetConverter.withDefaults(mapOf("legacyclaim" to Converter<Any, Any> { null }))Renaming a Claim
In more sophisticated scenarios, like consulting multiple claims at once or renaming a claim, Resource Server accepts any class that implements Converter<Map<String, Object>, Map<String,Object>>:
public class UsernameSubClaimAdapter implements Converter<Map<String, Object>, Map<String, Object>> {
    private final MappedJwtClaimSetConverter delegate =
            MappedJwtClaimSetConverter.withDefaults(Collections.emptyMap());

    public Map<String, Object> convert(Map<String, Object> claims) {
        Map<String, Object> convertedClaims = this.delegate.convert(claims);

        String username = (String) convertedClaims.get("user_name");
        convertedClaims.put("sub", username);

        return convertedClaims;
    }
}class UsernameSubClaimAdapter : Converter<Map<String, Any?>, Map<String, Any?>> {
private val delegate = MappedJwtClaimSetConverter.withDefaults(Collections.emptyMap())
override fun convert(claims: Map<String, Any?>): Map<String, Any?> {
val convertedClaims = delegate.convert(claims)
val username = convertedClaims["user_name"] as String
convertedClaims["sub"] = username
return convertedClaims
}
}And then, the instance can be supplied like normal:
@Bean
JwtDecoder jwtDecoder() {
    NimbusJwtDecoder jwtDecoder = NimbusJwtDecoder.withJwkSetUri(jwkSetUri).build();
    jwtDecoder.setClaimSetConverter(new UsernameSubClaimAdapter());
    return jwtDecoder;
}@Bean
fun jwtDecoder(): JwtDecoder {
val jwtDecoder: NimbusJwtDecoder = NimbusJwtDecoder.withJwkSetUri(jwkSetUri).build()
jwtDecoder.setClaimSetConverter(UsernameSubClaimAdapter())
return jwtDecoder
}Configuring Timeouts
By default, Resource Server uses connection and socket timeouts of 30 seconds each for coordinating with the authorization server.
This may be too short in some scenarios. Further, it doesn’t take into account more sophisticated patterns like back-off and discovery.
To adjust the way in which Resource Server connects to the authorization server, NimbusJwtDecoder accepts an instance of RestOperations:
@Bean
public JwtDecoder jwtDecoder(RestTemplateBuilder builder) {
    RestOperations rest = builder
            .setConnectTimeout(Duration.ofSeconds(60))
            .setReadTimeout(Duration.ofSeconds(60))
            .build();

    NimbusJwtDecoder jwtDecoder = NimbusJwtDecoder.withJwkSetUri(jwkSetUri).restOperations(rest).build();
    return jwtDecoder;
}@Bean
fun jwtDecoder(builder: RestTemplateBuilder): JwtDecoder {
val rest: RestOperations = builder
.setConnectTimeout(Duration.ofSeconds(60))
.setReadTimeout(Duration.ofSeconds(60))
.build()
return NimbusJwtDecoder.withJwkSetUri(jwkSetUri).restOperations(rest).build()
}Also by default, Resource Server caches in-memory the authorization server’s JWK set for 5 minutes, which you may want to adjust. Further, it doesn’t take into account more sophisticated caching patterns like eviction or using a shared cache.
To adjust the way in which Resource Server caches the JWK set, NimbusJwtDecoder accepts an instance of Cache:
@Bean
public JwtDecoder jwtDecoder(CacheManager cacheManager) {
    return NimbusJwtDecoder.withJwkSetUri(jwkSetUri)
            .cache(cacheManager.getCache("jwks"))
            .build();
}@Bean
fun jwtDecoder(cacheManager: CacheManager): JwtDecoder {
return NimbusJwtDecoder.withJwkSetUri(jwkSetUri)
.cache(cacheManager.getCache("jwks"))
.build()
}When given a Cache, Resource Server will use the JWK Set Uri as the key and the JWK Set JSON as the value.
Spring isn’t a cache provider, so you’ll need to make sure to include the appropriate dependencies, like spring-boot-starter-cache and your favorite caching provider.
|
Whether it’s socket or cache timeouts, you may instead want to work with Nimbus directly.
To do so, remember that NimbusJwtDecoder ships with a constructor that takes Nimbus’s JWTProcessor.
|
Minimal Dependencies for Introspection
As described in Minimal Dependencies for JWT most of Resource Server support is collected in spring-security-oauth2-resource-server.
However unless a custom OpaqueTokenIntrospector is provided, the Resource Server will fallback to NimbusOpaqueTokenIntrospector.
Meaning that both spring-security-oauth2-resource-server and oauth2-oidc-sdk are necessary in order to have a working minimal Resource Server that supports opaque Bearer Tokens.
Please refer to spring-security-oauth2-resource-server in order to determin the correct version for oauth2-oidc-sdk.
Minimal Configuration for Introspection
Typically, an opaque token can be verified via an OAuth 2.0 Introspection Endpoint, hosted by the authorization server. This can be handy when revocation is a requirement.
When using Spring Boot, configuring an application as a resource server that uses introspection consists of two basic steps. First, include the needed dependencies and second, indicate the introspection endpoint details.
Specifying the Authorization Server
To specify where the introspection endpoint is, simply do:
security:
  oauth2:
    resourceserver:
      opaque-token:
        introspection-uri: https://idp.example.com/introspect
        client-id: client
        client-secret: secret
Where https://idp.example.com/introspect is the introspection endpoint hosted by your authorization server and client-id and client-secret are the credentials needed to hit that endpoint.
Resource Server will use these properties to further self-configure and subsequently validate incoming JWTs.
| When using introspection, the authorization server’s word is the law. If the authorization server responses that the token is valid, then it is. |
And that’s it!
Startup Expectations
When this property and these dependencies are used, Resource Server will automatically configure itself to validate Opaque Bearer Tokens.
This startup process is quite a bit simpler than for JWTs since no endpoints need to be discovered and no additional validation rules get added.
Runtime Expectations
Once the application is started up, Resource Server will attempt to process any request containing an Authorization: Bearer header:
GET / HTTP/1.1
Authorization: Bearer some-token-value # Resource Server will process this
So long as this scheme is indicated, Resource Server will attempt to process the request according to the Bearer Token specification.
Given an Opaque Token, Resource Server will
-
Query the provided introspection endpoint using the provided credentials and the token
-
Inspect the response for an
{ 'active' : true }attribute -
Map each scope to an authority with the prefix
SCOPE_
The resulting Authentication#getPrincipal, by default, is a Spring Security OAuth2AuthenticatedPrincipal object, and Authentication#getName maps to the token’s sub property, if one is present.
From here, you may want to jump to:
How Opaque Token Authentication Works
Next, let’s see the architectural components that Spring Security uses to support opaque token Authentication in servlet-based applications, like the one we just saw.
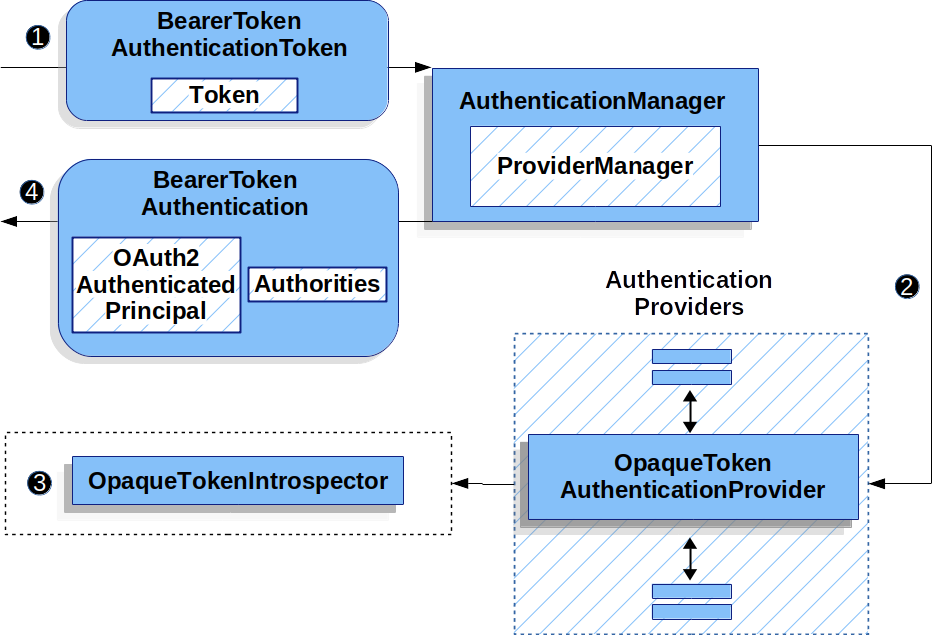
OpaqueTokenAuthenticationProvider is an AuthenticationProvider implementation that leverages a OpaqueTokenIntrospector to authenticate an opaque token.
Let’s take a look at how OpaqueTokenAuthenticationProvider works within Spring Security.
The figure explains details of how the AuthenticationManager in figures from Reading the Bearer Token works.
OpaqueTokenAuthenticationProvider Usage![]() The authentication
The authentication Filter from Reading the Bearer Token passes a BearerTokenAuthenticationToken to the AuthenticationManager which is implemented by ProviderManager.
![]() The
The ProviderManager is configured to use an AuthenticationProvider of type OpaqueTokenAuthenticationProvider.
![]()
OpaqueTokenAuthenticationProvider introspects the opaque token and adds granted authorities using an OpaqueTokenIntrospector.
When authentication is successful, the Authentication that is returned is of type BearerTokenAuthentication and has a principal that is the OAuth2AuthenticatedPrincipal returned by the configured OpaqueTokenIntrospector.
Ultimately, the returned BearerTokenAuthentication will be set on the SecurityContextHolder by the authentication Filter.
Looking Up Attributes Post-Authentication
Once a token is authenticated, an instance of BearerTokenAuthentication is set in the SecurityContext.
This means that it’s available in @Controller methods when using @EnableWebMvc in your configuration:
@GetMapping("/foo")
public String foo(BearerTokenAuthentication authentication) {
    return authentication.getTokenAttributes().get("sub") + " is the subject";
}@GetMapping("/foo")
fun foo(authentication: BearerTokenAuthentication): String {
return authentication.tokenAttributes["sub"].toString() + " is the subject"
}Since BearerTokenAuthentication holds an OAuth2AuthenticatedPrincipal, that also means that it’s available to controller methods, too:
@GetMapping("/foo")
public String foo(@AuthenticationPrincipal OAuth2AuthenticatedPrincipal principal) {
    return principal.getAttribute("sub") + " is the subject";
}@GetMapping("/foo")
fun foo(@AuthenticationPrincipal principal: OAuth2AuthenticatedPrincipal): String {
return principal.getAttribute<Any>("sub").toString() + " is the subject"
}Looking Up Attributes Via SpEL
Of course, this also means that attributes can be accessed via SpEL.
For example, if using @EnableGlobalMethodSecurity so that you can use @PreAuthorize annotations, you can do:
@PreAuthorize("principal?.attributes['sub'] == 'foo'")
public String forFoosEyesOnly() {
    return "foo";
}@PreAuthorize("principal?.attributes['sub'] == 'foo'")
fun forFoosEyesOnly(): String {
return "foo"
}Overriding or Replacing Boot Auto Configuration
There are two @Beans that Spring Boot generates on Resource Server’s behalf.
The first is a WebSecurityConfigurerAdapter that configures the app as a resource server.
When use Opaque Token, this WebSecurityConfigurerAdapter looks like:
protected void configure(HttpSecurity http) {
    http
        .authorizeRequests(authorize -> authorize
            .anyRequest().authenticated()
        )
        .oauth2ResourceServer(OAuth2ResourceServerConfigurer::opaqueToken);
}override fun configure(http: HttpSecurity) {
http {
authorizeRequests {
authorize(anyRequest, authenticated)
}
oauth2ResourceServer {
opaqueToken { }
}
}
}If the application doesn’t expose a WebSecurityConfigurerAdapter bean, then Spring Boot will expose the above default one.
Replacing this is as simple as exposing the bean within the application:
@EnableWebSecurity
public class MyCustomSecurityConfiguration extends WebSecurityConfigurerAdapter {
    protected void configure(HttpSecurity http) {
        http
            .authorizeRequests(authorize -> authorize
                .mvcMatchers("/messages/**").hasAuthority("SCOPE_message:read")
                .anyRequest().authenticated()
            )
            .oauth2ResourceServer(oauth2 -> oauth2
                .opaqueToken(opaqueToken -> opaqueToken
                    .introspector(myIntrospector())
                )
            );
    }
}@EnableWebSecurity
class MyCustomSecurityConfiguration : WebSecurityConfigurerAdapter() {
override fun configure(http: HttpSecurity) {
http {
authorizeRequests {
authorize("/messages/**", hasAuthority("SCOPE_message:read"))
authorize(anyRequest, authenticated)
}
oauth2ResourceServer {
opaqueToken {
introspector = myIntrospector()
}
}
}
}
}The above requires the scope of message:read for any URL that starts with /messages/.
Methods on the oauth2ResourceServer DSL will also override or replace auto configuration.
For example, the second @Bean Spring Boot creates is an OpaqueTokenIntrospector, which decodes String tokens into validated instances of OAuth2AuthenticatedPrincipal:
@Bean
public OpaqueTokenIntrospector introspector() {
    return new NimbusOpaqueTokenIntrospector(introspectionUri, clientId, clientSecret);
}@Bean
fun introspector(): OpaqueTokenIntrospector {
return NimbusOpaqueTokenIntrospector(introspectionUri, clientId, clientSecret)
}If the application doesn’t expose a OpaqueTokenIntrospector bean, then Spring Boot will expose the above default one.
And its configuration can be overridden using introspectionUri() and introspectionClientCredentials() or replaced using introspector().
Or, if you’re not using Spring Boot at all, then both of these components - the filter chain and a OpaqueTokenIntrospector can be specified in XML.
The filter chain is specified like so:
<http>
    <intercept-uri pattern="/**" access="authenticated"/>
    <oauth2-resource-server>
        <opaque-token introspector-ref="opaqueTokenIntrospector"/>
    </oauth2-resource-server>
</http>
And the OpaqueTokenIntrospector like so:
<bean id="opaqueTokenIntrospector"
        class="org.springframework.security.oauth2.server.resource.introspection.NimbusOpaqueTokenIntrospector">
    <constructor-arg value="${spring.security.oauth2.resourceserver.opaquetoken.introspection_uri}"/>
    <constructor-arg value="${spring.security.oauth2.resourceserver.opaquetoken.client_id}"/>
    <constructor-arg value="${spring.security.oauth2.resourceserver.opaquetoken.client_secret}"/>
</bean>
Using introspectionUri()
An authorization server’s Introspection Uri can be configured as a configuration property or it can be supplied in the DSL:
@EnableWebSecurity
public class DirectlyConfiguredIntrospectionUri extends WebSecurityConfigurerAdapter {
    protected void configure(HttpSecurity http) {
        http
            .authorizeRequests(authorize -> authorize
                .anyRequest().authenticated()
            )
            .oauth2ResourceServer(oauth2 -> oauth2
                .opaqueToken(opaqueToken -> opaqueToken
                    .introspectionUri("https://idp.example.com/introspect")
                    .introspectionClientCredentials("client", "secret")
                )
            );
    }
}@EnableWebSecurity
class DirectlyConfiguredIntrospectionUri : WebSecurityConfigurerAdapter() {
override fun configure(http: HttpSecurity) {
http {
authorizeRequests {
authorize(anyRequest, authenticated)
}
oauth2ResourceServer {
opaqueToken {
introspectionUri = "https://idp.example.com/introspect"
introspectionClientCredentials("client", "secret")
}
}
}
}
}<bean id="opaqueTokenIntrospector"
class="org.springframework.security.oauth2.server.resource.introspection.NimbusOpaqueTokenIntrospector">
<constructor-arg value="https://idp.example.com/introspect"/>
<constructor-arg value="client"/>
<constructor-arg value="secret"/>
</bean>Using introspectionUri() takes precedence over any configuration property.
Using introspector()
More powerful than introspectionUri() is introspector(), which will completely replace any Boot auto configuration of OpaqueTokenIntrospector:
@EnableWebSecurity
public class DirectlyConfiguredIntrospector extends WebSecurityConfigurerAdapter {
    protected void configure(HttpSecurity http) {
        http
            .authorizeRequests(authorize -> authorize
                .anyRequest().authenticated()
            )
            .oauth2ResourceServer(oauth2 -> oauth2
                .opaqueToken(opaqueToken -> opaqueToken
                    .introspector(myCustomIntrospector())
                )
            );
    }
}@EnableWebSecurity
class DirectlyConfiguredIntrospector : WebSecurityConfigurerAdapter() {
override fun configure(http: HttpSecurity) {
http {
authorizeRequests {
authorize(anyRequest, authenticated)
}
oauth2ResourceServer {
opaqueToken {
introspector = myCustomIntrospector()
}
}
}
}
}<http>
<intercept-uri pattern="/**" access="authenticated"/>
<oauth2-resource-server>
<opaque-token introspector-ref="myCustomIntrospector"/>
</oauth2-resource-server>
</http>This is handy when deeper configuration, like authority mapping, JWT revocation, or request timeouts, is necessary.
Exposing a OpaqueTokenIntrospector @Bean
Or, exposing a OpaqueTokenIntrospector @Bean has the same effect as introspector():
@Bean
public OpaqueTokenIntrospector introspector() {
    return new NimbusOpaqueTokenIntrospector(introspectionUri, clientId, clientSecret);
}
Configuring Authorization
An OAuth 2.0 Introspection endpoint will typically return a scope attribute, indicating the scopes (or authorities) it’s been granted, for example:
{ …, "scope" : "messages contacts"}
When this is the case, Resource Server will attempt to coerce these scopes into a list of granted authorities, prefixing each scope with the string "SCOPE_".
This means that to protect an endpoint or method with a scope derived from an Opaque Token, the corresponding expressions should include this prefix:
@EnableWebSecurity
public class MappedAuthorities extends WebSecurityConfigurerAdapter {
    protected void configure(HttpSecurity http) {
        http
            .authorizeRequests(authorizeRequests -> authorizeRequests
                .mvcMatchers("/contacts/**").hasAuthority("SCOPE_contacts")
                .mvcMatchers("/messages/**").hasAuthority("SCOPE_messages")
                .anyRequest().authenticated()
            )
            .oauth2ResourceServer(OAuth2ResourceServerConfigurer::opaqueToken);
    }
}@EnableWebSecurity
class MappedAuthorities : WebSecurityConfigurerAdapter() {
override fun configure(http: HttpSecurity) {
http {
authorizeRequests {
authorize("/contacts/**", hasAuthority("SCOPE_contacts"))
authorize("/messages/**", hasAuthority("SCOPE_messages"))
authorize(anyRequest, authenticated)
}
oauth2ResourceServer {
opaqueToken { }
}
}
}
}<http>
<intercept-uri pattern="/contacts/**" access="hasAuthority('SCOPE_contacts')"/>
<intercept-uri pattern="/messages/**" access="hasAuthority('SCOPE_messages')"/>
<oauth2-resource-server>
<opaque-token introspector-ref="opaqueTokenIntrospector"/>
</oauth2-resource-server>
</http>Or similarly with method security:
@PreAuthorize("hasAuthority('SCOPE_messages')")
public List<Message> getMessages(...) {}@PreAuthorize("hasAuthority('SCOPE_messages')")
fun getMessages(): List<Message?> {}Extracting Authorities Manually
By default, Opaque Token support will extract the scope claim from an introspection response and parse it into individual GrantedAuthority instances.
For example, if the introspection response were:
{
    "active" : true,
    "scope" : "message:read message:write"
}
Then Resource Server would generate an Authentication with two authorities, one for message:read and the other for message:write.
This can, of course, be customized using a custom OpaqueTokenIntrospector that takes a look at the attribute set and converts in its own way:
public class CustomAuthoritiesOpaqueTokenIntrospector implements OpaqueTokenIntrospector {
    private OpaqueTokenIntrospector delegate =
            new NimbusOpaqueTokenIntrospector("https://idp.example.org/introspect", "client", "secret");

    public OAuth2AuthenticatedPrincipal introspect(String token) {
        OAuth2AuthenticatedPrincipal principal = this.delegate.introspect(token);
        return new DefaultOAuth2AuthenticatedPrincipal(
                principal.getName(), principal.getAttributes(), extractAuthorities(principal));
    }

    private Collection<GrantedAuthority> extractAuthorities(OAuth2AuthenticatedPrincipal principal) {
        List<String> scopes = principal.getAttribute(OAuth2IntrospectionClaimNames.SCOPE);
        return scopes.stream()
                .map(SimpleGrantedAuthority::new)
                .collect(Collectors.toList());
    }
}class CustomAuthoritiesOpaqueTokenIntrospector : OpaqueTokenIntrospector {
private val delegate: OpaqueTokenIntrospector = NimbusOpaqueTokenIntrospector("https://idp.example.org/introspect", "client", "secret")
override fun introspect(token: String): OAuth2AuthenticatedPrincipal {
val principal: OAuth2AuthenticatedPrincipal = delegate.introspect(token)
return DefaultOAuth2AuthenticatedPrincipal(
principal.name, principal.attributes, extractAuthorities(principal))
}
private fun extractAuthorities(principal: OAuth2AuthenticatedPrincipal): Collection<GrantedAuthority> {
val scopes: List<String> = principal.getAttribute(OAuth2IntrospectionClaimNames.SCOPE)
return scopes
.map { SimpleGrantedAuthority(it) }
}
}Thereafter, this custom introspector can be configured simply by exposing it as a @Bean:
@Bean
public OpaqueTokenIntrospector introspector() {
    return new CustomAuthoritiesOpaqueTokenIntrospector();
}@Bean
fun introspector(): OpaqueTokenIntrospector {
return CustomAuthoritiesOpaqueTokenIntrospector()
}Configuring Timeouts
By default, Resource Server uses connection and socket timeouts of 30 seconds each for coordinating with the authorization server.
This may be too short in some scenarios. Further, it doesn’t take into account more sophisticated patterns like back-off and discovery.
To adjust the way in which Resource Server connects to the authorization server, NimbusOpaqueTokenIntrospector accepts an instance of RestOperations:
@Bean
public OpaqueTokenIntrospector introspector(RestTemplateBuilder builder, OAuth2ResourceServerProperties properties) {
    RestOperations rest = builder
            .basicAuthentication(properties.getOpaquetoken().getClientId(), properties.getOpaquetoken().getClientSecret())
            .setConnectTimeout(Duration.ofSeconds(60))
            .setReadTimeout(Duration.ofSeconds(60))
            .build();

    return new NimbusOpaqueTokenIntrospector(introspectionUri, rest);
}@Bean
fun introspector(builder: RestTemplateBuilder, properties: OAuth2ResourceServerProperties): OpaqueTokenIntrospector? {
val rest: RestOperations = builder
.basicAuthentication(properties.opaquetoken.clientId, properties.opaquetoken.clientSecret)
.setConnectTimeout(Duration.ofSeconds(60))
.setReadTimeout(Duration.ofSeconds(60))
.build()
return NimbusOpaqueTokenIntrospector(introspectionUri, rest)
}Using Introspection with JWTs
A common question is whether or not introspection is compatible with JWTs. Spring Security’s Opaque Token support has been designed to not care about the format of the token — it will gladly pass any token to the introspection endpoint provided.
So, let’s say that you’ve got a requirement that requires you to check with the authorization server on each request, in case the JWT has been revoked.
Even though you are using the JWT format for the token, your validation method is introspection, meaning you’d want to do:
spring:
  security:
    oauth2:
      resourceserver:
        opaque-token:
          introspection-uri: https://idp.example.org/introspection
          client-id: client
          client-secret: secret
In this case, the resulting Authentication would be BearerTokenAuthentication.
Any attributes in the corresponding OAuth2AuthenticatedPrincipal would be whatever was returned by the introspection endpoint.
But, let’s say that, oddly enough, the introspection endpoint only returns whether or not the token is active. Now what?
In this case, you can create a custom OpaqueTokenIntrospector that still hits the endpoint, but then updates the returned principal to have the JWTs claims as the attributes:
public class JwtOpaqueTokenIntrospector implements OpaqueTokenIntrospector {
    private OpaqueTokenIntrospector delegate =
            new NimbusOpaqueTokenIntrospector("https://idp.example.org/introspect", "client", "secret");
    private JwtDecoder jwtDecoder = new NimbusJwtDecoder(new ParseOnlyJWTProcessor());

    public OAuth2AuthenticatedPrincipal introspect(String token) {
        OAuth2AuthenticatedPrincipal principal = this.delegate.introspect(token);
        try {
            Jwt jwt = this.jwtDecoder.decode(token);
            return new DefaultOAuth2AuthenticatedPrincipal(jwt.getClaims(), NO_AUTHORITIES);
        } catch (JwtException ex) {
            throw new OAuth2IntrospectionException(ex);
        }
    }

    private static class ParseOnlyJWTProcessor extends DefaultJWTProcessor<SecurityContext> {
    	JWTClaimsSet process(SignedJWT jwt, SecurityContext context)
                throws JOSEException {
            return jwt.getJWTClaimsSet();
        }
    }
}class JwtOpaqueTokenIntrospector : OpaqueTokenIntrospector {
private val delegate: OpaqueTokenIntrospector = NimbusOpaqueTokenIntrospector("https://idp.example.org/introspect", "client", "secret")
private val jwtDecoder: JwtDecoder = NimbusJwtDecoder(ParseOnlyJWTProcessor())
override fun introspect(token: String): OAuth2AuthenticatedPrincipal {
val principal = delegate.introspect(token)
return try {
val jwt: Jwt = jwtDecoder.decode(token)
DefaultOAuth2AuthenticatedPrincipal(jwt.claims, NO_AUTHORITIES)
} catch (ex: JwtException) {
throw OAuth2IntrospectionException(ex.message)
}
}
private class ParseOnlyJWTProcessor : DefaultJWTProcessor<SecurityContext>() {
override fun process(jwt: SignedJWT, context: SecurityContext): JWTClaimsSet {
return jwt.jwtClaimsSet
}
}
}Thereafter, this custom introspector can be configured simply by exposing it as a @Bean:
@Bean
public OpaqueTokenIntrospector introspector() {
    return new JwtOpaqueTokenIntrospector();
}@Bean
fun introspector(): OpaqueTokenIntrospector {
return JwtOpaqueTokenIntrospector()
}Calling a /userinfo Endpoint
Generally speaking, a Resource Server doesn’t care about the underlying user, but instead about the authorities that have been granted.
That said, at times it can be valuable to tie the authorization statement back to a user.
If an application is also using spring-security-oauth2-client, having set up the appropriate ClientRegistrationRepository, then this is quite simple with a custom OpaqueTokenIntrospector.
This implementation below does three things:
-
Delegates to the introspection endpoint, to affirm the token’s validity
-
Looks up the appropriate client registration associated with the
/userinfoendpoint -
Invokes and returns the response from the
/userinfoendpoint
public class UserInfoOpaqueTokenIntrospector implements OpaqueTokenIntrospector {
    private final OpaqueTokenIntrospector delegate =
            new NimbusOpaqueTokenIntrospector("https://idp.example.org/introspect", "client", "secret");
    private final OAuth2UserService oauth2UserService = new DefaultOAuth2UserService();

    private final ClientRegistrationRepository repository;

    // ... constructor

    @Override
    public OAuth2AuthenticatedPrincipal introspect(String token) {
        OAuth2AuthenticatedPrincipal authorized = this.delegate.introspect(token);
        Instant issuedAt = authorized.getAttribute(ISSUED_AT);
        Instant expiresAt = authorized.getAttribute(EXPIRES_AT);
        ClientRegistration clientRegistration = this.repository.findByRegistrationId("registration-id");
        OAuth2AccessToken token = new OAuth2AccessToken(BEARER, token, issuedAt, expiresAt);
        OAuth2UserRequest oauth2UserRequest = new OAuth2UserRequest(clientRegistration, token);
        return this.oauth2UserService.loadUser(oauth2UserRequest);
    }
}class UserInfoOpaqueTokenIntrospector : OpaqueTokenIntrospector {
private val delegate: OpaqueTokenIntrospector = NimbusOpaqueTokenIntrospector("https://idp.example.org/introspect", "client", "secret")
private val oauth2UserService = DefaultOAuth2UserService()
private val repository: ClientRegistrationRepository? = null
// ... constructor
override fun introspect(token: String): OAuth2AuthenticatedPrincipal {
val authorized = delegate.introspect(token)
val issuedAt: Instant? = authorized.getAttribute(ISSUED_AT)
val expiresAt: Instant? = authorized.getAttribute(EXPIRES_AT)
val clientRegistration: ClientRegistration = repository!!.findByRegistrationId("registration-id")
val accessToken = OAuth2AccessToken(BEARER, token, issuedAt, expiresAt)
val oauth2UserRequest = OAuth2UserRequest(clientRegistration, accessToken)
return oauth2UserService.loadUser(oauth2UserRequest)
}
}If you aren’t using spring-security-oauth2-client, it’s still quite simple.
You will simply need to invoke the /userinfo with your own instance of WebClient:
public class UserInfoOpaqueTokenIntrospector implements OpaqueTokenIntrospector {
    private final OpaqueTokenIntrospector delegate =
            new NimbusOpaqueTokenIntrospector("https://idp.example.org/introspect", "client", "secret");
    private final WebClient rest = WebClient.create();

    @Override
    public OAuth2AuthenticatedPrincipal introspect(String token) {
        OAuth2AuthenticatedPrincipal authorized = this.delegate.introspect(token);
        return makeUserInfoRequest(authorized);
    }
}class UserInfoOpaqueTokenIntrospector : OpaqueTokenIntrospector {
private val delegate: OpaqueTokenIntrospector = NimbusOpaqueTokenIntrospector("https://idp.example.org/introspect", "client", "secret")
private val rest: WebClient = WebClient.create()
override fun introspect(token: String): OAuth2AuthenticatedPrincipal {
val authorized = delegate.introspect(token)
return makeUserInfoRequest(authorized)
}
}Either way, having created your OpaqueTokenIntrospector, you should publish it as a @Bean to override the defaults:
@Bean
OpaqueTokenIntrospector introspector() {
    return new UserInfoOpaqueTokenIntrospector(...);
}@Bean
fun introspector(): OpaqueTokenIntrospector {
return UserInfoOpaqueTokenIntrospector(...)
}Supporting both JWT and Opaque Token
In some cases, you may have a need to access both kinds of tokens. For example, you may support more than one tenant where one tenant issues JWTs and the other issues opaque tokens.
If this decision must be made at request-time, then you can use an AuthenticationManagerResolver to achieve it, like so:
@Bean
AuthenticationManagerResolver<HttpServletRequest> tokenAuthenticationManagerResolver
        (JwtDecoder jwtDecoder, OpaqueTokenIntrospector opaqueTokenIntrospector) {
    AuthenticationManager jwt = new ProviderManager(new JwtAuthenticationProvider(jwtDecoder));
    AuthenticationManager opaqueToken = new ProviderManager(
            new OpaqueTokenAuthenticationProvider(opaqueTokenIntrospector));
    return (request) -> useJwt(request) ? jwt : opaqueToken;
}@Bean
fun tokenAuthenticationManagerResolver
(jwtDecoder: JwtDecoder, opaqueTokenIntrospector: OpaqueTokenIntrospector):
AuthenticationManagerResolver<HttpServletRequest> {
val jwt = ProviderManager(JwtAuthenticationProvider(jwtDecoder))
val opaqueToken = ProviderManager(OpaqueTokenAuthenticationProvider(opaqueTokenIntrospector));
return AuthenticationManagerResolver { request ->
if (useJwt(request)) {
jwt
} else {
opaqueToken
}
}
}
The implementation of useJwt(HttpServletRequest) will likely depend on custom request material like the path.
|
And then specify this AuthenticationManagerResolver in the DSL:
http
    .authorizeRequests(authorize -> authorize
        .anyRequest().authenticated()
    )
    .oauth2ResourceServer(oauth2 -> oauth2
        .authenticationManagerResolver(this.tokenAuthenticationManagerResolver)
);http {
authorizeRequests {
authorize(anyRequest, authenticated)
}
oauth2ResourceServer {
authenticationManagerResolver = tokenAuthenticationManagerResolver()
}
}<http>
<oauth2-resource-server authentication-manager-resolver-ref="tokenAuthenticationManagerResolver"/>
</http>Multi-tenancy
A resource server is considered multi-tenant when there are multiple strategies for verifying a bearer token, keyed by some tenant identifier.
For example, your resource server may accept bearer tokens from two different authorization servers. Or, your authorization server may represent a multiplicity of issuers.
In each case, there are two things that need to be done and trade-offs associated with how you choose to do them:
-
Resolve the tenant
-
Propagate the tenant
Resolving the Tenant By Claim
One way to differentiate tenants is by the issuer claim. Since the issuer claim accompanies signed JWTs, this can be done with the JwtIssuerAuthenticationManagerResolver, like so:
JwtIssuerAuthenticationManagerResolver authenticationManagerResolver = new JwtIssuerAuthenticationManagerResolver
    ("https://idp.example.org/issuerOne", "https://idp.example.org/issuerTwo");

http
    .authorizeRequests(authorize -> authorize
        .anyRequest().authenticated()
    )
    .oauth2ResourceServer(oauth2 -> oauth2
        .authenticationManagerResolver(authenticationManagerResolver)
);val customAuthenticationManagerResolver = JwtIssuerAuthenticationManagerResolver
("https://idp.example.org/issuerOne", "https://idp.example.org/issuerTwo")
http {
authorizeRequests {
authorize(anyRequest, authenticated)
}
oauth2ResourceServer {
authenticationManagerResolver = customAuthenticationManagerResolver
}
}<http>
<oauth2-resource-server authentication-manager-resolver-ref="authenticationManagerResolver"/>
</http>
<bean id="authenticationManagerResolver"
class="org.springframework.security.oauth2.server.resource.authentication.JwtIssuerAuthenticationManagerResolver">
<constructor-arg>
<list>
<value>https://idp.example.org/issuerOne</value>
<value>https://idp.example.org/issuerTwo</value>
</list>
</constructor-arg>
</bean>This is nice because the issuer endpoints are loaded lazily.
In fact, the corresponding JwtAuthenticationProvider is instantiated only when the first request with the corresponding issuer is sent.
This allows for an application startup that is independent from those authorization servers being up and available.
Dynamic Tenants
Of course, you may not want to restart the application each time a new tenant is added.
In this case, you can configure the JwtIssuerAuthenticationManagerResolver with a repository of AuthenticationManager instances, which you can edit at runtime, like so:
private void addManager(Map<String, AuthenticationManager> authenticationManagers, String issuer) {
	JwtAuthenticationProvider authenticationProvider = new JwtAuthenticationProvider
	        (JwtDecoders.fromIssuerLocation(issuer));
	authenticationManagers.put(issuer, authenticationProvider::authenticate);
}

// ...

JwtIssuerAuthenticationManagerResolver authenticationManagerResolver =
        new JwtIssuerAuthenticationManagerResolver(authenticationManagers::get);

http
    .authorizeRequests(authorize -> authorize
        .anyRequest().authenticated()
    )
    .oauth2ResourceServer(oauth2 -> oauth2
        .authenticationManagerResolver(authenticationManagerResolver)
);private fun addManager(authenticationManagers: MutableMap<String, AuthenticationManager>, issuer: String) {
val authenticationProvider = JwtAuthenticationProvider(JwtDecoders.fromIssuerLocation(issuer))
authenticationManagers[issuer] = AuthenticationManager {
authentication: Authentication? -> authenticationProvider.authenticate(authentication)
}
}
// ...
val customAuthenticationManagerResolver: JwtIssuerAuthenticationManagerResolver =
JwtIssuerAuthenticationManagerResolver(authenticationManagers::get)
http {
authorizeRequests {
authorize(anyRequest, authenticated)
}
oauth2ResourceServer {
authenticationManagerResolver = customAuthenticationManagerResolver
}
}In this case, you construct JwtIssuerAuthenticationManagerResolver with a strategy for obtaining the AuthenticationManager given the issuer.
This approach allows us to add and remove elements from the repository (shown as a Map in the snippet) at runtime.
It would be unsafe to simply take any issuer and construct an AuthenticationManager from it.
The issuer should be one that the code can verify from a trusted source like a list of allowed issuers.
|
Parsing the Claim Only Once
You may have observed that this strategy, while simple, comes with the trade-off that the JWT is parsed once by the AuthenticationManagerResolver and then again by the JwtDecoder later on in the request.
This extra parsing can be alleviated by configuring the JwtDecoder directly with a JWTClaimsSetAwareJWSKeySelector from Nimbus:
@Component
public class TenantJWSKeySelector
    implements JWTClaimsSetAwareJWSKeySelector<SecurityContext> {

	private final TenantRepository tenants; (1)
	private final Map<String, JWSKeySelector<SecurityContext>> selectors = new ConcurrentHashMap<>(); (2)

	public TenantJWSKeySelector(TenantRepository tenants) {
		this.tenants = tenants;
	}

	@Override
	public List<? extends Key> selectKeys(JWSHeader jwsHeader, JWTClaimsSet jwtClaimsSet, SecurityContext securityContext)
			throws KeySourceException {
		return this.selectors.computeIfAbsent(toTenant(jwtClaimsSet), this::fromTenant)
				.selectJWSKeys(jwsHeader, securityContext);
	}

	private String toTenant(JWTClaimsSet claimSet) {
		return (String) claimSet.getClaim("iss");
	}

	private JWSKeySelector<SecurityContext> fromTenant(String tenant) {
		return Optional.ofNullable(this.tenantRepository.findById(tenant)) (3)
		        .map(t -> t.getAttrbute("jwks_uri"))
				.map(this::fromUri)
				.orElseThrow(() -> new IllegalArgumentException("unknown tenant"));
	}

	private JWSKeySelector<SecurityContext> fromUri(String uri) {
		try {
			return JWSAlgorithmFamilyJWSKeySelector.fromJWKSetURL(new URL(uri)); (4)
		} catch (Exception ex) {
			throw new IllegalArgumentException(ex);
		}
	}
}@Component
class TenantJWSKeySelector(tenants: TenantRepository) : JWTClaimsSetAwareJWSKeySelector<SecurityContext> {
private val tenants: TenantRepository (1)
private val selectors: MutableMap<String, JWSKeySelector<SecurityContext>> = ConcurrentHashMap() (2)
init {
this.tenants = tenants
}
fun selectKeys(jwsHeader: JWSHeader?, jwtClaimsSet: JWTClaimsSet, securityContext: SecurityContext): List<Key?> {
return selectors.computeIfAbsent(toTenant(jwtClaimsSet)) { tenant: String -> fromTenant(tenant) }
.selectJWSKeys(jwsHeader, securityContext)
}
private fun toTenant(claimSet: JWTClaimsSet): String {
return claimSet.getClaim("iss") as String
}
private fun fromTenant(tenant: String): JWSKeySelector<SecurityContext> {
return Optional.ofNullable(this.tenants.findById(tenant)) (3)
.map { t -> t.getAttrbute("jwks_uri") }
.map { uri: String -> fromUri(uri) }
.orElseThrow { IllegalArgumentException("unknown tenant") }
}
private fun fromUri(uri: String): JWSKeySelector<SecurityContext?> {
return try {
JWSAlgorithmFamilyJWSKeySelector.fromJWKSetURL(URL(uri)) (4)
} catch (ex: Exception) {
throw IllegalArgumentException(ex)
}
}
}| 1 | A hypothetical source for tenant information |
| 2 | A cache for `JWKKeySelector`s, keyed by tenant identifier |
| 3 | Looking up the tenant is more secure than simply calculating the JWK Set endpoint on the fly - the lookup acts as a list of allowed tenants |
| 4 | Create a JWSKeySelector via the types of keys that come back from the JWK Set endpoint - the lazy lookup here means that you don’t need to configure all tenants at startup |
The above key selector is a composition of many key selectors.
It chooses which key selector to use based on the iss claim in the JWT.
| To use this approach, make sure that the authorization server is configured to include the claim set as part of the token’s signature. Without this, you have no guarantee that the issuer hasn’t been altered by a bad actor. |
Next, we can construct a JWTProcessor:
@Bean
JWTProcessor jwtProcessor(JWTClaimSetJWSKeySelector keySelector) {
	ConfigurableJWTProcessor<SecurityContext> jwtProcessor =
            new DefaultJWTProcessor();
	jwtProcessor.setJWTClaimSetJWSKeySelector(keySelector);
	return jwtProcessor;
}@Bean
fun jwtProcessor(keySelector: JWTClaimsSetAwareJWSKeySelector<SecurityContext>): JWTProcessor<SecurityContext> {
val jwtProcessor = DefaultJWTProcessor<SecurityContext>()
jwtProcessor.jwtClaimsSetAwareJWSKeySelector = keySelector
return jwtProcessor
}As you are already seeing, the trade-off for moving tenant-awareness down to this level is more configuration. We have just a bit more.
Next, we still want to make sure you are validating the issuer. But, since the issuer may be different per JWT, then you’ll need a tenant-aware validator, too:
@Component
public class TenantJwtIssuerValidator implements OAuth2TokenValidator<Jwt> {
	private final TenantRepository tenants;
	private final Map<String, JwtIssuerValidator> validators = new ConcurrentHashMap<>();

	public TenantJwtIssuerValidator(TenantRepository tenants) {
		this.tenants = tenants;
	}

	@Override
	public OAuth2TokenValidatorResult validate(Jwt token) {
		return this.validators.computeIfAbsent(toTenant(token), this::fromTenant)
				.validate(token);
	}

	private String toTenant(Jwt jwt) {
		return jwt.getIssuer();
	}

	private JwtIssuerValidator fromTenant(String tenant) {
		return Optional.ofNullable(this.tenants.findById(tenant))
		        .map(t -> t.getAttribute("issuer"))
				.map(JwtIssuerValidator::new)
				.orElseThrow(() -> new IllegalArgumentException("unknown tenant"));
	}
}@Component
class TenantJwtIssuerValidator(tenants: TenantRepository) : OAuth2TokenValidator<Jwt> {
private val tenants: TenantRepository
private val validators: MutableMap<String, JwtIssuerValidator> = ConcurrentHashMap()
override fun validate(token: Jwt): OAuth2TokenValidatorResult {
return validators.computeIfAbsent(toTenant(token)) { tenant: String -> fromTenant(tenant) }
.validate(token)
}
private fun toTenant(jwt: Jwt): String {
return jwt.issuer.toString()
}
private fun fromTenant(tenant: String): JwtIssuerValidator {
return Optional.ofNullable(tenants.findById(tenant))
.map({ t -> t.getAttribute("issuer") })
.map({ JwtIssuerValidator() })
.orElseThrow({ IllegalArgumentException("unknown tenant") })
}
init {
this.tenants = tenants
}
}Now that we have a tenant-aware processor and a tenant-aware validator, we can proceed with creating our JwtDecoder:
@Bean
JwtDecoder jwtDecoder(JWTProcessor jwtProcessor, OAuth2TokenValidator<Jwt> jwtValidator) {
	NimbusJwtDecoder decoder = new NimbusJwtDecoder(processor);
	OAuth2TokenValidator<Jwt> validator = new DelegatingOAuth2TokenValidator<>
			(JwtValidators.createDefault(), this.jwtValidator);
	decoder.setJwtValidator(validator);
	return decoder;
}@Bean
fun jwtDecoder(jwtProcessor: JWTProcessor<SecurityContext>?, jwtValidator: OAuth2TokenValidator<Jwt>?): JwtDecoder {
val decoder = NimbusJwtDecoder(jwtProcessor)
val validator: OAuth2TokenValidator<Jwt> = DelegatingOAuth2TokenValidator(JwtValidators.createDefault(), jwtValidator)
decoder.setJwtValidator(validator)
return decoder
}We’ve finished talking about resolving the tenant.
If you’ve chosen to resolve the tenant by something other than a JWT claim, then you’ll need to make sure you address your downstream resource servers in the same way. For example, if you are resolving it by subdomain, you may need to address the downstream resource server using the same subdomain.
However, if you resolve it by a claim in the bearer token, read on to learn about Spring Security’s support for bearer token propagation.
Bearer Token Resolution
By default, Resource Server looks for a bearer token in the Authorization header.
This, however, can be customized in a handful of ways.
Reading the Bearer Token from a Custom Header
For example, you may have a need to read the bearer token from a custom header.
To achieve this, you can expose a DefaultBearerTokenResolver as a bean, or wire an instance into the DSL, as you can see in the following example:
@Bean
BearerTokenResolver bearerTokenResolver() {
    DefaultBearerTokenResolver bearerTokenResolver = new DefaultBearerTokenResolver();
    bearerTokenResolver.setBearerTokenHeaderName(HttpHeaders.PROXY_AUTHORIZATION);
    return bearerTokenResolver;
}@Bean
fun bearerTokenResolver(): BearerTokenResolver {
val bearerTokenResolver = DefaultBearerTokenResolver()
bearerTokenResolver.setBearerTokenHeaderName(HttpHeaders.PROXY_AUTHORIZATION)
return bearerTokenResolver
}<http>
<oauth2-resource-server bearer-token-resolver-ref="bearerTokenResolver"/>
</http>
<bean id="bearerTokenResolver"
class="org.springframework.security.oauth2.server.resource.web.DefaultBearerTokenResolver">
<property name="bearerTokenHeaderName" value="Proxy-Authorization"/>
</bean>Or, in circumstances where a provider is using both a custom header and value, you can use HeaderBearerTokenResolver instead.
Reading the Bearer Token from a Form Parameter
Or, you may wish to read the token from a form parameter, which you can do by configuring the DefaultBearerTokenResolver, as you can see below:
DefaultBearerTokenResolver resolver = new DefaultBearerTokenResolver();
resolver.setAllowFormEncodedBodyParameter(true);
http
    .oauth2ResourceServer(oauth2 -> oauth2
        .bearerTokenResolver(resolver)
);val resolver = DefaultBearerTokenResolver()
resolver.setAllowFormEncodedBodyParameter(true)
http {
oauth2ResourceServer {
bearerTokenResolver = resolver
}
}<http>
<oauth2-resource-server bearer-token-resolver-ref="bearerTokenResolver"/>
</http>
<bean id="bearerTokenResolver"
class="org.springframework.security.oauth2.server.resource.web.HeaderBearerTokenResolver">
<property name="allowFormEncodedBodyParameter" value="true"/>
</bean>Bearer Token Propagation
Now that you’re resource server has validated the token, it might be handy to pass it to downstream services.
This is quite simple with ServletBearerExchangeFilterFunction, which you can see in the following example:
@Bean
public WebClient rest() {
    return WebClient.builder()
            .filter(new ServletBearerExchangeFilterFunction())
            .build();
}@Bean
fun rest(): WebClient {
return WebClient.builder()
.filter(ServletBearerExchangeFilterFunction())
.build()
}When the above WebClient is used to perform requests, Spring Security will look up the current Authentication and extract any AbstractOAuth2Token credential.
Then, it will propagate that token in the Authorization header.
For example:
this.rest.get()
        .uri("https://other-service.example.com/endpoint")
        .retrieve()
        .bodyToMono(String.class)
.block()this.rest.get()
.uri("https://other-service.example.com/endpoint")
.retrieve()
.bodyToMono<String>()
.block()Will invoke the https://other-service.example.com/endpoint, adding the bearer token Authorization header for you.
In places where you need to override this behavior, it’s a simple matter of supplying the header yourself, like so:
this.rest.get()
        .uri("https://other-service.example.com/endpoint")
        .headers(headers -> headers.setBearerAuth(overridingToken))
        .retrieve()
        .bodyToMono(String.class)
.block()this.rest.get()
.uri("https://other-service.example.com/endpoint")
.headers{ headers -> headers.setBearerAuth(overridingToken)}
.retrieve()
.bodyToMono<String>()
.block()In this case, the filter will fall back and simply forward the request onto the rest of the web filter chain.
| Unlike the OAuth 2.0 Client filter function, this filter function makes no attempt to renew the token, should it be expired. To obtain this level of support, please use the OAuth 2.0 Client filter. |
RestTemplate support
There is no RestTemplate equivalent for ServletBearerExchangeFilterFunction at the moment, but you can propagate the request’s bearer token quite simply with your own interceptor:
@Bean
RestTemplate rest() {
	RestTemplate rest = new RestTemplate();
	rest.getInterceptors().add((request, body, execution) -> {
		Authentication authentication = SecurityContextHolder.getContext().getAuthentication();
		if (authentication == null) {
			return execution.execute(request, body);
		}

		if (!(authentication.getCredentials() instanceof AbstractOAuth2Token)) {
			return execution.execute(request, body);
		}

		AbstractOAuth2Token token = (AbstractOAuth2Token) authentication.getCredentials();
	    request.getHeaders().setBearerAuth(token.getTokenValue());
	    return execution.execute(request, body);
	});
	return rest;
}@Bean
fun rest(): RestTemplate {
val rest = RestTemplate()
rest.interceptors.add(ClientHttpRequestInterceptor { request, body, execution ->
val authentication: Authentication? = SecurityContextHolder.getContext().authentication
if (authentication != null) {
execution.execute(request, body)
}
if (authentication!!.credentials !is AbstractOAuth2Token) {
execution.execute(request, body)
}
val token: AbstractOAuth2Token = authentication.credentials as AbstractOAuth2Token
request.headers.setBearerAuth(token.tokenValue)
execution.execute(request, body)
})
return rest
}| Unlike the OAuth 2.0 Authorized Client Manager, this filter interceptor makes no attempt to renew the token, should it be expired. To obtain this level of support, please create an interceptor using the OAuth 2.0 Authorized Client Manager. |
Bearer Token Failure
A bearer token may be invalid for a number of reasons. For example, the token may no longer be active.
In these circumstances, Resource Server throws an InvalidBearerTokenException.
Like other exceptions, this results in an OAuth 2.0 Bearer Token error response:
HTTP/1.1 401 Unauthorized
WWW-Authenticate: Bearer error_code="invalid_token", error_description="Unsupported algorithm of none", error_uri="https://tools.ietf.org/html/rfc6750#section-3.1"
Additionally, it is published as an AuthenticationFailureBadCredentialsEvent, which you can listen for in your application like so:
@Component
public class FailureEvents {
	@EventListener
    public void onFailure(AuthenticationFailureBadCredentialsEvent badCredentials) {
		if (badCredentials.getAuthentication() instanceof BearerTokenAuthenticationToken) {
		    // ... handle
        }
    }
}@Component
class FailureEvents {
@EventListener
fun onFailure(badCredentials: AuthenticationFailureBadCredentialsEvent) {
if (badCredentials.authentication is BearerTokenAuthenticationToken) {
// ... handle
}
}
}