|
There is a newer version available. Please update to Spring Security 5.6! |
Servlet Applications
Spring Security integrates with the Servlet Container by using a standard Servlet Filter. This means it works with any application that runs in a Servlet Container. More concretely, you do not need to use Spring in your Servlet-based application to take advantage of Spring Security.
Unresolved include directive in modules/ROOT/pages/servlet/index.adoc - include::hello/index.adoc[]
Unresolved include directive in modules/ROOT/pages/servlet/index.adoc - include::architecture/index.adoc[]
Authentication
Spring Security provides comprehensive support for [authentication]. This section discusses:
Architecture Components
This section describes the main architectural components of Spring Security’s used in Servlet authentication. If you need concrete flows that explain how these pieces fit together, look at the Authentication Mechanism specific sections.
-
[servlet-authentication-securitycontextholder] - The
SecurityContextHolderis where Spring Security stores the details of who is authenticated. -
[servlet-authentication-securitycontext] - is obtained from the
SecurityContextHolderand contains theAuthenticationof the currently authenticated user. -
[servlet-authentication-authentication] - Can be the input to
AuthenticationManagerto provide the credentials a user has provided to authenticate or the current user from theSecurityContext. -
[servlet-authentication-granted-authority] - An authority that is granted to the principal on the
Authentication(i.e. roles, scopes, etc.) -
[servlet-authentication-authenticationmanager] - the API that defines how Spring Security’s Filters perform authentication.
-
[servlet-authentication-providermanager] - the most common implementation of
AuthenticationManager. -
[servlet-authentication-authenticationprovider] - used by
ProviderManagerto perform a specific type of authentication. -
[servlet-authentication-authenticationentrypoint] - used for requesting credentials from a client (i.e. redirecting to a log in page, sending a
WWW-Authenticateresponse, etc.) -
[servlet-authentication-abstractprocessingfilter] - a base
Filterused for authentication. This also gives a good idea of the high level flow of authentication and how pieces work together.
Authentication Mechanisms
-
Username and Password - how to authenticate with a username/password
-
OAuth 2.0 Login - OAuth 2.0 Log In with OpenID Connect and non-standard OAuth 2.0 Login (i.e. GitHub)
-
SAML 2.0 Login - SAML 2.0 Log In
-
Central Authentication Server (CAS) - Central Authentication Server (CAS) Support
-
Remember Me - How to remember a user past session expiration
-
JAAS Authentication - Authenticate with JAAS
-
OpenID - OpenID Authentication (not to be confused with OpenID Connect)
-
[servlet-preauth] - Authenticate with an external mechanism such as SiteMinder or Java EE security but still use Spring Security for authorization and protection against common exploits.
-
X509 Authentication - X509 Authentication
Authorization
The advanced authorization capabilities within Spring Security represent one of the most compelling reasons for its popularity. Irrespective of how you choose to authenticate - whether using a Spring Security-provided mechanism and provider, or integrating with a container or other non-Spring Security authentication authority - you will find the authorization services can be used within your application in a consistent and simple way.
In this part we’ll explore the different AbstractSecurityInterceptor implementations, which were introduced in Part I.
We then move on to explore how to fine-tune authorization through use of domain access control lists.
OAuth2
OAuth 2.0 Login
The OAuth 2.0 Login feature provides an application with the capability to have users log in to the application by using their existing account at an OAuth 2.0 Provider (e.g. GitHub) or OpenID Connect 1.0 Provider (such as Google). OAuth 2.0 Login implements the use cases: "Login with Google" or "Login with GitHub".
| OAuth 2.0 Login is implemented by using the Authorization Code Grant, as specified in the OAuth 2.0 Authorization Framework and OpenID Connect Core 1.0. |
Spring Boot 2.x Sample
Spring Boot 2.x brings full auto-configuration capabilities for OAuth 2.0 Login.
This section shows how to configure the {gh-samples-url}/servlet/spring-boot/java/oauth2/login[OAuth 2.0 Login sample] using Google as the Authentication Provider and covers the following topics:
Initial setup
To use Google’s OAuth 2.0 authentication system for login, you must set up a project in the Google API Console to obtain OAuth 2.0 credentials.
| Google’s OAuth 2.0 implementation for authentication conforms to the OpenID Connect 1.0 specification and is OpenID Certified. |
Follow the instructions on the OpenID Connect page, starting in the section, "Setting up OAuth 2.0".
After completing the "Obtain OAuth 2.0 credentials" instructions, you should have a new OAuth Client with credentials consisting of a Client ID and a Client Secret.
Setting the redirect URI
The redirect URI is the path in the application that the end-user’s user-agent is redirected back to after they have authenticated with Google and have granted access to the OAuth Client (created in the previous step) on the Consent page.
In the "Set a redirect URI" sub-section, ensure that the Authorized redirect URIs field is set to http://localhost:8080/login/oauth2/code/google.
The default redirect URI template is {baseUrl}/login/oauth2/code/{registrationId}.
The registrationId is a unique identifier for the ClientRegistration.
|
If the OAuth Client is running behind a proxy server, it is recommended to check Proxy Server Configuration to ensure the application is correctly configured.
Also, see the supported URI template variables for redirect-uri.
|
Configure application.yml
Now that you have a new OAuth Client with Google, you need to configure the application to use the OAuth Client for the authentication flow. To do so:
-
Go to
application.ymland set the following configuration:spring: security: oauth2: client: registration: (1) google: (2) client-id: google-client-id client-secret: google-client-secretExample 1. OAuth Client properties1 spring.security.oauth2.client.registrationis the base property prefix for OAuth Client properties.2 Following the base property prefix is the ID for the ClientRegistration, such as google. -
Replace the values in the
client-idandclient-secretproperty with the OAuth 2.0 credentials you created earlier.
Boot up the application
Launch the Spring Boot 2.x sample and go to http://localhost:8080.
You are then redirected to the default auto-generated login page, which displays a link for Google.
Click on the Google link, and you are then redirected to Google for authentication.
After authenticating with your Google account credentials, the next page presented to you is the Consent screen. The Consent screen asks you to either allow or deny access to the OAuth Client you created earlier. Click Allow to authorize the OAuth Client to access your email address and basic profile information.
At this point, the OAuth Client retrieves your email address and basic profile information from the UserInfo Endpoint and establishes an authenticated session.
Spring Boot 2.x Property Mappings
The following table outlines the mapping of the Spring Boot 2.x OAuth Client properties to the ClientRegistration properties.
| Spring Boot 2.x | ClientRegistration |
|---|---|
|
|
|
|
|
|
|
|
|
|
|
|
|
|
|
|
|
|
|
|
|
|
|
|
|
|
|
|
|
|
A ClientRegistration can be initially configured using discovery of an OpenID Connect Provider’s Configuration endpoint or an Authorization Server’s Metadata endpoint, by specifying the spring.security.oauth2.client.provider.[providerId].issuer-uri property.
|
CommonOAuth2Provider
CommonOAuth2Provider pre-defines a set of default client properties for a number of well known providers: Google, GitHub, Facebook, and Okta.
For example, the authorization-uri, token-uri, and user-info-uri do not change often for a Provider.
Therefore, it makes sense to provide default values in order to reduce the required configuration.
As demonstrated previously, when we configured a Google client, only the client-id and client-secret properties are required.
The following listing shows an example:
spring:
  security:
    oauth2:
      client:
        registration:
          google:
            client-id: google-client-id
            client-secret: google-client-secret
The auto-defaulting of client properties works seamlessly here because the registrationId (google) matches the GOOGLE enum (case-insensitive) in CommonOAuth2Provider.
|
For cases where you may want to specify a different registrationId, such as google-login, you can still leverage auto-defaulting of client properties by configuring the provider property.
The following listing shows an example:
spring:
  security:
    oauth2:
      client:
        registration:
          google-login:	(1)
            provider: google	(2)
            client-id: google-client-id
client-secret: google-client-secret| 1 | The registrationId is set to google-login. |
| 2 | The provider property is set to google, which will leverage the auto-defaulting of client properties set in CommonOAuth2Provider.GOOGLE.getBuilder(). |
Configuring Custom Provider Properties
There are some OAuth 2.0 Providers that support multi-tenancy, which results in different protocol endpoints for each tenant (or sub-domain).
For example, an OAuth Client registered with Okta is assigned to a specific sub-domain and have their own protocol endpoints.
For these cases, Spring Boot 2.x provides the following base property for configuring custom provider properties: spring.security.oauth2.client.provider.[providerId].
The following listing shows an example:
spring:
  security:
    oauth2:
      client:
        registration:
          okta:
            client-id: okta-client-id
            client-secret: okta-client-secret
        provider:
          okta:	(1)
            authorization-uri: https://your-subdomain.oktapreview.com/oauth2/v1/authorize
            token-uri: https://your-subdomain.oktapreview.com/oauth2/v1/token
            user-info-uri: https://your-subdomain.oktapreview.com/oauth2/v1/userinfo
            user-name-attribute: sub
jwk-set-uri: https://your-subdomain.oktapreview.com/oauth2/v1/keys| 1 | The base property (spring.security.oauth2.client.provider.okta) allows for custom configuration of protocol endpoint locations. |
Overriding Spring Boot 2.x Auto-configuration
The Spring Boot 2.x auto-configuration class for OAuth Client support is OAuth2ClientAutoConfiguration.
It performs the following tasks:
-
Registers a
ClientRegistrationRepository@Beancomposed ofClientRegistration(s) from the configured OAuth Client properties. -
Provides a
WebSecurityConfigurerAdapter@Configurationand enables OAuth 2.0 Login throughhttpSecurity.oauth2Login().
If you need to override the auto-configuration based on your specific requirements, you may do so in the following ways:
Register a ClientRegistrationRepository @Bean
The following example shows how to register a ClientRegistrationRepository @Bean:
@Configuration
public class OAuth2LoginConfig {

	@Bean
	public ClientRegistrationRepository clientRegistrationRepository() {
		return new InMemoryClientRegistrationRepository(this.googleClientRegistration());
	}

	private ClientRegistration googleClientRegistration() {
		return ClientRegistration.withRegistrationId("google")
			.clientId("google-client-id")
			.clientSecret("google-client-secret")
			.clientAuthenticationMethod(ClientAuthenticationMethod.CLIENT_SECRET_BASIC)
			.authorizationGrantType(AuthorizationGrantType.AUTHORIZATION_CODE)
			.redirectUri("{baseUrl}/login/oauth2/code/{registrationId}")
			.scope("openid", "profile", "email", "address", "phone")
			.authorizationUri("https://accounts.google.com/o/oauth2/v2/auth")
			.tokenUri("https://www.googleapis.com/oauth2/v4/token")
			.userInfoUri("https://www.googleapis.com/oauth2/v3/userinfo")
			.userNameAttributeName(IdTokenClaimNames.SUB)
			.jwkSetUri("https://www.googleapis.com/oauth2/v3/certs")
			.clientName("Google")
			.build();
	}
}@Configuration
class OAuth2LoginConfig {
@Bean
fun clientRegistrationRepository(): ClientRegistrationRepository {
return InMemoryClientRegistrationRepository(googleClientRegistration())
}
private fun googleClientRegistration(): ClientRegistration {
return ClientRegistration.withRegistrationId("google")
.clientId("google-client-id")
.clientSecret("google-client-secret")
.clientAuthenticationMethod(ClientAuthenticationMethod.CLIENT_SECRET_BASIC)
.authorizationGrantType(AuthorizationGrantType.AUTHORIZATION_CODE)
.redirectUri("{baseUrl}/login/oauth2/code/{registrationId}")
.scope("openid", "profile", "email", "address", "phone")
.authorizationUri("https://accounts.google.com/o/oauth2/v2/auth")
.tokenUri("https://www.googleapis.com/oauth2/v4/token")
.userInfoUri("https://www.googleapis.com/oauth2/v3/userinfo")
.userNameAttributeName(IdTokenClaimNames.SUB)
.jwkSetUri("https://www.googleapis.com/oauth2/v3/certs")
.clientName("Google")
.build()
}
}Provide a WebSecurityConfigurerAdapter
The following example shows how to provide a WebSecurityConfigurerAdapter with @EnableWebSecurity and enable OAuth 2.0 login through httpSecurity.oauth2Login():
@EnableWebSecurity
public class OAuth2LoginSecurityConfig extends WebSecurityConfigurerAdapter {

	@Override
	protected void configure(HttpSecurity http) throws Exception {
		http
			.authorizeRequests(authorize -> authorize
				.anyRequest().authenticated()
			)
			.oauth2Login(withDefaults());
	}
}@EnableWebSecurity
class OAuth2LoginSecurityConfig : WebSecurityConfigurerAdapter() {
override fun configure(http: HttpSecurity) {
http {
authorizeRequests {
authorize(anyRequest, authenticated)
}
oauth2Login { }
}
}
}Completely Override the Auto-configuration
The following example shows how to completely override the auto-configuration by registering a ClientRegistrationRepository @Bean and providing a WebSecurityConfigurerAdapter.
@Configuration
public class OAuth2LoginConfig {

	@EnableWebSecurity
	public static class OAuth2LoginSecurityConfig extends WebSecurityConfigurerAdapter {

		@Override
		protected void configure(HttpSecurity http) throws Exception {
			http
				.authorizeRequests(authorize -> authorize
					.anyRequest().authenticated()
				)
				.oauth2Login(withDefaults());
		}
	}

	@Bean
	public ClientRegistrationRepository clientRegistrationRepository() {
		return new InMemoryClientRegistrationRepository(this.googleClientRegistration());
	}

	private ClientRegistration googleClientRegistration() {
		return ClientRegistration.withRegistrationId("google")
			.clientId("google-client-id")
			.clientSecret("google-client-secret")
			.clientAuthenticationMethod(ClientAuthenticationMethod.CLIENT_SECRET_BASIC)
			.authorizationGrantType(AuthorizationGrantType.AUTHORIZATION_CODE)
			.redirectUri("{baseUrl}/login/oauth2/code/{registrationId}")
			.scope("openid", "profile", "email", "address", "phone")
			.authorizationUri("https://accounts.google.com/o/oauth2/v2/auth")
			.tokenUri("https://www.googleapis.com/oauth2/v4/token")
			.userInfoUri("https://www.googleapis.com/oauth2/v3/userinfo")
			.userNameAttributeName(IdTokenClaimNames.SUB)
			.jwkSetUri("https://www.googleapis.com/oauth2/v3/certs")
			.clientName("Google")
			.build();
	}
}@Configuration
class OAuth2LoginConfig {
@EnableWebSecurity
class OAuth2LoginSecurityConfig: WebSecurityConfigurerAdapter() {
override fun configure(http: HttpSecurity) {
http {
authorizeRequests {
authorize(anyRequest, authenticated)
}
oauth2Login { }
}
}
}
@Bean
fun clientRegistrationRepository(): ClientRegistrationRepository {
return InMemoryClientRegistrationRepository(googleClientRegistration())
}
private fun googleClientRegistration(): ClientRegistration {
return ClientRegistration.withRegistrationId("google")
.clientId("google-client-id")
.clientSecret("google-client-secret")
.clientAuthenticationMethod(ClientAuthenticationMethod.CLIENT_SECRET_BASIC)
.authorizationGrantType(AuthorizationGrantType.AUTHORIZATION_CODE)
.redirectUri("{baseUrl}/login/oauth2/code/{registrationId}")
.scope("openid", "profile", "email", "address", "phone")
.authorizationUri("https://accounts.google.com/o/oauth2/v2/auth")
.tokenUri("https://www.googleapis.com/oauth2/v4/token")
.userInfoUri("https://www.googleapis.com/oauth2/v3/userinfo")
.userNameAttributeName(IdTokenClaimNames.SUB)
.jwkSetUri("https://www.googleapis.com/oauth2/v3/certs")
.clientName("Google")
.build()
}
}Java Configuration without Spring Boot 2.x
If you are not able to use Spring Boot 2.x and would like to configure one of the pre-defined providers in CommonOAuth2Provider (for example, Google), apply the following configuration:
@Configuration
public class OAuth2LoginConfig {

	@EnableWebSecurity
	public static class OAuth2LoginSecurityConfig extends WebSecurityConfigurerAdapter {

		@Override
		protected void configure(HttpSecurity http) throws Exception {
			http
				.authorizeRequests(authorize -> authorize
					.anyRequest().authenticated()
				)
				.oauth2Login(withDefaults());
		}
	}

	@Bean
	public ClientRegistrationRepository clientRegistrationRepository() {
		return new InMemoryClientRegistrationRepository(this.googleClientRegistration());
	}

	@Bean
	public OAuth2AuthorizedClientService authorizedClientService(
			ClientRegistrationRepository clientRegistrationRepository) {
		return new InMemoryOAuth2AuthorizedClientService(clientRegistrationRepository);
	}

	@Bean
	public OAuth2AuthorizedClientRepository authorizedClientRepository(
			OAuth2AuthorizedClientService authorizedClientService) {
		return new AuthenticatedPrincipalOAuth2AuthorizedClientRepository(authorizedClientService);
	}

	private ClientRegistration googleClientRegistration() {
		return CommonOAuth2Provider.GOOGLE.getBuilder("google")
			.clientId("google-client-id")
			.clientSecret("google-client-secret")
			.build();
	}
}<http auto-config="true">
<intercept-url pattern="/**" access="authenticated"/>
<oauth2-login authorized-client-repository-ref="authorizedClientRepository"/>
</http>
<client-registrations>
<client-registration registration-id="google"
client-id="google-client-id"
client-secret="google-client-secret"
provider-id="google"/>
</client-registrations>
<b:bean id="authorizedClientService"
class="org.springframework.security.oauth2.client.InMemoryOAuth2AuthorizedClientService"
autowire="constructor"/>
<b:bean id="authorizedClientRepository"
class="org.springframework.security.oauth2.client.web.AuthenticatedPrincipalOAuth2AuthorizedClientRepository">
<b:constructor-arg ref="authorizedClientService"/>
</b:bean>Advanced Configuration
HttpSecurity.oauth2Login() provides a number of configuration options for customizing OAuth 2.0 Login.
The main configuration options are grouped into their protocol endpoint counterparts.
For example, oauth2Login().authorizationEndpoint() allows configuring the Authorization Endpoint, whereas oauth2Login().tokenEndpoint() allows configuring the Token Endpoint.
The following code shows an example:
@EnableWebSecurity
public class OAuth2LoginSecurityConfig extends WebSecurityConfigurerAdapter {

	@Override
	protected void configure(HttpSecurity http) throws Exception {
		http
			.oauth2Login(oauth2 -> oauth2
			    .authorizationEndpoint(authorization -> authorization
			            ...
			    )
			    .redirectionEndpoint(redirection -> redirection
			            ...
			    )
			    .tokenEndpoint(token -> token
			            ...
			    )
			    .userInfoEndpoint(userInfo -> userInfo
			            ...
			    )
			);
	}
}@EnableWebSecurity
class OAuth2LoginSecurityConfig : WebSecurityConfigurerAdapter() {
override fun configure(http: HttpSecurity) {
http {
oauth2Login {
authorizationEndpoint {
...
}
redirectionEndpoint {
...
}
tokenEndpoint {
...
}
userInfoEndpoint {
...
}
}
}
}
}The main goal of the oauth2Login() DSL was to closely align with the naming, as defined in the specifications.
The OAuth 2.0 Authorization Framework defines the Protocol Endpoints as follows:
The authorization process utilizes two authorization server endpoints (HTTP resources):
-
Authorization Endpoint: Used by the client to obtain authorization from the resource owner via user-agent redirection.
-
Token Endpoint: Used by the client to exchange an authorization grant for an access token, typically with client authentication.
As well as one client endpoint:
-
Redirection Endpoint: Used by the authorization server to return responses containing authorization credentials to the client via the resource owner user-agent.
The OpenID Connect Core 1.0 specification defines the UserInfo Endpoint as follows:
The UserInfo Endpoint is an OAuth 2.0 Protected Resource that returns claims about the authenticated end-user. To obtain the requested claims about the end-user, the client makes a request to the UserInfo Endpoint by using an access token obtained through OpenID Connect Authentication. These claims are normally represented by a JSON object that contains a collection of name-value pairs for the claims.
The following code shows the complete configuration options available for the oauth2Login() DSL:
@EnableWebSecurity
public class OAuth2LoginSecurityConfig extends WebSecurityConfigurerAdapter {

	@Override
	protected void configure(HttpSecurity http) throws Exception {
		http
			.oauth2Login(oauth2 -> oauth2
			    .clientRegistrationRepository(this.clientRegistrationRepository())
			    .authorizedClientRepository(this.authorizedClientRepository())
			    .authorizedClientService(this.authorizedClientService())
			    .loginPage("/login")
			    .authorizationEndpoint(authorization -> authorization
			        .baseUri(this.authorizationRequestBaseUri())
			        .authorizationRequestRepository(this.authorizationRequestRepository())
			        .authorizationRequestResolver(this.authorizationRequestResolver())
			    )
			    .redirectionEndpoint(redirection -> redirection
			        .baseUri(this.authorizationResponseBaseUri())
			    )
			    .tokenEndpoint(token -> token
			        .accessTokenResponseClient(this.accessTokenResponseClient())
			    )
			    .userInfoEndpoint(userInfo -> userInfo
			        .userAuthoritiesMapper(this.userAuthoritiesMapper())
			        .userService(this.oauth2UserService())
			        .oidcUserService(this.oidcUserService())
			    )
			);
	}
}@EnableWebSecurity
class OAuth2LoginSecurityConfig : WebSecurityConfigurerAdapter() {
override fun configure(http: HttpSecurity) {
http {
oauth2Login {
clientRegistrationRepository = clientRegistrationRepository()
authorizedClientRepository = authorizedClientRepository()
authorizedClientService = authorizedClientService()
loginPage = "/login"
authorizationEndpoint {
baseUri = authorizationRequestBaseUri()
authorizationRequestRepository = authorizationRequestRepository()
authorizationRequestResolver = authorizationRequestResolver()
}
redirectionEndpoint {
baseUri = authorizationResponseBaseUri()
}
tokenEndpoint {
accessTokenResponseClient = accessTokenResponseClient()
}
userInfoEndpoint {
userAuthoritiesMapper = userAuthoritiesMapper()
userService = oauth2UserService()
oidcUserService = oidcUserService()
}
}
}
}
}In addition to the oauth2Login() DSL, XML configuration is also supported.
The following code shows the complete configuration options available in the security namespace:
<http>
	<oauth2-login client-registration-repository-ref="clientRegistrationRepository"
				  authorized-client-repository-ref="authorizedClientRepository"
				  authorized-client-service-ref="authorizedClientService"
				  authorization-request-repository-ref="authorizationRequestRepository"
				  authorization-request-resolver-ref="authorizationRequestResolver"
				  access-token-response-client-ref="accessTokenResponseClient"
				  user-authorities-mapper-ref="userAuthoritiesMapper"
				  user-service-ref="oauth2UserService"
				  oidc-user-service-ref="oidcUserService"
				  login-processing-url="/login/oauth2/code/*"
				  login-page="/login"
				  authentication-success-handler-ref="authenticationSuccessHandler"
				  authentication-failure-handler-ref="authenticationFailureHandler"
				  jwt-decoder-factory-ref="jwtDecoderFactory"/>
</http>
The following sections go into more detail on each of the configuration options available:
OAuth 2.0 Login Page
By default, the OAuth 2.0 Login Page is auto-generated by the DefaultLoginPageGeneratingFilter.
The default login page shows each configured OAuth Client with its ClientRegistration.clientName as a link, which is capable of initiating the Authorization Request (or OAuth 2.0 Login).
In order for DefaultLoginPageGeneratingFilter to show links for configured OAuth Clients, the registered ClientRegistrationRepository needs to also implement Iterable<ClientRegistration>.
See InMemoryClientRegistrationRepository for reference.
|
The link’s destination for each OAuth Client defaults to the following:
OAuth2AuthorizationRequestRedirectFilter.DEFAULT_AUTHORIZATION_REQUEST_BASE_URI + "/{registrationId}"
The following line shows an example:
<a href="/oauth2/authorization/google">Google</a>To override the default login page, configure oauth2Login().loginPage() and (optionally) oauth2Login().authorizationEndpoint().baseUri().
The following listing shows an example:
@EnableWebSecurity
public class OAuth2LoginSecurityConfig extends WebSecurityConfigurerAdapter {

	@Override
	protected void configure(HttpSecurity http) throws Exception {
		http
			.oauth2Login(oauth2 -> oauth2
			    .loginPage("/login/oauth2")
			    ...
			    .authorizationEndpoint(authorization -> authorization
			        .baseUri("/login/oauth2/authorization")
			        ...
			    )
			);
	}
}@EnableWebSecurity
class OAuth2LoginSecurityConfig : WebSecurityConfigurerAdapter() {
override fun configure(http: HttpSecurity) {
http {
oauth2Login {
loginPage = "/login/oauth2"
authorizationEndpoint {
baseUri = "/login/oauth2/authorization"
}
}
}
}
}<http>
<oauth2-login login-page="/login/oauth2"
...
/>
</http>
You need to provide a @Controller with a @RequestMapping("/login/oauth2") that is capable of rendering the custom login page.
|
|
As noted earlier, configuring The following line shows an example: |
Redirection Endpoint
The Redirection Endpoint is used by the Authorization Server for returning the Authorization Response (which contains the authorization credentials) to the client via the Resource Owner user-agent.
| OAuth 2.0 Login leverages the Authorization Code Grant. Therefore, the authorization credential is the authorization code. |
The default Authorization Response baseUri (redirection endpoint) is /login/oauth2/code/*, which is defined in OAuth2LoginAuthenticationFilter.DEFAULT_FILTER_PROCESSES_URI.
If you would like to customize the Authorization Response baseUri, configure it as shown in the following example:
@EnableWebSecurity
public class OAuth2LoginSecurityConfig extends WebSecurityConfigurerAdapter {

	@Override
	protected void configure(HttpSecurity http) throws Exception {
		http
			.oauth2Login(oauth2 -> oauth2
			    .redirectionEndpoint(redirection -> redirection
			        .baseUri("/login/oauth2/callback/*")
			        ...
			    )
			);
	}
}@EnableWebSecurity
class OAuth2LoginSecurityConfig : WebSecurityConfigurerAdapter() {
override fun configure(http: HttpSecurity) {
http {
oauth2Login {
redirectionEndpoint {
baseUri = "/login/oauth2/callback/*"
}
}
}
}
}<http>
<oauth2-login login-processing-url="/login/oauth2/callback/*"
...
/>
</http>|
You also need to ensure the The following listing shows an example: Java
Kotlin
|
UserInfo Endpoint
The UserInfo Endpoint includes a number of configuration options, as described in the following sub-sections:
Mapping User Authorities
After the user successfully authenticates with the OAuth 2.0 Provider, the OAuth2User.getAuthorities() (or OidcUser.getAuthorities()) may be mapped to a new set of GrantedAuthority instances, which will be supplied to OAuth2AuthenticationToken when completing the authentication.
OAuth2AuthenticationToken.getAuthorities() is used for authorizing requests, such as in hasRole('USER') or hasRole('ADMIN').
|
There are a couple of options to choose from when mapping user authorities:
Provide an implementation of GrantedAuthoritiesMapper and configure it as shown in the following example:
@EnableWebSecurity
public class OAuth2LoginSecurityConfig extends WebSecurityConfigurerAdapter {

	@Override
	protected void configure(HttpSecurity http) throws Exception {
		http
			.oauth2Login(oauth2 -> oauth2
			    .userInfoEndpoint(userInfo -> userInfo
			        .userAuthoritiesMapper(this.userAuthoritiesMapper())
			        ...
			    )
			);
	}

	private GrantedAuthoritiesMapper userAuthoritiesMapper() {
		return (authorities) -> {
			Set<GrantedAuthority> mappedAuthorities = new HashSet<>();

			authorities.forEach(authority -> {
				if (OidcUserAuthority.class.isInstance(authority)) {
					OidcUserAuthority oidcUserAuthority = (OidcUserAuthority)authority;

					OidcIdToken idToken = oidcUserAuthority.getIdToken();
					OidcUserInfo userInfo = oidcUserAuthority.getUserInfo();

					// Map the claims found in idToken and/or userInfo
					// to one or more GrantedAuthority's and add it to mappedAuthorities

				} else if (OAuth2UserAuthority.class.isInstance(authority)) {
					OAuth2UserAuthority oauth2UserAuthority = (OAuth2UserAuthority)authority;

					Map<String, Object> userAttributes = oauth2UserAuthority.getAttributes();

					// Map the attributes found in userAttributes
					// to one or more GrantedAuthority's and add it to mappedAuthorities

				}
			});

			return mappedAuthorities;
		};
	}
}@EnableWebSecurity
class OAuth2LoginSecurityConfig : WebSecurityConfigurerAdapter() {
override fun configure(http: HttpSecurity) {
http {
oauth2Login {
userInfoEndpoint {
userAuthoritiesMapper = userAuthoritiesMapper()
}
}
}
}
private fun userAuthoritiesMapper(): GrantedAuthoritiesMapper = GrantedAuthoritiesMapper { authorities: Collection<GrantedAuthority> ->
val mappedAuthorities = emptySet<GrantedAuthority>()
authorities.forEach { authority ->
if (authority is OidcUserAuthority) {
val idToken = authority.idToken
val userInfo = authority.userInfo
// Map the claims found in idToken and/or userInfo
// to one or more GrantedAuthority's and add it to mappedAuthorities
} else if (authority is OAuth2UserAuthority) {
val userAttributes = authority.attributes
// Map the attributes found in userAttributes
// to one or more GrantedAuthority's and add it to mappedAuthorities
}
}
mappedAuthorities
}
}<http>
<oauth2-login user-authorities-mapper-ref="userAuthoritiesMapper"
...
/>
</http>Alternatively, you may register a GrantedAuthoritiesMapper @Bean to have it automatically applied to the configuration, as shown in the following example:
@EnableWebSecurity
public class OAuth2LoginSecurityConfig extends WebSecurityConfigurerAdapter {

	@Override
	protected void configure(HttpSecurity http) throws Exception {
		http
		    .oauth2Login(withDefaults());
	}

	@Bean
	public GrantedAuthoritiesMapper userAuthoritiesMapper() {
		...
	}
}@EnableWebSecurity
class OAuth2LoginSecurityConfig : WebSecurityConfigurerAdapter() {
override fun configure(http: HttpSecurity) {
http {
oauth2Login { }
}
}
@Bean
fun userAuthoritiesMapper(): GrantedAuthoritiesMapper {
...
}
}This strategy is advanced compared to using a GrantedAuthoritiesMapper, however, it’s also more flexible as it gives you access to the OAuth2UserRequest and OAuth2User (when using an OAuth 2.0 UserService) or OidcUserRequest and OidcUser (when using an OpenID Connect 1.0 UserService).
The OAuth2UserRequest (and OidcUserRequest) provides you access to the associated OAuth2AccessToken, which is very useful in the cases where the delegator needs to fetch authority information from a protected resource before it can map the custom authorities for the user.
The following example shows how to implement and configure a delegation-based strategy using an OpenID Connect 1.0 UserService:
@EnableWebSecurity
public class OAuth2LoginSecurityConfig extends WebSecurityConfigurerAdapter {

	@Override
	protected void configure(HttpSecurity http) throws Exception {
		http
			.oauth2Login(oauth2 -> oauth2
			    .userInfoEndpoint(userInfo -> userInfo
			        .oidcUserService(this.oidcUserService())
			        ...
			    )
			);
	}

	private OAuth2UserService<OidcUserRequest, OidcUser> oidcUserService() {
		final OidcUserService delegate = new OidcUserService();

		return (userRequest) -> {
			// Delegate to the default implementation for loading a user
			OidcUser oidcUser = delegate.loadUser(userRequest);

			OAuth2AccessToken accessToken = userRequest.getAccessToken();
			Set<GrantedAuthority> mappedAuthorities = new HashSet<>();

			// TODO
			// 1) Fetch the authority information from the protected resource using accessToken
			// 2) Map the authority information to one or more GrantedAuthority's and add it to mappedAuthorities

			// 3) Create a copy of oidcUser but use the mappedAuthorities instead
			oidcUser = new DefaultOidcUser(mappedAuthorities, oidcUser.getIdToken(), oidcUser.getUserInfo());

			return oidcUser;
		};
	}
}@EnableWebSecurity
class OAuth2LoginSecurityConfig : WebSecurityConfigurerAdapter() {
override fun configure(http: HttpSecurity) {
http {
oauth2Login {
userInfoEndpoint {
oidcUserService = oidcUserService()
}
}
}
}
@Bean
fun oidcUserService(): OAuth2UserService<OidcUserRequest, OidcUser> {
val delegate = OidcUserService()
return OAuth2UserService { userRequest ->
// Delegate to the default implementation for loading a user
var oidcUser = delegate.loadUser(userRequest)
val accessToken = userRequest.accessToken
val mappedAuthorities = HashSet<GrantedAuthority>()
// TODO
// 1) Fetch the authority information from the protected resource using accessToken
// 2) Map the authority information to one or more GrantedAuthority's and add it to mappedAuthorities
// 3) Create a copy of oidcUser but use the mappedAuthorities instead
oidcUser = DefaultOidcUser(mappedAuthorities, oidcUser.idToken, oidcUser.userInfo)
oidcUser
}
}
}<http>
<oauth2-login oidc-user-service-ref="oidcUserService"
...
/>
</http>OAuth 2.0 UserService
DefaultOAuth2UserService is an implementation of an OAuth2UserService that supports standard OAuth 2.0 Provider’s.
OAuth2UserService obtains the user attributes of the end-user (the resource owner) from the UserInfo Endpoint (by using the access token granted to the client during the authorization flow) and returns an AuthenticatedPrincipal in the form of an OAuth2User.
|
DefaultOAuth2UserService uses a RestOperations when requesting the user attributes at the UserInfo Endpoint.
If you need to customize the pre-processing of the UserInfo Request, you can provide DefaultOAuth2UserService.setRequestEntityConverter() with a custom Converter<OAuth2UserRequest, RequestEntity<?>>.
The default implementation OAuth2UserRequestEntityConverter builds a RequestEntity representation of a UserInfo Request that sets the OAuth2AccessToken in the Authorization header by default.
On the other end, if you need to customize the post-handling of the UserInfo Response, you will need to provide DefaultOAuth2UserService.setRestOperations() with a custom configured RestOperations.
The default RestOperations is configured as follows:
RestTemplate restTemplate = new RestTemplate();
restTemplate.setErrorHandler(new OAuth2ErrorResponseErrorHandler());
OAuth2ErrorResponseErrorHandler is a ResponseErrorHandler that can handle an OAuth 2.0 Error (400 Bad Request).
It uses an OAuth2ErrorHttpMessageConverter for converting the OAuth 2.0 Error parameters to an OAuth2Error.
Whether you customize DefaultOAuth2UserService or provide your own implementation of OAuth2UserService, you’ll need to configure it as shown in the following example:
@EnableWebSecurity
public class OAuth2LoginSecurityConfig extends WebSecurityConfigurerAdapter {

	@Override
	protected void configure(HttpSecurity http) throws Exception {
		http
			.oauth2Login(oauth2 -> oauth2
			    .userInfoEndpoint(userInfo -> userInfo
			        .userService(this.oauth2UserService())
			        ...
			    )
			);
	}

	private OAuth2UserService<OAuth2UserRequest, OAuth2User> oauth2UserService() {
		...
	}
}@EnableWebSecurity
class OAuth2LoginSecurityConfig : WebSecurityConfigurerAdapter() {
override fun configure(http: HttpSecurity) {
http {
oauth2Login {
userInfoEndpoint {
userService = oauth2UserService()
// ...
}
}
}
}
private fun oauth2UserService(): OAuth2UserService<OAuth2UserRequest, OAuth2User> {
// ...
}
}OpenID Connect 1.0 UserService
OidcUserService is an implementation of an OAuth2UserService that supports OpenID Connect 1.0 Provider’s.
The OidcUserService leverages the DefaultOAuth2UserService when requesting the user attributes at the UserInfo Endpoint.
If you need to customize the pre-processing of the UserInfo Request and/or the post-handling of the UserInfo Response, you will need to provide OidcUserService.setOauth2UserService() with a custom configured DefaultOAuth2UserService.
Whether you customize OidcUserService or provide your own implementation of OAuth2UserService for OpenID Connect 1.0 Provider’s, you’ll need to configure it as shown in the following example:
@EnableWebSecurity
public class OAuth2LoginSecurityConfig extends WebSecurityConfigurerAdapter {

	@Override
	protected void configure(HttpSecurity http) throws Exception {
		http
			.oauth2Login(oauth2 -> oauth2
				.userInfoEndpoint(userInfo -> userInfo
				    .oidcUserService(this.oidcUserService())
				    ...
			    )
			);
	}

	private OAuth2UserService<OidcUserRequest, OidcUser> oidcUserService() {
		...
	}
}@EnableWebSecurity
class OAuth2LoginSecurityConfig : WebSecurityConfigurerAdapter() {
override fun configure(http: HttpSecurity) {
http {
oauth2Login {
userInfoEndpoint {
oidcUserService = oidcUserService()
// ...
}
}
}
}
private fun oidcUserService(): OAuth2UserService<OidcUserRequest, OidcUser> {
// ...
}
}ID Token Signature Verification
OpenID Connect 1.0 Authentication introduces the ID Token, which is a security token that contains Claims about the Authentication of an End-User by an Authorization Server when used by a Client.
The ID Token is represented as a JSON Web Token (JWT) and MUST be signed using JSON Web Signature (JWS).
The OidcIdTokenDecoderFactory provides a JwtDecoder used for OidcIdToken signature verification. The default algorithm is RS256 but may be different when assigned during client registration.
For these cases, a resolver may be configured to return the expected JWS algorithm assigned for a specific client.
The JWS algorithm resolver is a Function that accepts a ClientRegistration and returns the expected JwsAlgorithm for the client, eg. SignatureAlgorithm.RS256 or MacAlgorithm.HS256
The following code shows how to configure the OidcIdTokenDecoderFactory @Bean to default to MacAlgorithm.HS256 for all ClientRegistration:
@Bean
public JwtDecoderFactory<ClientRegistration> idTokenDecoderFactory() {
	OidcIdTokenDecoderFactory idTokenDecoderFactory = new OidcIdTokenDecoderFactory();
	idTokenDecoderFactory.setJwsAlgorithmResolver(clientRegistration -> MacAlgorithm.HS256);
	return idTokenDecoderFactory;
}@Bean
fun idTokenDecoderFactory(): JwtDecoderFactory<ClientRegistration?> {
val idTokenDecoderFactory = OidcIdTokenDecoderFactory()
idTokenDecoderFactory.setJwsAlgorithmResolver { MacAlgorithm.HS256 }
return idTokenDecoderFactory
}
For MAC based algorithms such as HS256, HS384 or HS512, the client-secret corresponding to the client-id is used as the symmetric key for signature verification.
|
If more than one ClientRegistration is configured for OpenID Connect 1.0 Authentication, the JWS algorithm resolver may evaluate the provided ClientRegistration to determine which algorithm to return.
|
OpenID Connect 1.0 Logout
OpenID Connect Session Management 1.0 allows the ability to log out the End-User at the Provider using the Client. One of the strategies available is RP-Initiated Logout.
If the OpenID Provider supports both Session Management and Discovery, the client may obtain the end_session_endpoint URL from the OpenID Provider’s Discovery Metadata.
This can be achieved by configuring the ClientRegistration with the issuer-uri, as in the following example:
spring:
  security:
    oauth2:
      client:
        registration:
          okta:
            client-id: okta-client-id
            client-secret: okta-client-secret
            ...
        provider:
          okta:
issuer-uri: https://dev-1234.oktapreview.com…and the OidcClientInitiatedLogoutSuccessHandler, which implements RP-Initiated Logout, may be configured as follows:
@EnableWebSecurity
public class OAuth2LoginSecurityConfig extends WebSecurityConfigurerAdapter {

	@Autowired
	private ClientRegistrationRepository clientRegistrationRepository;

	@Override
	protected void configure(HttpSecurity http) throws Exception {
		http
			.authorizeRequests(authorize -> authorize
				.anyRequest().authenticated()
			)
			.oauth2Login(withDefaults())
			.logout(logout -> logout
				.logoutSuccessHandler(oidcLogoutSuccessHandler())
			);
	}

	private LogoutSuccessHandler oidcLogoutSuccessHandler() {
		OidcClientInitiatedLogoutSuccessHandler oidcLogoutSuccessHandler =
				new OidcClientInitiatedLogoutSuccessHandler(this.clientRegistrationRepository);

		// Sets the location that the End-User's User Agent will be redirected to
		// after the logout has been performed at the Provider
		oidcLogoutSuccessHandler.setPostLogoutRedirectUri("{baseUrl}");

		return oidcLogoutSuccessHandler;
	}
}

NOTE: `OidcClientInitiatedLogoutSuccessHandler` supports the `{baseUrl}` placeholder.
If used, the application's base URL, like `https://app.example.org`, will replace it at request time.@EnableWebSecurity
class OAuth2LoginSecurityConfig : WebSecurityConfigurerAdapter() {
@Autowired
private lateinit var clientRegistrationRepository: ClientRegistrationRepository
override fun configure(http: HttpSecurity) {
http {
authorizeRequests {
authorize(anyRequest, authenticated)
}
oauth2Login { }
logout {
logoutSuccessHandler = oidcLogoutSuccessHandler()
}
}
}
private fun oidcLogoutSuccessHandler(): LogoutSuccessHandler {
val oidcLogoutSuccessHandler = OidcClientInitiatedLogoutSuccessHandler(clientRegistrationRepository)
// Sets the location that the End-User's User Agent will be redirected to
// after the logout has been performed at the Provider
oidcLogoutSuccessHandler.setPostLogoutRedirectUri("{baseUrl}")
return oidcLogoutSuccessHandler
}
}
NOTE: `OidcClientInitiatedLogoutSuccessHandler` supports the `{baseUrl}` placeholder.
If used, the application's base URL, like `https://app.example.org`, will replace it at request time.OAuth 2.0 Client
The OAuth 2.0 Client features provide support for the Client role as defined in the OAuth 2.0 Authorization Framework.
At a high-level, the core features available are:
-
WebClientintegration for Servlet Environments (for requesting protected resources)
The HttpSecurity.oauth2Client() DSL provides a number of configuration options for customizing the core components used by OAuth 2.0 Client.
In addition, HttpSecurity.oauth2Client().authorizationCodeGrant() enables the customization of the Authorization Code grant.
The following code shows the complete configuration options provided by the HttpSecurity.oauth2Client() DSL:
@EnableWebSecurity
public class OAuth2ClientSecurityConfig extends WebSecurityConfigurerAdapter {

	@Override
	protected void configure(HttpSecurity http) throws Exception {
		http
			.oauth2Client(oauth2 -> oauth2
				.clientRegistrationRepository(this.clientRegistrationRepository())
				.authorizedClientRepository(this.authorizedClientRepository())
				.authorizedClientService(this.authorizedClientService())
				.authorizationCodeGrant(codeGrant -> codeGrant
					.authorizationRequestRepository(this.authorizationRequestRepository())
					.authorizationRequestResolver(this.authorizationRequestResolver())
					.accessTokenResponseClient(this.accessTokenResponseClient())
				)
			);
	}
}@EnableWebSecurity
class OAuth2ClientSecurityConfig : WebSecurityConfigurerAdapter() {
override fun configure(http: HttpSecurity) {
http {
oauth2Client {
clientRegistrationRepository = clientRegistrationRepository()
authorizedClientRepository = authorizedClientRepository()
authorizedClientService = authorizedClientService()
authorizationCodeGrant {
authorizationRequestRepository = authorizationRequestRepository()
authorizationRequestResolver = authorizationRequestResolver()
accessTokenResponseClient = accessTokenResponseClient()
}
}
}
}
}In addition to the HttpSecurity.oauth2Client() DSL, XML configuration is also supported.
The following code shows the complete configuration options available in the security namespace:
<http>
	<oauth2-client client-registration-repository-ref="clientRegistrationRepository"
				   authorized-client-repository-ref="authorizedClientRepository"
				   authorized-client-service-ref="authorizedClientService">
		<authorization-code-grant
				authorization-request-repository-ref="authorizationRequestRepository"
				authorization-request-resolver-ref="authorizationRequestResolver"
				access-token-response-client-ref="accessTokenResponseClient"/>
	</oauth2-client>
</http>
The OAuth2AuthorizedClientManager is responsible for managing the authorization (or re-authorization) of an OAuth 2.0 Client, in collaboration with one or more OAuth2AuthorizedClientProvider(s).
The following code shows an example of how to register an OAuth2AuthorizedClientManager @Bean and associate it with an OAuth2AuthorizedClientProvider composite that provides support for the authorization_code, refresh_token, client_credentials and password authorization grant types:
@Bean
public OAuth2AuthorizedClientManager authorizedClientManager(
		ClientRegistrationRepository clientRegistrationRepository,
		OAuth2AuthorizedClientRepository authorizedClientRepository) {

	OAuth2AuthorizedClientProvider authorizedClientProvider =
			OAuth2AuthorizedClientProviderBuilder.builder()
					.authorizationCode()
					.refreshToken()
					.clientCredentials()
					.password()
					.build();

	DefaultOAuth2AuthorizedClientManager authorizedClientManager =
			new DefaultOAuth2AuthorizedClientManager(
					clientRegistrationRepository, authorizedClientRepository);
	authorizedClientManager.setAuthorizedClientProvider(authorizedClientProvider);

	return authorizedClientManager;
}@Bean
fun authorizedClientManager(
clientRegistrationRepository: ClientRegistrationRepository,
authorizedClientRepository: OAuth2AuthorizedClientRepository): OAuth2AuthorizedClientManager {
val authorizedClientProvider: OAuth2AuthorizedClientProvider = OAuth2AuthorizedClientProviderBuilder.builder()
.authorizationCode()
.refreshToken()
.clientCredentials()
.password()
.build()
val authorizedClientManager = DefaultOAuth2AuthorizedClientManager(
clientRegistrationRepository, authorizedClientRepository)
authorizedClientManager.setAuthorizedClientProvider(authorizedClientProvider)
return authorizedClientManager
}The following sections will go into more detail on the core components used by OAuth 2.0 Client and the configuration options available:
Core Interfaces / Classes
ClientRegistration
ClientRegistration is a representation of a client registered with an OAuth 2.0 or OpenID Connect 1.0 Provider.
A client registration holds information, such as client id, client secret, authorization grant type, redirect URI, scope(s), authorization URI, token URI, and other details.
ClientRegistration and its properties are defined as follows:
public final class ClientRegistration {
	private String registrationId;	(1)
	private String clientId;	(2)
	private String clientSecret;	(3)
	private ClientAuthenticationMethod clientAuthenticationMethod;	(4)
	private AuthorizationGrantType authorizationGrantType;	(5)
	private String redirectUri;	(6)
	private Set<String> scopes;	(7)
	private ProviderDetails providerDetails;
	private String clientName;	(8)

	public class ProviderDetails {
		private String authorizationUri;	(9)
		private String tokenUri;	(10)
		private UserInfoEndpoint userInfoEndpoint;
		private String jwkSetUri;	(11)
		private String issuerUri;	(12)
        private Map<String, Object> configurationMetadata;  (13)

		public class UserInfoEndpoint {
			private String uri;	(14)
            private AuthenticationMethod authenticationMethod;  (15)
			private String userNameAttributeName;	(16)

		}
	}
}| 1 | registrationId: The ID that uniquely identifies the ClientRegistration. |
| 2 | clientId: The client identifier. |
| 3 | clientSecret: The client secret. |
| 4 | clientAuthenticationMethod: The method used to authenticate the Client with the Provider.
The supported values are client_secret_basic, client_secret_post, private_key_jwt, client_secret_jwt and none (public clients). |
| 5 | authorizationGrantType: The OAuth 2.0 Authorization Framework defines four Authorization Grant types.
The supported values are authorization_code, client_credentials, password, as well as, extension grant type urn:ietf:params:oauth:grant-type:jwt-bearer. |
| 6 | redirectUri: The client’s registered redirect URI that the Authorization Server redirects the end-user’s user-agent
to after the end-user has authenticated and authorized access to the client. |
| 7 | scopes: The scope(s) requested by the client during the Authorization Request flow, such as openid, email, or profile. |
| 8 | clientName: A descriptive name used for the client.
The name may be used in certain scenarios, such as when displaying the name of the client in the auto-generated login page. |
| 9 | authorizationUri: The Authorization Endpoint URI for the Authorization Server. |
| 10 | tokenUri: The Token Endpoint URI for the Authorization Server. |
| 11 | jwkSetUri: The URI used to retrieve the JSON Web Key (JWK) Set from the Authorization Server,
which contains the cryptographic key(s) used to verify the JSON Web Signature (JWS) of the ID Token and optionally the UserInfo Response. |
| 12 | issuerUri: Returns the issuer identifier uri for the OpenID Connect 1.0 provider or the OAuth 2.0 Authorization Server. |
| 13 | configurationMetadata: The OpenID Provider Configuration Information.
This information will only be available if the Spring Boot 2.x property spring.security.oauth2.client.provider.[providerId].issuerUri is configured. |
| 14 | (userInfoEndpoint)uri: The UserInfo Endpoint URI used to access the claims/attributes of the authenticated end-user. |
| 15 | (userInfoEndpoint)authenticationMethod: The authentication method used when sending the access token to the UserInfo Endpoint.
The supported values are header, form and query. |
| 16 | userNameAttributeName: The name of the attribute returned in the UserInfo Response that references the Name or Identifier of the end-user. |
A ClientRegistration can be initially configured using discovery of an OpenID Connect Provider’s Configuration endpoint or an Authorization Server’s Metadata endpoint.
ClientRegistrations provides convenience methods for configuring a ClientRegistration in this way, as can be seen in the following example:
ClientRegistration clientRegistration =
ClientRegistrations.fromIssuerLocation("https://idp.example.com/issuer").build();val clientRegistration = ClientRegistrations.fromIssuerLocation("https://idp.example.com/issuer").build()The above code will query in series https://idp.example.com/issuer/.well-known/openid-configuration, and then https://idp.example.com/.well-known/openid-configuration/issuer, and finally https://idp.example.com/.well-known/oauth-authorization-server/issuer, stopping at the first to return a 200 response.
As an alternative, you can use ClientRegistrations.fromOidcIssuerLocation() to only query the OpenID Connect Provider’s Configuration endpoint.
ClientRegistrationRepository
The ClientRegistrationRepository serves as a repository for OAuth 2.0 / OpenID Connect 1.0 ClientRegistration(s).
| Client registration information is ultimately stored and owned by the associated Authorization Server. This repository provides the ability to retrieve a sub-set of the primary client registration information, which is stored with the Authorization Server. |
Spring Boot 2.x auto-configuration binds each of the properties under spring.security.oauth2.client.registration.[registrationId] to an instance of ClientRegistration and then composes each of the ClientRegistration instance(s) within a ClientRegistrationRepository.
The default implementation of ClientRegistrationRepository is InMemoryClientRegistrationRepository.
|
The auto-configuration also registers the ClientRegistrationRepository as a @Bean in the ApplicationContext so that it is available for dependency-injection, if needed by the application.
The following listing shows an example:
@Controller
public class OAuth2ClientController {

	@Autowired
	private ClientRegistrationRepository clientRegistrationRepository;

	@GetMapping("/")
	public String index() {
		ClientRegistration oktaRegistration =
			this.clientRegistrationRepository.findByRegistrationId("okta");

		...

		return "index";
	}
}@Controller
class OAuth2ClientController {
@Autowired
private lateinit var clientRegistrationRepository: ClientRegistrationRepository
@GetMapping("/")
fun index(): String {
val oktaRegistration =
this.clientRegistrationRepository.findByRegistrationId("okta")
//...
return "index";
}
}OAuth2AuthorizedClient
OAuth2AuthorizedClient is a representation of an Authorized Client.
A client is considered to be authorized when the end-user (Resource Owner) has granted authorization to the client to access its protected resources.
OAuth2AuthorizedClient serves the purpose of associating an OAuth2AccessToken (and optional OAuth2RefreshToken) to a ClientRegistration (client) and resource owner, who is the Principal end-user that granted the authorization.
OAuth2AuthorizedClientRepository / OAuth2AuthorizedClientService
OAuth2AuthorizedClientRepository is responsible for persisting OAuth2AuthorizedClient(s) between web requests.
Whereas, the primary role of OAuth2AuthorizedClientService is to manage OAuth2AuthorizedClient(s) at the application-level.
From a developer perspective, the OAuth2AuthorizedClientRepository or OAuth2AuthorizedClientService provides the capability to lookup an OAuth2AccessToken associated with a client so that it may be used to initiate a protected resource request.
The following listing shows an example:
@Controller
public class OAuth2ClientController {

    @Autowired
    private OAuth2AuthorizedClientService authorizedClientService;

    @GetMapping("/")
    public String index(Authentication authentication) {
        OAuth2AuthorizedClient authorizedClient =
            this.authorizedClientService.loadAuthorizedClient("okta", authentication.getName());

        OAuth2AccessToken accessToken = authorizedClient.getAccessToken();

        ...

        return "index";
    }
}@Controller
class OAuth2ClientController {
@Autowired
private lateinit var authorizedClientService: OAuth2AuthorizedClientService
@GetMapping("/")
fun index(authentication: Authentication): String {
val authorizedClient: OAuth2AuthorizedClient =
this.authorizedClientService.loadAuthorizedClient("okta", authentication.getName());
val accessToken = authorizedClient.accessToken
...
return "index";
}
}
Spring Boot 2.x auto-configuration registers an OAuth2AuthorizedClientRepository and/or OAuth2AuthorizedClientService @Bean in the ApplicationContext.
However, the application may choose to override and register a custom OAuth2AuthorizedClientRepository or OAuth2AuthorizedClientService @Bean.
|
The default implementation of OAuth2AuthorizedClientService is InMemoryOAuth2AuthorizedClientService, which stores OAuth2AuthorizedClient(s) in-memory.
Alternatively, the JDBC implementation JdbcOAuth2AuthorizedClientService may be configured for persisting OAuth2AuthorizedClient(s) in a database.
JdbcOAuth2AuthorizedClientService depends on the table definition described in OAuth 2.0 Client Schema.
|
OAuth2AuthorizedClientManager / OAuth2AuthorizedClientProvider
The OAuth2AuthorizedClientManager is responsible for the overall management of OAuth2AuthorizedClient(s).
The primary responsibilities include:
-
Authorizing (or re-authorizing) an OAuth 2.0 Client, using an
OAuth2AuthorizedClientProvider. -
Delegating the persistence of an
OAuth2AuthorizedClient, typically using anOAuth2AuthorizedClientServiceorOAuth2AuthorizedClientRepository. -
Delegating to an
OAuth2AuthorizationSuccessHandlerwhen an OAuth 2.0 Client has been successfully authorized (or re-authorized). -
Delegating to an
OAuth2AuthorizationFailureHandlerwhen an OAuth 2.0 Client fails to authorize (or re-authorize).
An OAuth2AuthorizedClientProvider implements a strategy for authorizing (or re-authorizing) an OAuth 2.0 Client.
Implementations will typically implement an authorization grant type, eg. authorization_code, client_credentials, etc.
The default implementation of OAuth2AuthorizedClientManager is DefaultOAuth2AuthorizedClientManager, which is associated with an OAuth2AuthorizedClientProvider that may support multiple authorization grant types using a delegation-based composite.
The OAuth2AuthorizedClientProviderBuilder may be used to configure and build the delegation-based composite.
The following code shows an example of how to configure and build an OAuth2AuthorizedClientProvider composite that provides support for the authorization_code, refresh_token, client_credentials and password authorization grant types:
@Bean
public OAuth2AuthorizedClientManager authorizedClientManager(
		ClientRegistrationRepository clientRegistrationRepository,
		OAuth2AuthorizedClientRepository authorizedClientRepository) {

	OAuth2AuthorizedClientProvider authorizedClientProvider =
			OAuth2AuthorizedClientProviderBuilder.builder()
					.authorizationCode()
					.refreshToken()
					.clientCredentials()
					.password()
					.build();

	DefaultOAuth2AuthorizedClientManager authorizedClientManager =
			new DefaultOAuth2AuthorizedClientManager(
					clientRegistrationRepository, authorizedClientRepository);
	authorizedClientManager.setAuthorizedClientProvider(authorizedClientProvider);

	return authorizedClientManager;
}@Bean
fun authorizedClientManager(
clientRegistrationRepository: ClientRegistrationRepository,
authorizedClientRepository: OAuth2AuthorizedClientRepository): OAuth2AuthorizedClientManager {
val authorizedClientProvider = OAuth2AuthorizedClientProviderBuilder.builder()
.authorizationCode()
.refreshToken()
.clientCredentials()
.password()
.build()
val authorizedClientManager = DefaultOAuth2AuthorizedClientManager(
clientRegistrationRepository, authorizedClientRepository)
authorizedClientManager.setAuthorizedClientProvider(authorizedClientProvider)
return authorizedClientManager
}When an authorization attempt succeeds, the DefaultOAuth2AuthorizedClientManager will delegate to the OAuth2AuthorizationSuccessHandler, which (by default) will save the OAuth2AuthorizedClient via the OAuth2AuthorizedClientRepository.
In the case of a re-authorization failure, eg. a refresh token is no longer valid, the previously saved OAuth2AuthorizedClient will be removed from the OAuth2AuthorizedClientRepository via the RemoveAuthorizedClientOAuth2AuthorizationFailureHandler.
The default behaviour may be customized via setAuthorizationSuccessHandler(OAuth2AuthorizationSuccessHandler) and setAuthorizationFailureHandler(OAuth2AuthorizationFailureHandler).
The DefaultOAuth2AuthorizedClientManager is also associated with a contextAttributesMapper of type Function<OAuth2AuthorizeRequest, Map<String, Object>>, which is responsible for mapping attribute(s) from the OAuth2AuthorizeRequest to a Map of attributes to be associated to the OAuth2AuthorizationContext.
This can be useful when you need to supply an OAuth2AuthorizedClientProvider with required (supported) attribute(s), eg. the PasswordOAuth2AuthorizedClientProvider requires the resource owner’s username and password to be available in OAuth2AuthorizationContext.getAttributes().
The following code shows an example of the contextAttributesMapper:
@Bean
public OAuth2AuthorizedClientManager authorizedClientManager(
		ClientRegistrationRepository clientRegistrationRepository,
		OAuth2AuthorizedClientRepository authorizedClientRepository) {

	OAuth2AuthorizedClientProvider authorizedClientProvider =
			OAuth2AuthorizedClientProviderBuilder.builder()
					.password()
					.refreshToken()
					.build();

	DefaultOAuth2AuthorizedClientManager authorizedClientManager =
			new DefaultOAuth2AuthorizedClientManager(
					clientRegistrationRepository, authorizedClientRepository);
	authorizedClientManager.setAuthorizedClientProvider(authorizedClientProvider);

	// Assuming the `username` and `password` are supplied as `HttpServletRequest` parameters,
	// map the `HttpServletRequest` parameters to `OAuth2AuthorizationContext.getAttributes()`
	authorizedClientManager.setContextAttributesMapper(contextAttributesMapper());

	return authorizedClientManager;
}

private Function<OAuth2AuthorizeRequest, Map<String, Object>> contextAttributesMapper() {
	return authorizeRequest -> {
		Map<String, Object> contextAttributes = Collections.emptyMap();
		HttpServletRequest servletRequest = authorizeRequest.getAttribute(HttpServletRequest.class.getName());
		String username = servletRequest.getParameter(OAuth2ParameterNames.USERNAME);
		String password = servletRequest.getParameter(OAuth2ParameterNames.PASSWORD);
		if (StringUtils.hasText(username) && StringUtils.hasText(password)) {
			contextAttributes = new HashMap<>();

			// `PasswordOAuth2AuthorizedClientProvider` requires both attributes
			contextAttributes.put(OAuth2AuthorizationContext.USERNAME_ATTRIBUTE_NAME, username);
			contextAttributes.put(OAuth2AuthorizationContext.PASSWORD_ATTRIBUTE_NAME, password);
		}
		return contextAttributes;
	};
}@Bean
fun authorizedClientManager(
clientRegistrationRepository: ClientRegistrationRepository,
authorizedClientRepository: OAuth2AuthorizedClientRepository): OAuth2AuthorizedClientManager {
val authorizedClientProvider = OAuth2AuthorizedClientProviderBuilder.builder()
.password()
.refreshToken()
.build()
val authorizedClientManager = DefaultOAuth2AuthorizedClientManager(
clientRegistrationRepository, authorizedClientRepository)
authorizedClientManager.setAuthorizedClientProvider(authorizedClientProvider)
// Assuming the `username` and `password` are supplied as `HttpServletRequest` parameters,
// map the `HttpServletRequest` parameters to `OAuth2AuthorizationContext.getAttributes()`
authorizedClientManager.setContextAttributesMapper(contextAttributesMapper())
return authorizedClientManager
}
private fun contextAttributesMapper(): Function<OAuth2AuthorizeRequest, MutableMap<String, Any>> {
return Function { authorizeRequest ->
var contextAttributes: MutableMap<String, Any> = mutableMapOf()
val servletRequest: HttpServletRequest = authorizeRequest.getAttribute(HttpServletRequest::class.java.name)
val username: String = servletRequest.getParameter(OAuth2ParameterNames.USERNAME)
val password: String = servletRequest.getParameter(OAuth2ParameterNames.PASSWORD)
if (StringUtils.hasText(username) && StringUtils.hasText(password)) {
contextAttributes = hashMapOf()
// `PasswordOAuth2AuthorizedClientProvider` requires both attributes
contextAttributes[OAuth2AuthorizationContext.USERNAME_ATTRIBUTE_NAME] = username
contextAttributes[OAuth2AuthorizationContext.PASSWORD_ATTRIBUTE_NAME] = password
}
contextAttributes
}
}The DefaultOAuth2AuthorizedClientManager is designed to be used within the context of a HttpServletRequest.
When operating outside of a HttpServletRequest context, use AuthorizedClientServiceOAuth2AuthorizedClientManager instead.
A service application is a common use case for when to use an AuthorizedClientServiceOAuth2AuthorizedClientManager.
Service applications often run in the background, without any user interaction, and typically run under a system-level account instead of a user account.
An OAuth 2.0 Client configured with the client_credentials grant type can be considered a type of service application.
The following code shows an example of how to configure an AuthorizedClientServiceOAuth2AuthorizedClientManager that provides support for the client_credentials grant type:
@Bean
public OAuth2AuthorizedClientManager authorizedClientManager(
		ClientRegistrationRepository clientRegistrationRepository,
		OAuth2AuthorizedClientService authorizedClientService) {

	OAuth2AuthorizedClientProvider authorizedClientProvider =
			OAuth2AuthorizedClientProviderBuilder.builder()
					.clientCredentials()
					.build();

	AuthorizedClientServiceOAuth2AuthorizedClientManager authorizedClientManager =
			new AuthorizedClientServiceOAuth2AuthorizedClientManager(
					clientRegistrationRepository, authorizedClientService);
	authorizedClientManager.setAuthorizedClientProvider(authorizedClientProvider);

	return authorizedClientManager;
}@Bean
fun authorizedClientManager(
clientRegistrationRepository: ClientRegistrationRepository,
authorizedClientService: OAuth2AuthorizedClientService): OAuth2AuthorizedClientManager {
val authorizedClientProvider = OAuth2AuthorizedClientProviderBuilder.builder()
.clientCredentials()
.build()
val authorizedClientManager = AuthorizedClientServiceOAuth2AuthorizedClientManager(
clientRegistrationRepository, authorizedClientService)
authorizedClientManager.setAuthorizedClientProvider(authorizedClientProvider)
return authorizedClientManager
}Authorization Grant Support
Authorization Code
| Please refer to the OAuth 2.0 Authorization Framework for further details on the Authorization Code grant. |
Obtaining Authorization
| Please refer to the Authorization Request/Response protocol flow for the Authorization Code grant. |
Initiating the Authorization Request
The OAuth2AuthorizationRequestRedirectFilter uses an OAuth2AuthorizationRequestResolver to resolve an OAuth2AuthorizationRequest and initiate the Authorization Code grant flow by redirecting the end-user’s user-agent to the Authorization Server’s Authorization Endpoint.
The primary role of the OAuth2AuthorizationRequestResolver is to resolve an OAuth2AuthorizationRequest from the provided web request.
The default implementation DefaultOAuth2AuthorizationRequestResolver matches on the (default) path /oauth2/authorization/{registrationId} extracting the registrationId and using it to build the OAuth2AuthorizationRequest for the associated ClientRegistration.
Given the following Spring Boot 2.x properties for an OAuth 2.0 Client registration:
spring:
  security:
    oauth2:
      client:
        registration:
          okta:
            client-id: okta-client-id
            client-secret: okta-client-secret
            authorization-grant-type: authorization_code
            redirect-uri: "{baseUrl}/authorized/okta"
            scope: read, write
        provider:
          okta:
            authorization-uri: https://dev-1234.oktapreview.com/oauth2/v1/authorize
            token-uri: https://dev-1234.oktapreview.com/oauth2/v1/token
A request with the base path /oauth2/authorization/okta will initiate the Authorization Request redirect by the OAuth2AuthorizationRequestRedirectFilter and ultimately start the Authorization Code grant flow.
The AuthorizationCodeOAuth2AuthorizedClientProvider is an implementation of OAuth2AuthorizedClientProvider for the Authorization Code grant,
which also initiates the Authorization Request redirect by the OAuth2AuthorizationRequestRedirectFilter.
|
If the OAuth 2.0 Client is a Public Client, then configure the OAuth 2.0 Client registration as follows:
spring:
  security:
    oauth2:
      client:
        registration:
          okta:
            client-id: okta-client-id
            client-authentication-method: none
            authorization-grant-type: authorization_code
            redirect-uri: "{baseUrl}/authorized/okta"
            ...
Public Clients are supported using Proof Key for Code Exchange (PKCE). If the client is running in an untrusted environment (eg. native application or web browser-based application) and therefore incapable of maintaining the confidentiality of it’s credentials, PKCE will automatically be used when the following conditions are true:
-
client-secretis omitted (or empty) -
client-authentication-methodis set to "none" (ClientAuthenticationMethod.NONE)
The DefaultOAuth2AuthorizationRequestResolver also supports URI template variables for the redirect-uri using UriComponentsBuilder.
The following configuration uses all the supported URI template variables:
spring:
  security:
    oauth2:
      client:
        registration:
          okta:
            ...
            redirect-uri: "{baseScheme}://{baseHost}{basePort}{basePath}/authorized/{registrationId}"
            ...
{baseUrl} resolves to {baseScheme}://{baseHost}{basePort}{basePath}
|
Configuring the redirect-uri with URI template variables is especially useful when the OAuth 2.0 Client is running behind a Proxy Server.
This ensures that the X-Forwarded-* headers are used when expanding the redirect-uri.
Customizing the Authorization Request
One of the primary use cases an OAuth2AuthorizationRequestResolver can realize is the ability to customize the Authorization Request with additional parameters above the standard parameters defined in the OAuth 2.0 Authorization Framework.
For example, OpenID Connect defines additional OAuth 2.0 request parameters for the Authorization Code Flow extending from the standard parameters defined in the OAuth 2.0 Authorization Framework.
One of those extended parameters is the prompt parameter.
| OPTIONAL. Space delimited, case sensitive list of ASCII string values that specifies whether the Authorization Server prompts the End-User for reauthentication and consent. The defined values are: none, login, consent, select_account |
The following example shows how to configure the DefaultOAuth2AuthorizationRequestResolver with a Consumer<OAuth2AuthorizationRequest.Builder> that customizes the Authorization Request for oauth2Login(), by including the request parameter prompt=consent.
@EnableWebSecurity
public class OAuth2LoginSecurityConfig extends WebSecurityConfigurerAdapter {

	@Autowired
	private ClientRegistrationRepository clientRegistrationRepository;

	@Override
	protected void configure(HttpSecurity http) throws Exception {
		http
			.authorizeRequests(authorize -> authorize
				.anyRequest().authenticated()
			)
			.oauth2Login(oauth2 -> oauth2
				.authorizationEndpoint(authorization -> authorization
					.authorizationRequestResolver(
						authorizationRequestResolver(this.clientRegistrationRepository)
					)
				)
			);
	}

	private OAuth2AuthorizationRequestResolver authorizationRequestResolver(
			ClientRegistrationRepository clientRegistrationRepository) {

		DefaultOAuth2AuthorizationRequestResolver authorizationRequestResolver =
				new DefaultOAuth2AuthorizationRequestResolver(
						clientRegistrationRepository, "/oauth2/authorization");
		authorizationRequestResolver.setAuthorizationRequestCustomizer(
				authorizationRequestCustomizer());

		return  authorizationRequestResolver;
	}

	private Consumer<OAuth2AuthorizationRequest.Builder> authorizationRequestCustomizer() {
		return customizer -> customizer
					.additionalParameters(params -> params.put("prompt", "consent"));
	}
}@EnableWebSecurity
class SecurityConfig : WebSecurityConfigurerAdapter() {
@Autowired
private lateinit var customClientRegistrationRepository: ClientRegistrationRepository
override fun configure(http: HttpSecurity) {
http {
authorizeRequests {
authorize(anyRequest, authenticated)
}
oauth2Login {
authorizationEndpoint {
authorizationRequestResolver = authorizationRequestResolver(customClientRegistrationRepository)
}
}
}
}
private fun authorizationRequestResolver(
clientRegistrationRepository: ClientRegistrationRepository?): OAuth2AuthorizationRequestResolver? {
val authorizationRequestResolver = DefaultOAuth2AuthorizationRequestResolver(
clientRegistrationRepository, "/oauth2/authorization")
authorizationRequestResolver.setAuthorizationRequestCustomizer(
authorizationRequestCustomizer())
return authorizationRequestResolver
}
private fun authorizationRequestCustomizer(): Consumer<OAuth2AuthorizationRequest.Builder> {
return Consumer { customizer ->
customizer
.additionalParameters { params -> params["prompt"] = "consent" }
}
}
}For the simple use case, where the additional request parameter is always the same for a specific provider, it may be added directly in the authorization-uri property.
For example, if the value for the request parameter prompt is always consent for the provider okta, than simply configure as follows:
spring:
  security:
    oauth2:
      client:
        provider:
          okta:
            authorization-uri: https://dev-1234.oktapreview.com/oauth2/v1/authorize?prompt=consent
The preceding example shows the common use case of adding a custom parameter on top of the standard parameters.
Alternatively, if your requirements are more advanced, you can take full control in building the Authorization Request URI by simply overriding the OAuth2AuthorizationRequest.authorizationRequestUri property.
OAuth2AuthorizationRequest.Builder.build() constructs the OAuth2AuthorizationRequest.authorizationRequestUri, which represents the Authorization Request URI including all query parameters using the application/x-www-form-urlencoded format.
|
The following example shows a variation of authorizationRequestCustomizer() from the preceding example, and instead overrides the OAuth2AuthorizationRequest.authorizationRequestUri property.
private Consumer<OAuth2AuthorizationRequest.Builder> authorizationRequestCustomizer() {
	return customizer -> customizer
				.authorizationRequestUri(uriBuilder -> uriBuilder
					.queryParam("prompt", "consent").build());
}private fun authorizationRequestCustomizer(): Consumer<OAuth2AuthorizationRequest.Builder> {
return Consumer { customizer: OAuth2AuthorizationRequest.Builder ->
customizer
.authorizationRequestUri { uriBuilder: UriBuilder ->
uriBuilder
.queryParam("prompt", "consent").build()
}
}
}Storing the Authorization Request
The AuthorizationRequestRepository is responsible for the persistence of the OAuth2AuthorizationRequest from the time the Authorization Request is initiated to the time the Authorization Response is received (the callback).
The OAuth2AuthorizationRequest is used to correlate and validate the Authorization Response.
|
The default implementation of AuthorizationRequestRepository is HttpSessionOAuth2AuthorizationRequestRepository, which stores the OAuth2AuthorizationRequest in the HttpSession.
If you have a custom implementation of AuthorizationRequestRepository, you may configure it as shown in the following example:
@EnableWebSecurity
public class OAuth2ClientSecurityConfig extends WebSecurityConfigurerAdapter {

	@Override
	protected void configure(HttpSecurity http) throws Exception {
		http
			.oauth2Client(oauth2 -> oauth2
				.authorizationCodeGrant(codeGrant -> codeGrant
					.authorizationRequestRepository(this.authorizationRequestRepository())
					...
				)
			);
	}
}@EnableWebSecurity
class OAuth2ClientSecurityConfig : WebSecurityConfigurerAdapter() {
override fun configure(http: HttpSecurity) {
http {
oauth2Client {
authorizationCodeGrant {
authorizationRequestRepository = authorizationRequestRepository()
}
}
}
}
}<http>
<oauth2-client>
<authorization-code-grant authorization-request-repository-ref="authorizationRequestRepository"/>
</oauth2-client>
</http>Requesting an Access Token
| Please refer to the Access Token Request/Response protocol flow for the Authorization Code grant. |
The default implementation of OAuth2AccessTokenResponseClient for the Authorization Code grant is DefaultAuthorizationCodeTokenResponseClient, which uses a RestOperations for exchanging an authorization code for an access token at the Authorization Server’s Token Endpoint.
The DefaultAuthorizationCodeTokenResponseClient is quite flexible as it allows you to customize the pre-processing of the Token Request and/or post-handling of the Token Response.
Customizing the Access Token Request
If you need to customize the pre-processing of the Token Request, you can provide DefaultAuthorizationCodeTokenResponseClient.setRequestEntityConverter() with a custom Converter<OAuth2AuthorizationCodeGrantRequest, RequestEntity<?>>.
The default implementation OAuth2AuthorizationCodeGrantRequestEntityConverter builds a RequestEntity representation of a standard OAuth 2.0 Access Token Request.
However, providing a custom Converter, would allow you to extend the standard Token Request and add custom parameter(s).
The custom Converter must return a valid RequestEntity representation of an OAuth 2.0 Access Token Request that is understood by the intended OAuth 2.0 Provider.
|
Customizing the Access Token Response
On the other end, if you need to customize the post-handling of the Token Response, you will need to provide DefaultAuthorizationCodeTokenResponseClient.setRestOperations() with a custom configured RestOperations.
The default RestOperations is configured as follows:
RestTemplate restTemplate = new RestTemplate(Arrays.asList(
		new FormHttpMessageConverter(),
		new OAuth2AccessTokenResponseHttpMessageConverter()));

restTemplate.setErrorHandler(new OAuth2ErrorResponseErrorHandler());val restTemplate = RestTemplate(listOf(
FormHttpMessageConverter(),
OAuth2AccessTokenResponseHttpMessageConverter()))
restTemplate.errorHandler = OAuth2ErrorResponseErrorHandler()
Spring MVC FormHttpMessageConverter is required as it’s used when sending the OAuth 2.0 Access Token Request.
|
OAuth2AccessTokenResponseHttpMessageConverter is a HttpMessageConverter for an OAuth 2.0 Access Token Response.
You can provide OAuth2AccessTokenResponseHttpMessageConverter.setTokenResponseConverter() with a custom Converter<Map<String, String>, OAuth2AccessTokenResponse> that is used for converting the OAuth 2.0 Access Token Response parameters to an OAuth2AccessTokenResponse.
OAuth2ErrorResponseErrorHandler is a ResponseErrorHandler that can handle an OAuth 2.0 Error, eg. 400 Bad Request.
It uses an OAuth2ErrorHttpMessageConverter for converting the OAuth 2.0 Error parameters to an OAuth2Error.
Whether you customize DefaultAuthorizationCodeTokenResponseClient or provide your own implementation of OAuth2AccessTokenResponseClient, you’ll need to configure it as shown in the following example:
@EnableWebSecurity
public class OAuth2ClientSecurityConfig extends WebSecurityConfigurerAdapter {

	@Override
	protected void configure(HttpSecurity http) throws Exception {
		http
			.oauth2Client(oauth2 -> oauth2
				.authorizationCodeGrant(codeGrant -> codeGrant
					.accessTokenResponseClient(this.accessTokenResponseClient())
					...
				)
			);
	}
}@EnableWebSecurity
class OAuth2ClientSecurityConfig : WebSecurityConfigurerAdapter() {
override fun configure(http: HttpSecurity) {
http {
oauth2Client {
authorizationCodeGrant {
accessTokenResponseClient = accessTokenResponseClient()
}
}
}
}
}<http>
<oauth2-client>
<authorization-code-grant access-token-response-client-ref="accessTokenResponseClient"/>
</oauth2-client>
</http>Refresh Token
| Please refer to the OAuth 2.0 Authorization Framework for further details on the Refresh Token. |
Refreshing an Access Token
| Please refer to the Access Token Request/Response protocol flow for the Refresh Token grant. |
The default implementation of OAuth2AccessTokenResponseClient for the Refresh Token grant is DefaultRefreshTokenTokenResponseClient, which uses a RestOperations when refreshing an access token at the Authorization Server’s Token Endpoint.
The DefaultRefreshTokenTokenResponseClient is quite flexible as it allows you to customize the pre-processing of the Token Request and/or post-handling of the Token Response.
Customizing the Access Token Request
If you need to customize the pre-processing of the Token Request, you can provide DefaultRefreshTokenTokenResponseClient.setRequestEntityConverter() with a custom Converter<OAuth2RefreshTokenGrantRequest, RequestEntity<?>>.
The default implementation OAuth2RefreshTokenGrantRequestEntityConverter builds a RequestEntity representation of a standard OAuth 2.0 Access Token Request.
However, providing a custom Converter, would allow you to extend the standard Token Request and add custom parameter(s).
The custom Converter must return a valid RequestEntity representation of an OAuth 2.0 Access Token Request that is understood by the intended OAuth 2.0 Provider.
|
Customizing the Access Token Response
On the other end, if you need to customize the post-handling of the Token Response, you will need to provide DefaultRefreshTokenTokenResponseClient.setRestOperations() with a custom configured RestOperations.
The default RestOperations is configured as follows:
RestTemplate restTemplate = new RestTemplate(Arrays.asList(
		new FormHttpMessageConverter(),
		new OAuth2AccessTokenResponseHttpMessageConverter()));

restTemplate.setErrorHandler(new OAuth2ErrorResponseErrorHandler());val restTemplate = RestTemplate(listOf(
FormHttpMessageConverter(),
OAuth2AccessTokenResponseHttpMessageConverter()))
restTemplate.errorHandler = OAuth2ErrorResponseErrorHandler()
Spring MVC FormHttpMessageConverter is required as it’s used when sending the OAuth 2.0 Access Token Request.
|
OAuth2AccessTokenResponseHttpMessageConverter is a HttpMessageConverter for an OAuth 2.0 Access Token Response.
You can provide OAuth2AccessTokenResponseHttpMessageConverter.setTokenResponseConverter() with a custom Converter<Map<String, String>, OAuth2AccessTokenResponse> that is used for converting the OAuth 2.0 Access Token Response parameters to an OAuth2AccessTokenResponse.
OAuth2ErrorResponseErrorHandler is a ResponseErrorHandler that can handle an OAuth 2.0 Error, eg. 400 Bad Request.
It uses an OAuth2ErrorHttpMessageConverter for converting the OAuth 2.0 Error parameters to an OAuth2Error.
Whether you customize DefaultRefreshTokenTokenResponseClient or provide your own implementation of OAuth2AccessTokenResponseClient, you’ll need to configure it as shown in the following example:
// Customize
OAuth2AccessTokenResponseClient<OAuth2RefreshTokenGrantRequest> refreshTokenTokenResponseClient = ...

OAuth2AuthorizedClientProvider authorizedClientProvider =
		OAuth2AuthorizedClientProviderBuilder.builder()
				.authorizationCode()
				.refreshToken(configurer -> configurer.accessTokenResponseClient(refreshTokenTokenResponseClient))
				.build();

...

authorizedClientManager.setAuthorizedClientProvider(authorizedClientProvider);// Customize
val refreshTokenTokenResponseClient: OAuth2AccessTokenResponseClient<OAuth2RefreshTokenGrantRequest> = ...
val authorizedClientProvider = OAuth2AuthorizedClientProviderBuilder.builder()
.authorizationCode()
.refreshToken { it.accessTokenResponseClient(refreshTokenTokenResponseClient) }
.build()
...
authorizedClientManager.setAuthorizedClientProvider(authorizedClientProvider)
OAuth2AuthorizedClientProviderBuilder.builder().refreshToken() configures a RefreshTokenOAuth2AuthorizedClientProvider,
which is an implementation of an OAuth2AuthorizedClientProvider for the Refresh Token grant.
|
The OAuth2RefreshToken may optionally be returned in the Access Token Response for the authorization_code and password grant types.
If the OAuth2AuthorizedClient.getRefreshToken() is available and the OAuth2AuthorizedClient.getAccessToken() is expired, it will automatically be refreshed by the RefreshTokenOAuth2AuthorizedClientProvider.
Client Credentials
| Please refer to the OAuth 2.0 Authorization Framework for further details on the Client Credentials grant. |
Requesting an Access Token
| Please refer to the Access Token Request/Response protocol flow for the Client Credentials grant. |
The default implementation of OAuth2AccessTokenResponseClient for the Client Credentials grant is DefaultClientCredentialsTokenResponseClient, which uses a RestOperations when requesting an access token at the Authorization Server’s Token Endpoint.
The DefaultClientCredentialsTokenResponseClient is quite flexible as it allows you to customize the pre-processing of the Token Request and/or post-handling of the Token Response.
Customizing the Access Token Request
If you need to customize the pre-processing of the Token Request, you can provide DefaultClientCredentialsTokenResponseClient.setRequestEntityConverter() with a custom Converter<OAuth2ClientCredentialsGrantRequest, RequestEntity<?>>.
The default implementation OAuth2ClientCredentialsGrantRequestEntityConverter builds a RequestEntity representation of a standard OAuth 2.0 Access Token Request.
However, providing a custom Converter, would allow you to extend the standard Token Request and add custom parameter(s).
The custom Converter must return a valid RequestEntity representation of an OAuth 2.0 Access Token Request that is understood by the intended OAuth 2.0 Provider.
|
Customizing the Access Token Response
On the other end, if you need to customize the post-handling of the Token Response, you will need to provide DefaultClientCredentialsTokenResponseClient.setRestOperations() with a custom configured RestOperations.
The default RestOperations is configured as follows:
RestTemplate restTemplate = new RestTemplate(Arrays.asList(
		new FormHttpMessageConverter(),
		new OAuth2AccessTokenResponseHttpMessageConverter()));

restTemplate.setErrorHandler(new OAuth2ErrorResponseErrorHandler());val restTemplate = RestTemplate(listOf(
FormHttpMessageConverter(),
OAuth2AccessTokenResponseHttpMessageConverter()))
restTemplate.errorHandler = OAuth2ErrorResponseErrorHandler()
Spring MVC FormHttpMessageConverter is required as it’s used when sending the OAuth 2.0 Access Token Request.
|
OAuth2AccessTokenResponseHttpMessageConverter is a HttpMessageConverter for an OAuth 2.0 Access Token Response.
You can provide OAuth2AccessTokenResponseHttpMessageConverter.setTokenResponseConverter() with a custom Converter<Map<String, String>, OAuth2AccessTokenResponse> that is used for converting the OAuth 2.0 Access Token Response parameters to an OAuth2AccessTokenResponse.
OAuth2ErrorResponseErrorHandler is a ResponseErrorHandler that can handle an OAuth 2.0 Error, eg. 400 Bad Request.
It uses an OAuth2ErrorHttpMessageConverter for converting the OAuth 2.0 Error parameters to an OAuth2Error.
Whether you customize DefaultClientCredentialsTokenResponseClient or provide your own implementation of OAuth2AccessTokenResponseClient, you’ll need to configure it as shown in the following example:
// Customize
OAuth2AccessTokenResponseClient<OAuth2ClientCredentialsGrantRequest> clientCredentialsTokenResponseClient = ...

OAuth2AuthorizedClientProvider authorizedClientProvider =
		OAuth2AuthorizedClientProviderBuilder.builder()
				.clientCredentials(configurer -> configurer.accessTokenResponseClient(clientCredentialsTokenResponseClient))
				.build();

...

authorizedClientManager.setAuthorizedClientProvider(authorizedClientProvider);// Customize
val clientCredentialsTokenResponseClient: OAuth2AccessTokenResponseClient<OAuth2ClientCredentialsGrantRequest> = ...
val authorizedClientProvider = OAuth2AuthorizedClientProviderBuilder.builder()
.clientCredentials { it.accessTokenResponseClient(clientCredentialsTokenResponseClient) }
.build()
...
authorizedClientManager.setAuthorizedClientProvider(authorizedClientProvider)
OAuth2AuthorizedClientProviderBuilder.builder().clientCredentials() configures a ClientCredentialsOAuth2AuthorizedClientProvider,
which is an implementation of an OAuth2AuthorizedClientProvider for the Client Credentials grant.
|
Using the Access Token
Given the following Spring Boot 2.x properties for an OAuth 2.0 Client registration:
spring:
  security:
    oauth2:
      client:
        registration:
          okta:
            client-id: okta-client-id
            client-secret: okta-client-secret
            authorization-grant-type: client_credentials
            scope: read, write
        provider:
          okta:
token-uri: https://dev-1234.oktapreview.com/oauth2/v1/token…and the OAuth2AuthorizedClientManager @Bean:
@Bean
public OAuth2AuthorizedClientManager authorizedClientManager(
		ClientRegistrationRepository clientRegistrationRepository,
		OAuth2AuthorizedClientRepository authorizedClientRepository) {

	OAuth2AuthorizedClientProvider authorizedClientProvider =
			OAuth2AuthorizedClientProviderBuilder.builder()
					.clientCredentials()
					.build();

	DefaultOAuth2AuthorizedClientManager authorizedClientManager =
			new DefaultOAuth2AuthorizedClientManager(
					clientRegistrationRepository, authorizedClientRepository);
	authorizedClientManager.setAuthorizedClientProvider(authorizedClientProvider);

	return authorizedClientManager;
}@Bean
fun authorizedClientManager(
clientRegistrationRepository: ClientRegistrationRepository,
authorizedClientRepository: OAuth2AuthorizedClientRepository): OAuth2AuthorizedClientManager {
val authorizedClientProvider = OAuth2AuthorizedClientProviderBuilder.builder()
.clientCredentials()
.build()
val authorizedClientManager = DefaultOAuth2AuthorizedClientManager(
clientRegistrationRepository, authorizedClientRepository)
authorizedClientManager.setAuthorizedClientProvider(authorizedClientProvider)
return authorizedClientManager
}You may obtain the OAuth2AccessToken as follows:
@Controller
public class OAuth2ClientController {

	@Autowired
	private OAuth2AuthorizedClientManager authorizedClientManager;

	@GetMapping("/")
	public String index(Authentication authentication,
						HttpServletRequest servletRequest,
						HttpServletResponse servletResponse) {

		OAuth2AuthorizeRequest authorizeRequest = OAuth2AuthorizeRequest.withClientRegistrationId("okta")
				.principal(authentication)
				.attributes(attrs -> {
					attrs.put(HttpServletRequest.class.getName(), servletRequest);
					attrs.put(HttpServletResponse.class.getName(), servletResponse);
				})
				.build();
		OAuth2AuthorizedClient authorizedClient = this.authorizedClientManager.authorize(authorizeRequest);

		OAuth2AccessToken accessToken = authorizedClient.getAccessToken();

		...

		return "index";
	}
}class OAuth2ClientController {
@Autowired
private lateinit var authorizedClientManager: OAuth2AuthorizedClientManager
@GetMapping("/")
fun index(authentication: Authentication?,
servletRequest: HttpServletRequest,
servletResponse: HttpServletResponse): String {
val authorizeRequest: OAuth2AuthorizeRequest = OAuth2AuthorizeRequest.withClientRegistrationId("okta")
.principal(authentication)
.attributes(Consumer { attrs: MutableMap<String, Any> ->
attrs[HttpServletRequest::class.java.name] = servletRequest
attrs[HttpServletResponse::class.java.name] = servletResponse
})
.build()
val authorizedClient = authorizedClientManager.authorize(authorizeRequest)
val accessToken: OAuth2AccessToken = authorizedClient.accessToken
...
return "index"
}
}
HttpServletRequest and HttpServletResponse are both OPTIONAL attributes.
If not provided, it will default to ServletRequestAttributes using RequestContextHolder.getRequestAttributes().
|
Resource Owner Password Credentials
| Please refer to the OAuth 2.0 Authorization Framework for further details on the Resource Owner Password Credentials grant. |
Requesting an Access Token
| Please refer to the Access Token Request/Response protocol flow for the Resource Owner Password Credentials grant. |
The default implementation of OAuth2AccessTokenResponseClient for the Resource Owner Password Credentials grant is DefaultPasswordTokenResponseClient, which uses a RestOperations when requesting an access token at the Authorization Server’s Token Endpoint.
The DefaultPasswordTokenResponseClient is quite flexible as it allows you to customize the pre-processing of the Token Request and/or post-handling of the Token Response.
Customizing the Access Token Request
If you need to customize the pre-processing of the Token Request, you can provide DefaultPasswordTokenResponseClient.setRequestEntityConverter() with a custom Converter<OAuth2PasswordGrantRequest, RequestEntity<?>>.
The default implementation OAuth2PasswordGrantRequestEntityConverter builds a RequestEntity representation of a standard OAuth 2.0 Access Token Request.
However, providing a custom Converter, would allow you to extend the standard Token Request and add custom parameter(s).
The custom Converter must return a valid RequestEntity representation of an OAuth 2.0 Access Token Request that is understood by the intended OAuth 2.0 Provider.
|
Customizing the Access Token Response
On the other end, if you need to customize the post-handling of the Token Response, you will need to provide DefaultPasswordTokenResponseClient.setRestOperations() with a custom configured RestOperations.
The default RestOperations is configured as follows:
RestTemplate restTemplate = new RestTemplate(Arrays.asList(
		new FormHttpMessageConverter(),
		new OAuth2AccessTokenResponseHttpMessageConverter()));

restTemplate.setErrorHandler(new OAuth2ErrorResponseErrorHandler());val restTemplate = RestTemplate(listOf(
FormHttpMessageConverter(),
OAuth2AccessTokenResponseHttpMessageConverter()))
restTemplate.errorHandler = OAuth2ErrorResponseErrorHandler()
Spring MVC FormHttpMessageConverter is required as it’s used when sending the OAuth 2.0 Access Token Request.
|
OAuth2AccessTokenResponseHttpMessageConverter is a HttpMessageConverter for an OAuth 2.0 Access Token Response.
You can provide OAuth2AccessTokenResponseHttpMessageConverter.setTokenResponseConverter() with a custom Converter<Map<String, String>, OAuth2AccessTokenResponse> that is used for converting the OAuth 2.0 Access Token Response parameters to an OAuth2AccessTokenResponse.
OAuth2ErrorResponseErrorHandler is a ResponseErrorHandler that can handle an OAuth 2.0 Error, eg. 400 Bad Request.
It uses an OAuth2ErrorHttpMessageConverter for converting the OAuth 2.0 Error parameters to an OAuth2Error.
Whether you customize DefaultPasswordTokenResponseClient or provide your own implementation of OAuth2AccessTokenResponseClient, you’ll need to configure it as shown in the following example:
// Customize
OAuth2AccessTokenResponseClient<OAuth2PasswordGrantRequest> passwordTokenResponseClient = ...

OAuth2AuthorizedClientProvider authorizedClientProvider =
		OAuth2AuthorizedClientProviderBuilder.builder()
				.password(configurer -> configurer.accessTokenResponseClient(passwordTokenResponseClient))
				.refreshToken()
				.build();

...

authorizedClientManager.setAuthorizedClientProvider(authorizedClientProvider);val passwordTokenResponseClient: OAuth2AccessTokenResponseClient<OAuth2PasswordGrantRequest> = ...
val authorizedClientProvider = OAuth2AuthorizedClientProviderBuilder.builder()
.password { it.accessTokenResponseClient(passwordTokenResponseClient) }
.refreshToken()
.build()
...
authorizedClientManager.setAuthorizedClientProvider(authorizedClientProvider)
OAuth2AuthorizedClientProviderBuilder.builder().password() configures a PasswordOAuth2AuthorizedClientProvider,
which is an implementation of an OAuth2AuthorizedClientProvider for the Resource Owner Password Credentials grant.
|
Using the Access Token
Given the following Spring Boot 2.x properties for an OAuth 2.0 Client registration:
spring:
  security:
    oauth2:
      client:
        registration:
          okta:
            client-id: okta-client-id
            client-secret: okta-client-secret
            authorization-grant-type: password
            scope: read, write
        provider:
          okta:
token-uri: https://dev-1234.oktapreview.com/oauth2/v1/token…and the OAuth2AuthorizedClientManager @Bean:
@Bean
public OAuth2AuthorizedClientManager authorizedClientManager(
		ClientRegistrationRepository clientRegistrationRepository,
		OAuth2AuthorizedClientRepository authorizedClientRepository) {

	OAuth2AuthorizedClientProvider authorizedClientProvider =
			OAuth2AuthorizedClientProviderBuilder.builder()
					.password()
					.refreshToken()
					.build();

	DefaultOAuth2AuthorizedClientManager authorizedClientManager =
			new DefaultOAuth2AuthorizedClientManager(
					clientRegistrationRepository, authorizedClientRepository);
	authorizedClientManager.setAuthorizedClientProvider(authorizedClientProvider);

	// Assuming the `username` and `password` are supplied as `HttpServletRequest` parameters,
	// map the `HttpServletRequest` parameters to `OAuth2AuthorizationContext.getAttributes()`
	authorizedClientManager.setContextAttributesMapper(contextAttributesMapper());

	return authorizedClientManager;
}

private Function<OAuth2AuthorizeRequest, Map<String, Object>> contextAttributesMapper() {
	return authorizeRequest -> {
		Map<String, Object> contextAttributes = Collections.emptyMap();
		HttpServletRequest servletRequest = authorizeRequest.getAttribute(HttpServletRequest.class.getName());
		String username = servletRequest.getParameter(OAuth2ParameterNames.USERNAME);
		String password = servletRequest.getParameter(OAuth2ParameterNames.PASSWORD);
		if (StringUtils.hasText(username) && StringUtils.hasText(password)) {
			contextAttributes = new HashMap<>();

			// `PasswordOAuth2AuthorizedClientProvider` requires both attributes
			contextAttributes.put(OAuth2AuthorizationContext.USERNAME_ATTRIBUTE_NAME, username);
			contextAttributes.put(OAuth2AuthorizationContext.PASSWORD_ATTRIBUTE_NAME, password);
		}
		return contextAttributes;
	};
}@Bean
fun authorizedClientManager(
clientRegistrationRepository: ClientRegistrationRepository,
authorizedClientRepository: OAuth2AuthorizedClientRepository): OAuth2AuthorizedClientManager {
val authorizedClientProvider = OAuth2AuthorizedClientProviderBuilder.builder()
.password()
.refreshToken()
.build()
val authorizedClientManager = DefaultOAuth2AuthorizedClientManager(
clientRegistrationRepository, authorizedClientRepository)
authorizedClientManager.setAuthorizedClientProvider(authorizedClientProvider)
// Assuming the `username` and `password` are supplied as `HttpServletRequest` parameters,
// map the `HttpServletRequest` parameters to `OAuth2AuthorizationContext.getAttributes()`
authorizedClientManager.setContextAttributesMapper(contextAttributesMapper())
return authorizedClientManager
}
private fun contextAttributesMapper(): Function<OAuth2AuthorizeRequest, MutableMap<String, Any>> {
return Function { authorizeRequest ->
var contextAttributes: MutableMap<String, Any> = mutableMapOf()
val servletRequest: HttpServletRequest = authorizeRequest.getAttribute(HttpServletRequest::class.java.name)
val username = servletRequest.getParameter(OAuth2ParameterNames.USERNAME)
val password = servletRequest.getParameter(OAuth2ParameterNames.PASSWORD)
if (StringUtils.hasText(username) && StringUtils.hasText(password)) {
contextAttributes = hashMapOf()
// `PasswordOAuth2AuthorizedClientProvider` requires both attributes
contextAttributes[OAuth2AuthorizationContext.USERNAME_ATTRIBUTE_NAME] = username
contextAttributes[OAuth2AuthorizationContext.PASSWORD_ATTRIBUTE_NAME] = password
}
contextAttributes
}
}You may obtain the OAuth2AccessToken as follows:
@Controller
public class OAuth2ClientController {

	@Autowired
	private OAuth2AuthorizedClientManager authorizedClientManager;

	@GetMapping("/")
	public String index(Authentication authentication,
						HttpServletRequest servletRequest,
						HttpServletResponse servletResponse) {

		OAuth2AuthorizeRequest authorizeRequest = OAuth2AuthorizeRequest.withClientRegistrationId("okta")
				.principal(authentication)
				.attributes(attrs -> {
					attrs.put(HttpServletRequest.class.getName(), servletRequest);
					attrs.put(HttpServletResponse.class.getName(), servletResponse);
				})
				.build();
		OAuth2AuthorizedClient authorizedClient = this.authorizedClientManager.authorize(authorizeRequest);

		OAuth2AccessToken accessToken = authorizedClient.getAccessToken();

		...

		return "index";
	}
}@Controller
class OAuth2ClientController {
@Autowired
private lateinit var authorizedClientManager: OAuth2AuthorizedClientManager
@GetMapping("/")
fun index(authentication: Authentication?,
servletRequest: HttpServletRequest,
servletResponse: HttpServletResponse): String {
val authorizeRequest: OAuth2AuthorizeRequest = OAuth2AuthorizeRequest.withClientRegistrationId("okta")
.principal(authentication)
.attributes(Consumer {
it[HttpServletRequest::class.java.name] = servletRequest
it[HttpServletResponse::class.java.name] = servletResponse
})
.build()
val authorizedClient = authorizedClientManager.authorize(authorizeRequest)
val accessToken: OAuth2AccessToken = authorizedClient.accessToken
...
return "index"
}
}
HttpServletRequest and HttpServletResponse are both OPTIONAL attributes.
If not provided, it will default to ServletRequestAttributes using RequestContextHolder.getRequestAttributes().
|
JWT Bearer
| Please refer to JSON Web Token (JWT) Profile for OAuth 2.0 Client Authentication and Authorization Grants for further details on the JWT Bearer grant. |
Requesting an Access Token
| Please refer to the Access Token Request/Response protocol flow for the JWT Bearer grant. |
The default implementation of OAuth2AccessTokenResponseClient for the JWT Bearer grant is DefaultJwtBearerTokenResponseClient, which uses a RestOperations when requesting an access token at the Authorization Server’s Token Endpoint.
The DefaultJwtBearerTokenResponseClient is quite flexible as it allows you to customize the pre-processing of the Token Request and/or post-handling of the Token Response.
Customizing the Access Token Request
If you need to customize the pre-processing of the Token Request, you can provide DefaultJwtBearerTokenResponseClient.setRequestEntityConverter() with a custom Converter<JwtBearerGrantRequest, RequestEntity<?>>.
The default implementation JwtBearerGrantRequestEntityConverter builds a RequestEntity representation of a OAuth 2.0 Access Token Request.
However, providing a custom Converter, would allow you to extend the Token Request and add custom parameter(s).
Customizing the Access Token Response
On the other end, if you need to customize the post-handling of the Token Response, you will need to provide DefaultJwtBearerTokenResponseClient.setRestOperations() with a custom configured RestOperations.
The default RestOperations is configured as follows:
RestTemplate restTemplate = new RestTemplate(Arrays.asList(
		new FormHttpMessageConverter(),
		new OAuth2AccessTokenResponseHttpMessageConverter()));

restTemplate.setErrorHandler(new OAuth2ErrorResponseErrorHandler());val restTemplate = RestTemplate(listOf(
FormHttpMessageConverter(),
OAuth2AccessTokenResponseHttpMessageConverter()))
restTemplate.errorHandler = OAuth2ErrorResponseErrorHandler()
Spring MVC FormHttpMessageConverter is required as it’s used when sending the OAuth 2.0 Access Token Request.
|
OAuth2AccessTokenResponseHttpMessageConverter is a HttpMessageConverter for an OAuth 2.0 Access Token Response.
You can provide OAuth2AccessTokenResponseHttpMessageConverter.setTokenResponseConverter() with a custom Converter<Map<String, String>, OAuth2AccessTokenResponse> that is used for converting the OAuth 2.0 Access Token Response parameters to an OAuth2AccessTokenResponse.
OAuth2ErrorResponseErrorHandler is a ResponseErrorHandler that can handle an OAuth 2.0 Error, eg. 400 Bad Request.
It uses an OAuth2ErrorHttpMessageConverter for converting the OAuth 2.0 Error parameters to an OAuth2Error.
Whether you customize DefaultJwtBearerTokenResponseClient or provide your own implementation of OAuth2AccessTokenResponseClient, you’ll need to configure it as shown in the following example:
// Customize
OAuth2AccessTokenResponseClient<JwtBearerGrantRequest> jwtBearerTokenResponseClient = ...

JwtBearerOAuth2AuthorizedClientProvider jwtBearerAuthorizedClientProvider = new JwtBearerOAuth2AuthorizedClientProvider();
jwtBearerAuthorizedClientProvider.setAccessTokenResponseClient(jwtBearerTokenResponseClient);

OAuth2AuthorizedClientProvider authorizedClientProvider =
		OAuth2AuthorizedClientProviderBuilder.builder()
				.provider(jwtBearerAuthorizedClientProvider)
				.build();

...

authorizedClientManager.setAuthorizedClientProvider(authorizedClientProvider);// Customize
val jwtBearerTokenResponseClient: OAuth2AccessTokenResponseClient<JwtBearerGrantRequest> = ...
val jwtBearerAuthorizedClientProvider = JwtBearerOAuth2AuthorizedClientProvider()
jwtBearerAuthorizedClientProvider.setAccessTokenResponseClient(jwtBearerTokenResponseClient);
val authorizedClientProvider = OAuth2AuthorizedClientProviderBuilder.builder()
.provider(jwtBearerAuthorizedClientProvider)
.build()
...
authorizedClientManager.setAuthorizedClientProvider(authorizedClientProvider)Using the Access Token
Given the following Spring Boot 2.x properties for an OAuth 2.0 Client registration:
spring:
  security:
    oauth2:
      client:
        registration:
          okta:
            client-id: okta-client-id
            client-secret: okta-client-secret
            authorization-grant-type: urn:ietf:params:oauth:grant-type:jwt-bearer
            scope: read
        provider:
          okta:
token-uri: https://dev-1234.oktapreview.com/oauth2/v1/token…and the OAuth2AuthorizedClientManager @Bean:
@Bean
public OAuth2AuthorizedClientManager authorizedClientManager(
		ClientRegistrationRepository clientRegistrationRepository,
		OAuth2AuthorizedClientRepository authorizedClientRepository) {

	JwtBearerOAuth2AuthorizedClientProvider jwtBearerAuthorizedClientProvider =
			new JwtBearerOAuth2AuthorizedClientProvider();

	OAuth2AuthorizedClientProvider authorizedClientProvider =
			OAuth2AuthorizedClientProviderBuilder.builder()
					.provider(jwtBearerAuthorizedClientProvider)
					.build();

	DefaultOAuth2AuthorizedClientManager authorizedClientManager =
			new DefaultOAuth2AuthorizedClientManager(
					clientRegistrationRepository, authorizedClientRepository);
	authorizedClientManager.setAuthorizedClientProvider(authorizedClientProvider);

	return authorizedClientManager;
}@Bean
fun authorizedClientManager(
clientRegistrationRepository: ClientRegistrationRepository,
authorizedClientRepository: OAuth2AuthorizedClientRepository): OAuth2AuthorizedClientManager {
val jwtBearerAuthorizedClientProvider = JwtBearerOAuth2AuthorizedClientProvider()
val authorizedClientProvider = OAuth2AuthorizedClientProviderBuilder.builder()
.provider(jwtBearerAuthorizedClientProvider)
.build()
val authorizedClientManager = DefaultOAuth2AuthorizedClientManager(
clientRegistrationRepository, authorizedClientRepository)
authorizedClientManager.setAuthorizedClientProvider(authorizedClientProvider)
return authorizedClientManager
}You may obtain the OAuth2AccessToken as follows:
@RestController
public class OAuth2ResourceServerController {

	@Autowired
	private OAuth2AuthorizedClientManager authorizedClientManager;

	@GetMapping("/resource")
	public String resource(JwtAuthenticationToken jwtAuthentication) {
		OAuth2AuthorizeRequest authorizeRequest = OAuth2AuthorizeRequest.withClientRegistrationId("okta")
				.principal(jwtAuthentication)
				.build();
		OAuth2AuthorizedClient authorizedClient = this.authorizedClientManager.authorize(authorizeRequest);
		OAuth2AccessToken accessToken = authorizedClient.getAccessToken();

		...

	}
}class OAuth2ResourceServerController {
@Autowired
private lateinit var authorizedClientManager: OAuth2AuthorizedClientManager
@GetMapping("/resource")
fun resource(jwtAuthentication: JwtAuthenticationToken?): String {
val authorizeRequest: OAuth2AuthorizeRequest = OAuth2AuthorizeRequest.withClientRegistrationId("okta")
.principal(jwtAuthentication)
.build()
val authorizedClient = authorizedClientManager.authorize(authorizeRequest)
val accessToken: OAuth2AccessToken = authorizedClient.accessToken
...
}
}Client Authentication Support
JWT Bearer
| Please refer to JSON Web Token (JWT) Profile for OAuth 2.0 Client Authentication and Authorization Grants for further details on JWT Bearer Client Authentication. |
The default implementation for JWT Bearer Client Authentication is NimbusJwtClientAuthenticationParametersConverter,
which is a Converter that customizes the Token Request parameters by adding
a signed JSON Web Token (JWS) in the client_assertion parameter.
The java.security.PrivateKey or javax.crypto.SecretKey used for signing the JWS
is supplied by the com.nimbusds.jose.jwk.JWK resolver associated with NimbusJwtClientAuthenticationParametersConverter.
Authenticate using private_key_jwt
Given the following Spring Boot 2.x properties for an OAuth 2.0 Client registration:
spring:
  security:
    oauth2:
      client:
        registration:
          okta:
            client-id: okta-client-id
            client-authentication-method: private_key_jwt
            authorization-grant-type: authorization_code
            ...
The following example shows how to configure DefaultAuthorizationCodeTokenResponseClient:
Function<ClientRegistration, JWK> jwkResolver = (clientRegistration) -> {
	if (clientRegistration.getClientAuthenticationMethod().equals(ClientAuthenticationMethod.PRIVATE_KEY_JWT)) {
		// Assuming RSA key type
		RSAPublicKey publicKey = ...
		RSAPrivateKey privateKey = ...
		return new RSAKey.Builder(publicKey)
				.privateKey(privateKey)
				.keyID(UUID.randomUUID().toString())
				.build();
	}
	return null;
};

OAuth2AuthorizationCodeGrantRequestEntityConverter requestEntityConverter =
		new OAuth2AuthorizationCodeGrantRequestEntityConverter();
requestEntityConverter.addParametersConverter(
		new NimbusJwtClientAuthenticationParametersConverter<>(jwkResolver));

DefaultAuthorizationCodeTokenResponseClient tokenResponseClient =
		new DefaultAuthorizationCodeTokenResponseClient();
tokenResponseClient.setRequestEntityConverter(requestEntityConverter);val jwkResolver: Function<ClientRegistration, JWK> =
Function<ClientRegistration, JWK> { clientRegistration ->
if (clientRegistration.clientAuthenticationMethod.equals(ClientAuthenticationMethod.PRIVATE_KEY_JWT)) {
// Assuming RSA key type
var publicKey: RSAPublicKey
var privateKey: RSAPrivateKey
RSAKey.Builder(publicKey) = //...
.privateKey(privateKey) = //...
.keyID(UUID.randomUUID().toString())
.build()
}
null
}
val requestEntityConverter = OAuth2AuthorizationCodeGrantRequestEntityConverter()
requestEntityConverter.addParametersConverter(
NimbusJwtClientAuthenticationParametersConverter(jwkResolver)
)
val tokenResponseClient = DefaultAuthorizationCodeTokenResponseClient()
tokenResponseClient.setRequestEntityConverter(requestEntityConverter)Authenticate using client_secret_jwt
Given the following Spring Boot 2.x properties for an OAuth 2.0 Client registration:
spring:
  security:
    oauth2:
      client:
        registration:
          okta:
            client-id: okta-client-id
            client-secret: okta-client-secret
            client-authentication-method: client_secret_jwt
            authorization-grant-type: client_credentials
            ...
The following example shows how to configure DefaultClientCredentialsTokenResponseClient:
Function<ClientRegistration, JWK> jwkResolver = (clientRegistration) -> {
	if (clientRegistration.getClientAuthenticationMethod().equals(ClientAuthenticationMethod.CLIENT_SECRET_JWT)) {
		SecretKeySpec secretKey = new SecretKeySpec(
				clientRegistration.getClientSecret().getBytes(StandardCharsets.UTF_8),
				"HmacSHA256");
		return new OctetSequenceKey.Builder(secretKey)
				.keyID(UUID.randomUUID().toString())
				.build();
	}
	return null;
};

OAuth2ClientCredentialsGrantRequestEntityConverter requestEntityConverter =
		new OAuth2ClientCredentialsGrantRequestEntityConverter();
requestEntityConverter.addParametersConverter(
		new NimbusJwtClientAuthenticationParametersConverter<>(jwkResolver));

DefaultClientCredentialsTokenResponseClient tokenResponseClient =
		new DefaultClientCredentialsTokenResponseClient();
tokenResponseClient.setRequestEntityConverter(requestEntityConverter);val jwkResolver = Function<ClientRegistration, JWK?> { clientRegistration: ClientRegistration ->
if (clientRegistration.clientAuthenticationMethod == ClientAuthenticationMethod.CLIENT_SECRET_JWT) {
val secretKey = SecretKeySpec(
clientRegistration.clientSecret.toByteArray(StandardCharsets.UTF_8),
"HmacSHA256"
)
OctetSequenceKey.Builder(secretKey)
.keyID(UUID.randomUUID().toString())
.build()
}
null
}
val requestEntityConverter = OAuth2ClientCredentialsGrantRequestEntityConverter()
requestEntityConverter.addParametersConverter(
NimbusJwtClientAuthenticationParametersConverter(jwkResolver)
)
val tokenResponseClient = DefaultClientCredentialsTokenResponseClient()
tokenResponseClient.setRequestEntityConverter(requestEntityConverter)Additional Features
Resolving an Authorized Client
The @RegisteredOAuth2AuthorizedClient annotation provides the capability of resolving a method parameter to an argument value of type OAuth2AuthorizedClient.
This is a convenient alternative compared to accessing the OAuth2AuthorizedClient using the OAuth2AuthorizedClientManager or OAuth2AuthorizedClientService.
@Controller
public class OAuth2ClientController {

	@GetMapping("/")
	public String index(@RegisteredOAuth2AuthorizedClient("okta") OAuth2AuthorizedClient authorizedClient) {
		OAuth2AccessToken accessToken = authorizedClient.getAccessToken();

		...

		return "index";
	}
}@Controller
class OAuth2ClientController {
@GetMapping("/")
fun index(@RegisteredOAuth2AuthorizedClient("okta") authorizedClient: OAuth2AuthorizedClient): String {
val accessToken = authorizedClient.accessToken
...
return "index"
}
}The @RegisteredOAuth2AuthorizedClient annotation is handled by OAuth2AuthorizedClientArgumentResolver, which directly uses an OAuth2AuthorizedClientManager and therefore inherits it’s capabilities.
WebClient integration for Servlet Environments
The OAuth 2.0 Client support integrates with WebClient using an ExchangeFilterFunction.
The ServletOAuth2AuthorizedClientExchangeFilterFunction provides a simple mechanism for requesting protected resources by using an OAuth2AuthorizedClient and including the associated OAuth2AccessToken as a Bearer Token.
It directly uses an OAuth2AuthorizedClientManager and therefore inherits the following capabilities:
-
An
OAuth2AccessTokenwill be requested if the client has not yet been authorized.-
authorization_code- triggers the Authorization Request redirect to initiate the flow -
client_credentials- the access token is obtained directly from the Token Endpoint -
password- the access token is obtained directly from the Token Endpoint
-
-
If the
OAuth2AccessTokenis expired, it will be refreshed (or renewed) if anOAuth2AuthorizedClientProvideris available to perform the authorization
The following code shows an example of how to configure WebClient with OAuth 2.0 Client support:
@Bean
WebClient webClient(OAuth2AuthorizedClientManager authorizedClientManager) {
	ServletOAuth2AuthorizedClientExchangeFilterFunction oauth2Client =
			new ServletOAuth2AuthorizedClientExchangeFilterFunction(authorizedClientManager);
	return WebClient.builder()
			.apply(oauth2Client.oauth2Configuration())
			.build();
}@Bean
fun webClient(authorizedClientManager: OAuth2AuthorizedClientManager?): WebClient {
val oauth2Client = ServletOAuth2AuthorizedClientExchangeFilterFunction(authorizedClientManager)
return WebClient.builder()
.apply(oauth2Client.oauth2Configuration())
.build()
}Providing the Authorized Client
The ServletOAuth2AuthorizedClientExchangeFilterFunction determines the client to use (for a request) by resolving the OAuth2AuthorizedClient from the ClientRequest.attributes() (request attributes).
The following code shows how to set an OAuth2AuthorizedClient as a request attribute:
@GetMapping("/")
public String index(@RegisteredOAuth2AuthorizedClient("okta") OAuth2AuthorizedClient authorizedClient) {
	String resourceUri = ...

	String body = webClient
			.get()
			.uri(resourceUri)
			.attributes(oauth2AuthorizedClient(authorizedClient))   (1)
			.retrieve()
			.bodyToMono(String.class)
			.block();

	...

	return "index";
}@GetMapping("/")
fun index(@RegisteredOAuth2AuthorizedClient("okta") authorizedClient: OAuth2AuthorizedClient): String {
val resourceUri: String = ...
val body: String = webClient
.get()
.uri(resourceUri)
.attributes(oauth2AuthorizedClient(authorizedClient)) (1)
.retrieve()
.bodyToMono()
.block()
...
return "index"
}| 1 | oauth2AuthorizedClient() is a static method in ServletOAuth2AuthorizedClientExchangeFilterFunction. |
The following code shows how to set the ClientRegistration.getRegistrationId() as a request attribute:
@GetMapping("/")
public String index() {
	String resourceUri = ...

	String body = webClient
			.get()
			.uri(resourceUri)
			.attributes(clientRegistrationId("okta"))   (1)
			.retrieve()
			.bodyToMono(String.class)
			.block();

	...

	return "index";
}@GetMapping("/")
fun index(): String {
val resourceUri: String = ...
val body: String = webClient
.get()
.uri(resourceUri)
.attributes(clientRegistrationId("okta")) (1)
.retrieve()
.bodyToMono()
.block()
...
return "index"
}| 1 | clientRegistrationId() is a static method in ServletOAuth2AuthorizedClientExchangeFilterFunction. |
Defaulting the Authorized Client
If neither OAuth2AuthorizedClient or ClientRegistration.getRegistrationId() is provided as a request attribute, the ServletOAuth2AuthorizedClientExchangeFilterFunction can determine the default client to use depending on it’s configuration.
If setDefaultOAuth2AuthorizedClient(true) is configured and the user has authenticated using HttpSecurity.oauth2Login(), the OAuth2AccessToken associated with the current OAuth2AuthenticationToken is used.
The following code shows the specific configuration:
@Bean
WebClient webClient(OAuth2AuthorizedClientManager authorizedClientManager) {
	ServletOAuth2AuthorizedClientExchangeFilterFunction oauth2Client =
			new ServletOAuth2AuthorizedClientExchangeFilterFunction(authorizedClientManager);
	oauth2Client.setDefaultOAuth2AuthorizedClient(true);
	return WebClient.builder()
			.apply(oauth2Client.oauth2Configuration())
			.build();
}@Bean
fun webClient(authorizedClientManager: OAuth2AuthorizedClientManager?): WebClient {
val oauth2Client = ServletOAuth2AuthorizedClientExchangeFilterFunction(authorizedClientManager)
oauth2Client.setDefaultOAuth2AuthorizedClient(true)
return WebClient.builder()
.apply(oauth2Client.oauth2Configuration())
.build()
}| It is recommended to be cautious with this feature since all HTTP requests will receive the access token. |
Alternatively, if setDefaultClientRegistrationId("okta") is configured with a valid ClientRegistration, the OAuth2AccessToken associated with the OAuth2AuthorizedClient is used.
The following code shows the specific configuration:
@Bean
WebClient webClient(OAuth2AuthorizedClientManager authorizedClientManager) {
	ServletOAuth2AuthorizedClientExchangeFilterFunction oauth2Client =
			new ServletOAuth2AuthorizedClientExchangeFilterFunction(authorizedClientManager);
	oauth2Client.setDefaultClientRegistrationId("okta");
	return WebClient.builder()
			.apply(oauth2Client.oauth2Configuration())
			.build();
}@Bean
fun webClient(authorizedClientManager: OAuth2AuthorizedClientManager?): WebClient {
val oauth2Client = ServletOAuth2AuthorizedClientExchangeFilterFunction(authorizedClientManager)
oauth2Client.setDefaultClientRegistrationId("okta")
return WebClient.builder()
.apply(oauth2Client.oauth2Configuration())
.build()
}| It is recommended to be cautious with this feature since all HTTP requests will receive the access token. |
OAuth 2.0 Resource Server
Spring Security supports protecting endpoints using two forms of OAuth 2.0 Bearer Tokens:
-
Opaque Tokens
This is handy in circumstances where an application has delegated its authority management to an authorization server (for example, Okta or Ping Identity). This authorization server can be consulted by resource servers to authorize requests.
This section provides details on how Spring Security provides support for OAuth 2.0 Bearer Tokens.
|
Working samples for both {gh-samples-url}/servlet/spring-boot/java/oauth2/resource-server/jwe[JWTs] and {gh-samples-url}/servlet/spring-boot/java/oauth2/resource-server/opaque[Opaque Tokens] are available in the {gh-samples-url}[Spring Security Samples repository]. |
Let’s take a look at how Bearer Token Authentication works within Spring Security. First, we see that, like Basic Authentication, the WWW-Authenticate header is sent back to an unauthenticated client.

The figure above builds off our SecurityFilterChain diagram.
![]() First, a user makes an unauthenticated request to the resource
First, a user makes an unauthenticated request to the resource /private for which it is not authorized.
![]() Spring Security’s
Spring Security’s FilterSecurityInterceptor indicates that the unauthenticated request is Denied by throwing an AccessDeniedException.
![]() Since the user is not authenticated,
Since the user is not authenticated, ExceptionTranslationFilter initiates Start Authentication.
The configured AuthenticationEntryPoint is an instance of {security-api-url}org/springframework/security/oauth2/server/resource/web/BearerTokenAuthenticationEntryPoint.html[BearerTokenAuthenticationEntryPoint] which sends a WWW-Authenticate header.
The RequestCache is typically a NullRequestCache that does not save the request since the client is capable of replaying the requests it originally requested.
When a client receives the WWW-Authenticate: Bearer header, it knows it should retry with a bearer token.
Below is the flow for the bearer token being processed.

The figure builds off our SecurityFilterChain diagram.
![]() When the user submits their bearer token, the
When the user submits their bearer token, the BearerTokenAuthenticationFilter creates a BearerTokenAuthenticationToken which is a type of Authentication by extracting the token from the HttpServletRequest.
![]() Next, the
Next, the HttpServletRequest is passed to the AuthenticationManagerResolver, which selects the AuthenticationManager. The BearerTokenAuthenticationToken is passed into the AuthenticationManager to be authenticated.
The details of what AuthenticationManager looks like depends on whether you’re configured for JWT or opaque token.
![]() If authentication fails, then Failure
If authentication fails, then Failure
-
The [servlet-authentication-securitycontextholder] is cleared out.
-
The
AuthenticationEntryPointis invoked to trigger the WWW-Authenticate header to be sent again.
![]() If authentication is successful, then Success.
If authentication is successful, then Success.
-
The [servlet-authentication-authentication] is set on the [servlet-authentication-securitycontextholder].
-
The
BearerTokenAuthenticationFilterinvokesFilterChain.doFilter(request,response)to continue with the rest of the application logic.
Minimal Dependencies for JWT
Most Resource Server support is collected into spring-security-oauth2-resource-server.
However, the support for decoding and verifying JWTs is in spring-security-oauth2-jose, meaning that both are necessary in order to have a working resource server that supports JWT-encoded Bearer Tokens.
Minimal Configuration for JWTs
When using Spring Boot, configuring an application as a resource server consists of two basic steps. First, include the needed dependencies and second, indicate the location of the authorization server.
Specifying the Authorization Server
In a Spring Boot application, to specify which authorization server to use, simply do:
spring:
  security:
    oauth2:
      resourceserver:
        jwt:
          issuer-uri: https://idp.example.com/issuer
Where https://idp.example.com/issuer is the value contained in the iss claim for JWT tokens that the authorization server will issue.
Resource Server will use this property to further self-configure, discover the authorization server’s public keys, and subsequently validate incoming JWTs.
To use the issuer-uri property, it must also be true that one of https://idp.example.com/issuer/.well-known/openid-configuration, https://idp.example.com/.well-known/openid-configuration/issuer, or https://idp.example.com/.well-known/oauth-authorization-server/issuer is a supported endpoint for the authorization server.
This endpoint is referred to as a Provider Configuration endpoint or a Authorization Server Metadata endpoint.
|
And that’s it!
Startup Expectations
When this property and these dependencies are used, Resource Server will automatically configure itself to validate JWT-encoded Bearer Tokens.
It achieves this through a deterministic startup process:
-
Query the Provider Configuration or Authorization Server Metadata endpoint for the
jwks_urlproperty -
Query the
jwks_urlendpoint for supported algorithms -
Configure the validation strategy to query
jwks_urlfor valid public keys of the algorithms found -
Configure the validation strategy to validate each JWTs
issclaim againsthttps://idp.example.com.
A consequence of this process is that the authorization server must be up and receiving requests in order for Resource Server to successfully start up.
| If the authorization server is down when Resource Server queries it (given appropriate timeouts), then startup will fail. |
Runtime Expectations
Once the application is started up, Resource Server will attempt to process any request containing an Authorization: Bearer header:
GET / HTTP/1.1
Authorization: Bearer some-token-value # Resource Server will process this
So long as this scheme is indicated, Resource Server will attempt to process the request according to the Bearer Token specification.
Given a well-formed JWT, Resource Server will:
-
Validate its signature against a public key obtained from the
jwks_urlendpoint during startup and matched against the JWT -
Validate the JWT’s
expandnbftimestamps and the JWT’sissclaim, and -
Map each scope to an authority with the prefix
SCOPE_.
| As the authorization server makes available new keys, Spring Security will automatically rotate the keys used to validate JWTs. |
The resulting Authentication#getPrincipal, by default, is a Spring Security Jwt object, and Authentication#getName maps to the JWT’s sub property, if one is present.
From here, consider jumping to:
How JWT Authentication Works
Next, let’s see the architectural components that Spring Security uses to support JWT Authentication in servlet-based applications, like the one we just saw.
{security-api-url}org/springframework/security/oauth2/server/resource/authentication/JwtAuthenticationProvider.html[JwtAuthenticationProvider] is an AuthenticationProvider implementation that leverages a JwtDecoder and JwtAuthenticationConverter to authenticate a JWT.
Let’s take a look at how JwtAuthenticationProvider works within Spring Security.
The figure explains details of how the AuthenticationManager in figures from Reading the Bearer Token works.

JwtAuthenticationProvider Usage![]() The authentication
The authentication Filter from Reading the Bearer Token passes a BearerTokenAuthenticationToken to the AuthenticationManager which is implemented by ProviderManager.
![]() The
The ProviderManager is configured to use an [servlet-authentication-authenticationprovider] of type JwtAuthenticationProvider.
![]()
JwtAuthenticationProvider decodes, verifies, and validates the Jwt using a JwtDecoder.
![]()
JwtAuthenticationProvider then uses the JwtAuthenticationConverter to convert the Jwt into a Collection of granted authorities.
![]() When authentication is successful, the
When authentication is successful, the Authentication that is returned is of type JwtAuthenticationToken and has a principal that is the Jwt returned by the configured JwtDecoder.
Ultimately, the returned JwtAuthenticationToken will be set on the SecurityContextHolder by the authentication Filter.
Specifying the Authorization Server JWK Set Uri Directly
If the authorization server doesn’t support any configuration endpoints, or if Resource Server must be able to start up independently from the authorization server, then the jwk-set-uri can be supplied as well:
spring:
  security:
    oauth2:
      resourceserver:
        jwt:
          issuer-uri: https://idp.example.com
jwk-set-uri: https://idp.example.com/.well-known/jwks.json| The JWK Set uri is not standardized, but can typically be found in the authorization server’s documentation |
Consequently, Resource Server will not ping the authorization server at startup.
We still specify the issuer-uri so that Resource Server still validates the iss claim on incoming JWTs.
| This property can also be supplied directly on the DSL. |
Overriding or Replacing Boot Auto Configuration
There are two @Bean s that Spring Boot generates on Resource Server’s behalf.
The first is a WebSecurityConfigurerAdapter that configures the app as a resource server. When including spring-security-oauth2-jose, this WebSecurityConfigurerAdapter looks like:
protected void configure(HttpSecurity http) {
    http
        .authorizeRequests(authorize -> authorize
            .anyRequest().authenticated()
        )
        .oauth2ResourceServer(OAuth2ResourceServerConfigurer::jwt);
}fun configure(http: HttpSecurity) {
http {
authorizeRequests {
authorize(anyRequest, authenticated)
}
oauth2ResourceServer {
jwt { }
}
}
}If the application doesn’t expose a WebSecurityConfigurerAdapter bean, then Spring Boot will expose the above default one.
Replacing this is as simple as exposing the bean within the application:
@EnableWebSecurity
public class MyCustomSecurityConfiguration extends WebSecurityConfigurerAdapter {
    protected void configure(HttpSecurity http) {
        http
            .authorizeRequests(authorize -> authorize
                .mvcMatchers("/messages/**").hasAuthority("SCOPE_message:read")
                .anyRequest().authenticated()
            )
            .oauth2ResourceServer(oauth2 -> oauth2
                .jwt(jwt -> jwt
                    .jwtAuthenticationConverter(myConverter())
                )
            );
    }
}@EnableWebSecurity
class MyCustomSecurityConfiguration : WebSecurityConfigurerAdapter() {
override fun configure(http: HttpSecurity) {
http {
authorizeRequests {
authorize("/messages/**", hasAuthority("SCOPE_message:read"))
authorize(anyRequest, authenticated)
}
oauth2ResourceServer {
jwt {
jwtAuthenticationConverter = myConverter()
}
}
}
}
}The above requires the scope of message:read for any URL that starts with /messages/.
Methods on the oauth2ResourceServer DSL will also override or replace auto configuration.
For example, the second @Bean Spring Boot creates is a JwtDecoder, which decodes String tokens into validated instances of Jwt:
@Bean
public JwtDecoder jwtDecoder() {
    return JwtDecoders.fromIssuerLocation(issuerUri);
}@Bean
fun jwtDecoder(): JwtDecoder {
return JwtDecoders.fromIssuerLocation(issuerUri)
}
Calling {security-api-url}org/springframework/security/oauth2/jwt/JwtDecoders.html#fromIssuerLocation-java.lang.String-[JwtDecoders#fromIssuerLocation] is what invokes the Provider Configuration or Authorization Server Metadata endpoint in order to derive the JWK Set Uri.
|
If the application doesn’t expose a JwtDecoder bean, then Spring Boot will expose the above default one.
And its configuration can be overridden using jwkSetUri() or replaced using decoder().
Or, if you’re not using Spring Boot at all, then both of these components - the filter chain and a JwtDecoder can be specified in XML.
The filter chain is specified like so:
<http>
    <intercept-uri pattern="/**" access="authenticated"/>
    <oauth2-resource-server>
        <jwt decoder-ref="jwtDecoder"/>
    </oauth2-resource-server>
</http>
And the JwtDecoder like so:
<bean id="jwtDecoder"
        class="org.springframework.security.oauth2.jwt.JwtDecoders"
        factory-method="fromIssuerLocation">
    <constructor-arg value="${spring.security.oauth2.resourceserver.jwt.jwk-set-uri}"/>
</bean>
Using jwkSetUri()
An authorization server’s JWK Set Uri can be configured as a configuration property or it can be supplied in the DSL:
@EnableWebSecurity
public class DirectlyConfiguredJwkSetUri extends WebSecurityConfigurerAdapter {
    protected void configure(HttpSecurity http) {
        http
            .authorizeRequests(authorize -> authorize
                .anyRequest().authenticated()
            )
            .oauth2ResourceServer(oauth2 -> oauth2
                .jwt(jwt -> jwt
                    .jwkSetUri("https://idp.example.com/.well-known/jwks.json")
                )
            );
    }
}@EnableWebSecurity
class DirectlyConfiguredJwkSetUri : WebSecurityConfigurerAdapter() {
override fun configure(http: HttpSecurity) {
http {
authorizeRequests {
authorize(anyRequest, authenticated)
}
oauth2ResourceServer {
jwt {
jwkSetUri = "https://idp.example.com/.well-known/jwks.json"
}
}
}
}
}<http>
<intercept-uri pattern="/**" access="authenticated"/>
<oauth2-resource-server>
<jwt jwk-set-uri="https://idp.example.com/.well-known/jwks.json"/>
</oauth2-resource-server>
</http>Using jwkSetUri() takes precedence over any configuration property.
Using decoder()
More powerful than jwkSetUri() is decoder(), which will completely replace any Boot auto configuration of JwtDecoder:
@EnableWebSecurity
public class DirectlyConfiguredJwtDecoder extends WebSecurityConfigurerAdapter {
    protected void configure(HttpSecurity http) {
        http
            .authorizeRequests(authorize -> authorize
                .anyRequest().authenticated()
            )
            .oauth2ResourceServer(oauth2 -> oauth2
                .jwt(jwt -> jwt
                    .decoder(myCustomDecoder())
                )
            );
    }
}@EnableWebSecurity
class DirectlyConfiguredJwtDecoder : WebSecurityConfigurerAdapter() {
override fun configure(http: HttpSecurity) {
http {
authorizeRequests {
authorize(anyRequest, authenticated)
}
oauth2ResourceServer {
jwt {
jwtDecoder = myCustomDecoder()
}
}
}
}
}<http>
<intercept-uri pattern="/**" access="authenticated"/>
<oauth2-resource-server>
<jwt decoder-ref="myCustomDecoder"/>
</oauth2-resource-server>
</http>This is handy when deeper configuration, like validation, mapping, or request timeouts, is necessary.
Exposing a JwtDecoder @Bean
Or, exposing a JwtDecoder @Bean has the same effect as decoder():
@Bean
public JwtDecoder jwtDecoder() {
    return NimbusJwtDecoder.withJwkSetUri(jwkSetUri).build();
}@Bean
fun jwtDecoder(): JwtDecoder {
return NimbusJwtDecoder.withJwkSetUri(jwkSetUri).build()
}Configuring Trusted Algorithms
By default, NimbusJwtDecoder, and hence Resource Server, will only trust and verify tokens using RS256.
You can customize this via Spring Boot, the NimbusJwtDecoder builder, or from the JWK Set response.
Via Spring Boot
The simplest way to set the algorithm is as a property:
spring:
  security:
    oauth2:
      resourceserver:
        jwt:
          jws-algorithm: RS512
          jwk-set-uri: https://idp.example.org/.well-known/jwks.json
Using a Builder
For greater power, though, we can use a builder that ships with NimbusJwtDecoder:
@Bean
JwtDecoder jwtDecoder() {
    return NimbusJwtDecoder.withJwkSetUri(this.jwkSetUri)
            .jwsAlgorithm(RS512).build();
}@Bean
fun jwtDecoder(): JwtDecoder {
return NimbusJwtDecoder.withJwkSetUri(this.jwkSetUri)
.jwsAlgorithm(RS512).build()
}Calling jwsAlgorithm more than once will configure NimbusJwtDecoder to trust more than one algorithm, like so:
@Bean
JwtDecoder jwtDecoder() {
    return NimbusJwtDecoder.withJwkSetUri(this.jwkSetUri)
            .jwsAlgorithm(RS512).jwsAlgorithm(ES512).build();
}@Bean
fun jwtDecoder(): JwtDecoder {
return NimbusJwtDecoder.withJwkSetUri(this.jwkSetUri)
.jwsAlgorithm(RS512).jwsAlgorithm(ES512).build()
}Or, you can call jwsAlgorithms:
@Bean
JwtDecoder jwtDecoder() {
    return NimbusJwtDecoder.withJwkSetUri(this.jwkSetUri)
            .jwsAlgorithms(algorithms -> {
                    algorithms.add(RS512);
                    algorithms.add(ES512);
            }).build();
}@Bean
fun jwtDecoder(): JwtDecoder {
return NimbusJwtDecoder.withJwkSetUri(this.jwkSetUri)
.jwsAlgorithms {
it.add(RS512)
it.add(ES512)
}.build()
}From JWK Set response
Since Spring Security’s JWT support is based off of Nimbus, you can use all it’s great features as well.
For example, Nimbus has a JWSKeySelector implementation that will select the set of algorithms based on the JWK Set URI response.
You can use it to generate a NimbusJwtDecoder like so:
@Bean
public JwtDecoder jwtDecoder() {
    // makes a request to the JWK Set endpoint
    JWSKeySelector<SecurityContext> jwsKeySelector =
            JWSAlgorithmFamilyJWSKeySelector.fromJWKSetURL(this.jwkSetUrl);

    DefaultJWTProcessor<SecurityContext> jwtProcessor =
            new DefaultJWTProcessor<>();
    jwtProcessor.setJWSKeySelector(jwsKeySelector);

    return new NimbusJwtDecoder(jwtProcessor);
}@Bean
fun jwtDecoder(): JwtDecoder {
// makes a request to the JWK Set endpoint
val jwsKeySelector: JWSKeySelector<SecurityContext> = JWSAlgorithmFamilyJWSKeySelector.fromJWKSetURL<SecurityContext>(this.jwkSetUrl)
val jwtProcessor: DefaultJWTProcessor<SecurityContext> = DefaultJWTProcessor()
jwtProcessor.jwsKeySelector = jwsKeySelector
return NimbusJwtDecoder(jwtProcessor)
}Trusting a Single Asymmetric Key
Simpler than backing a Resource Server with a JWK Set endpoint is to hard-code an RSA public key. The public key can be provided via Spring Boot or by Using a Builder.
Via Spring Boot
Specifying a key via Spring Boot is quite simple. The key’s location can be specified like so:
spring:
  security:
    oauth2:
      resourceserver:
        jwt:
          public-key-location: classpath:my-key.pub
Or, to allow for a more sophisticated lookup, you can post-process the RsaKeyConversionServicePostProcessor:
@Bean
BeanFactoryPostProcessor conversionServiceCustomizer() {
    return beanFactory ->
        beanFactory.getBean(RsaKeyConversionServicePostProcessor.class)
                .setResourceLoader(new CustomResourceLoader());
}@Bean
fun conversionServiceCustomizer(): BeanFactoryPostProcessor {
return BeanFactoryPostProcessor { beanFactory ->
beanFactory.getBean<RsaKeyConversionServicePostProcessor>()
.setResourceLoader(CustomResourceLoader())
}
}Specify your key’s location:
key.location: hfds://my-key.pubAnd then autowire the value:
@Value("${key.location}")
RSAPublicKey key;@Value("\${key.location}")
val key: RSAPublicKey? = nullUsing a Builder
To wire an RSAPublicKey directly, you can simply use the appropriate NimbusJwtDecoder builder, like so:
@Bean
public JwtDecoder jwtDecoder() {
    return NimbusJwtDecoder.withPublicKey(this.key).build();
}@Bean
fun jwtDecoder(): JwtDecoder {
return NimbusJwtDecoder.withPublicKey(this.key).build()
}Trusting a Single Symmetric Key
Using a single symmetric key is also simple.
You can simply load in your SecretKey and use the appropriate NimbusJwtDecoder builder, like so:
@Bean
public JwtDecoder jwtDecoder() {
    return NimbusJwtDecoder.withSecretKey(this.key).build();
}@Bean
fun jwtDecoder(): JwtDecoder {
return NimbusJwtDecoder.withSecretKey(key).build()
}Configuring Authorization
A JWT that is issued from an OAuth 2.0 Authorization Server will typically either have a scope or scp attribute, indicating the scopes (or authorities) it’s been granted, for example:
{ …, "scope" : "messages contacts"}
When this is the case, Resource Server will attempt to coerce these scopes into a list of granted authorities, prefixing each scope with the string "SCOPE_".
This means that to protect an endpoint or method with a scope derived from a JWT, the corresponding expressions should include this prefix:
@EnableWebSecurity
public class DirectlyConfiguredJwkSetUri extends WebSecurityConfigurerAdapter {
    protected void configure(HttpSecurity http) {
        http
            .authorizeRequests(authorize -> authorize
                .mvcMatchers("/contacts/**").hasAuthority("SCOPE_contacts")
                .mvcMatchers("/messages/**").hasAuthority("SCOPE_messages")
                .anyRequest().authenticated()
            )
            .oauth2ResourceServer(OAuth2ResourceServerConfigurer::jwt);
    }
}@EnableWebSecurity
class DirectlyConfiguredJwkSetUri : WebSecurityConfigurerAdapter() {
override fun configure(http: HttpSecurity) {
http {
authorizeRequests {
authorize("/contacts/**", hasAuthority("SCOPE_contacts"))
authorize("/messages/**", hasAuthority("SCOPE_messages"))
authorize(anyRequest, authenticated)
}
oauth2ResourceServer {
jwt { }
}
}
}
}<http>
<intercept-uri pattern="/contacts/**" access="hasAuthority('SCOPE_contacts')"/>
<intercept-uri pattern="/messages/**" access="hasAuthority('SCOPE_messages')"/>
<oauth2-resource-server>
<jwt jwk-set-uri="https://idp.example.org/.well-known/jwks.json"/>
</oauth2-resource-server>
</http>Or similarly with method security:
@PreAuthorize("hasAuthority('SCOPE_messages')")
public List<Message> getMessages(...) {}
Extracting Authorities Manually
However, there are a number of circumstances where this default is insufficient.
For example, some authorization servers don’t use the scope attribute, but instead have their own custom attribute.
Or, at other times, the resource server may need to adapt the attribute or a composition of attributes into internalized authorities.
To this end, Spring Security ships with JwtAuthenticationConverter, which is responsible for converting a Jwt into an Authentication.
By default, Spring Security will wire the JwtAuthenticationProvider with a default instance of JwtAuthenticationConverter.
As part of configuring a JwtAuthenticationConverter, you can supply a subsidiary converter to go from Jwt to a Collection of granted authorities.
Let’s say that that your authorization server communicates authorities in a custom claim called authorities.
In that case, you can configure the claim that JwtAuthenticationConverter should inspect, like so:
@Bean
public JwtAuthenticationConverter jwtAuthenticationConverter() {
    JwtGrantedAuthoritiesConverter grantedAuthoritiesConverter = new JwtGrantedAuthoritiesConverter();
    grantedAuthoritiesConverter.setAuthoritiesClaimName("authorities");

    JwtAuthenticationConverter jwtAuthenticationConverter = new JwtAuthenticationConverter();
    jwtAuthenticationConverter.setJwtGrantedAuthoritiesConverter(grantedAuthoritiesConverter);
    return jwtAuthenticationConverter;
}@Bean
fun jwtAuthenticationConverter(): JwtAuthenticationConverter {
val grantedAuthoritiesConverter = JwtGrantedAuthoritiesConverter()
grantedAuthoritiesConverter.setAuthoritiesClaimName("authorities")
val jwtAuthenticationConverter = JwtAuthenticationConverter()
jwtAuthenticationConverter.setJwtGrantedAuthoritiesConverter(grantedAuthoritiesConverter)
return jwtAuthenticationConverter
}<http>
<intercept-uri pattern="/contacts/**" access="hasAuthority('SCOPE_contacts')"/>
<intercept-uri pattern="/messages/**" access="hasAuthority('SCOPE_messages')"/>
<oauth2-resource-server>
<jwt jwk-set-uri="https://idp.example.org/.well-known/jwks.json"
jwt-authentication-converter-ref="jwtAuthenticationConverter"/>
</oauth2-resource-server>
</http>
<bean id="jwtAuthenticationConverter"
class="org.springframework.security.oauth2.server.resource.authentication.JwtAuthenticationConverter">
<property name="jwtGrantedAuthoritiesConverter" ref="jwtGrantedAuthoritiesConverter"/>
</bean>
<bean id="jwtGrantedAuthoritiesConverter"
class="org.springframework.security.oauth2.server.resource.authentication.JwtGrantedAuthoritiesConverter">
<property name="authoritiesClaimName" value="authorities"/>
</bean>You can also configure the authority prefix to be different as well.
Instead of prefixing each authority with SCOPE_, you can change it to ROLE_ like so:
@Bean
public JwtAuthenticationConverter jwtAuthenticationConverter() {
    JwtGrantedAuthoritiesConverter grantedAuthoritiesConverter = new JwtGrantedAuthoritiesConverter();
    grantedAuthoritiesConverter.setAuthorityPrefix("ROLE_");

    JwtAuthenticationConverter jwtAuthenticationConverter = new JwtAuthenticationConverter();
    jwtAuthenticationConverter.setJwtGrantedAuthoritiesConverter(grantedAuthoritiesConverter);
    return jwtAuthenticationConverter;
}@Bean
fun jwtAuthenticationConverter(): JwtAuthenticationConverter {
val grantedAuthoritiesConverter = JwtGrantedAuthoritiesConverter()
grantedAuthoritiesConverter.setAuthorityPrefix("ROLE_")
val jwtAuthenticationConverter = JwtAuthenticationConverter()
jwtAuthenticationConverter.setJwtGrantedAuthoritiesConverter(grantedAuthoritiesConverter)
return jwtAuthenticationConverter
}<http>
<intercept-uri pattern="/contacts/**" access="hasAuthority('SCOPE_contacts')"/>
<intercept-uri pattern="/messages/**" access="hasAuthority('SCOPE_messages')"/>
<oauth2-resource-server>
<jwt jwk-set-uri="https://idp.example.org/.well-known/jwks.json"
jwt-authentication-converter-ref="jwtAuthenticationConverter"/>
</oauth2-resource-server>
</http>
<bean id="jwtAuthenticationConverter"
class="org.springframework.security.oauth2.server.resource.authentication.JwtAuthenticationConverter">
<property name="jwtGrantedAuthoritiesConverter" ref="jwtGrantedAuthoritiesConverter"/>
</bean>
<bean id="jwtGrantedAuthoritiesConverter"
class="org.springframework.security.oauth2.server.resource.authentication.JwtGrantedAuthoritiesConverter">
<property name="authorityPrefix" value="ROLE_"/>
</bean>Or, you can remove the prefix altogether by calling JwtGrantedAuthoritiesConverter#setAuthorityPrefix("").
For more flexibility, the DSL supports entirely replacing the converter with any class that implements Converter<Jwt, AbstractAuthenticationToken>:
static class CustomAuthenticationConverter implements Converter<Jwt, AbstractAuthenticationToken> {
    public AbstractAuthenticationToken convert(Jwt jwt) {
        return new CustomAuthenticationToken(jwt);
    }
}

// ...

@EnableWebSecurity
public class CustomAuthenticationConverterConfig extends WebSecurityConfigurerAdapter {
    protected void configure(HttpSecurity http) {
        http
            .authorizeRequests(authorize -> authorize
                .anyRequest().authenticated()
            )
            .oauth2ResourceServer(oauth2 -> oauth2
                .jwt(jwt -> jwt
                    .jwtAuthenticationConverter(new CustomAuthenticationConverter())
                )
            );
    }
}internal class CustomAuthenticationConverter : Converter<Jwt, AbstractAuthenticationToken> {
override fun convert(jwt: Jwt): AbstractAuthenticationToken {
return CustomAuthenticationToken(jwt)
}
}
// ...
@EnableWebSecurity
class CustomAuthenticationConverterConfig : WebSecurityConfigurerAdapter() {
override fun configure(http: HttpSecurity) {
http {
authorizeRequests {
authorize(anyRequest, authenticated)
}
oauth2ResourceServer {
jwt {
jwtAuthenticationConverter = CustomAuthenticationConverter()
}
}
}
}
}Configuring Validation
Using minimal Spring Boot configuration, indicating the authorization server’s issuer uri, Resource Server will default to verifying the iss claim as well as the exp and nbf timestamp claims.
In circumstances where validation needs to be customized, Resource Server ships with two standard validators and also accepts custom OAuth2TokenValidator instances.
Customizing Timestamp Validation
JWT’s typically have a window of validity, with the start of the window indicated in the nbf claim and the end indicated in the exp claim.
However, every server can experience clock drift, which can cause tokens to appear expired to one server, but not to another. This can cause some implementation heartburn as the number of collaborating servers increases in a distributed system.
Resource Server uses JwtTimestampValidator to verify a token’s validity window, and it can be configured with a clockSkew to alleviate the above problem:
@Bean
JwtDecoder jwtDecoder() {
     NimbusJwtDecoder jwtDecoder = (NimbusJwtDecoder)
             JwtDecoders.fromIssuerLocation(issuerUri);

     OAuth2TokenValidator<Jwt> withClockSkew = new DelegatingOAuth2TokenValidator<>(
            new JwtTimestampValidator(Duration.ofSeconds(60)),
            new JwtIssuerValidator(issuerUri));

     jwtDecoder.setJwtValidator(withClockSkew);

     return jwtDecoder;
}@Bean
fun jwtDecoder(): JwtDecoder {
val jwtDecoder: NimbusJwtDecoder = JwtDecoders.fromIssuerLocation(issuerUri) as NimbusJwtDecoder
val withClockSkew: OAuth2TokenValidator<Jwt> = DelegatingOAuth2TokenValidator(
JwtTimestampValidator(Duration.ofSeconds(60)),
JwtIssuerValidator(issuerUri))
jwtDecoder.setJwtValidator(withClockSkew)
return jwtDecoder
}| By default, Resource Server configures a clock skew of 60 seconds. |
Configuring a Custom Validator
Adding a check for the aud claim is simple with the OAuth2TokenValidator API:
OAuth2TokenValidator<Jwt> audienceValidator() {
    return new JwtClaimValidator<List<String>>(AUD, aud -> aud.contains("messaging"));
}fun audienceValidator(): OAuth2TokenValidator<Jwt?> {
return JwtClaimValidator<List<String>>(AUD) { aud -> aud.contains("messaging") }
}Or, for more control you can implement your own OAuth2TokenValidator:
static class AudienceValidator implements OAuth2TokenValidator<Jwt> {
    OAuth2Error error = new OAuth2Error("custom_code", "Custom error message", null);

    @Override
    public OAuth2TokenValidatorResult validate(Jwt jwt) {
        if (jwt.getAudience().contains("messaging")) {
            return OAuth2TokenValidatorResult.success();
        } else {
            return OAuth2TokenValidatorResult.failure(error);
        }
    }
}

// ...

OAuth2TokenValidator<Jwt> audienceValidator() {
    return new AudienceValidator();
}internal class AudienceValidator : OAuth2TokenValidator<Jwt> {
var error: OAuth2Error = OAuth2Error("custom_code", "Custom error message", null)
override fun validate(jwt: Jwt): OAuth2TokenValidatorResult {
return if (jwt.audience.contains("messaging")) {
OAuth2TokenValidatorResult.success()
} else {
OAuth2TokenValidatorResult.failure(error)
}
}
}
// ...
fun audienceValidator(): OAuth2TokenValidator<Jwt> {
return AudienceValidator()
}Then, to add into a resource server, it’s a matter of specifying the JwtDecoder instance:
@Bean
JwtDecoder jwtDecoder() {
    NimbusJwtDecoder jwtDecoder = (NimbusJwtDecoder)
        JwtDecoders.fromIssuerLocation(issuerUri);

    OAuth2TokenValidator<Jwt> audienceValidator = audienceValidator();
    OAuth2TokenValidator<Jwt> withIssuer = JwtValidators.createDefaultWithIssuer(issuerUri);
    OAuth2TokenValidator<Jwt> withAudience = new DelegatingOAuth2TokenValidator<>(withIssuer, audienceValidator);

    jwtDecoder.setJwtValidator(withAudience);

    return jwtDecoder;
}@Bean
fun jwtDecoder(): JwtDecoder {
val jwtDecoder: NimbusJwtDecoder = JwtDecoders.fromIssuerLocation(issuerUri) as NimbusJwtDecoder
val audienceValidator = audienceValidator()
val withIssuer: OAuth2TokenValidator<Jwt> = JwtValidators.createDefaultWithIssuer(issuerUri)
val withAudience: OAuth2TokenValidator<Jwt> = DelegatingOAuth2TokenValidator(withIssuer, audienceValidator)
jwtDecoder.setJwtValidator(withAudience)
return jwtDecoder
}Configuring Claim Set Mapping
Spring Security uses the Nimbus library for parsing JWTs and validating their signatures. Consequently, Spring Security is subject to Nimbus’s interpretation of each field value and how to coerce each into a Java type.
For example, because Nimbus remains Java 7 compatible, it doesn’t use Instant to represent timestamp fields.
And it’s entirely possible to use a different library or for JWT processing, which may make its own coercion decisions that need adjustment.
Or, quite simply, a resource server may want to add or remove claims from a JWT for domain-specific reasons.
For these purposes, Resource Server supports mapping the JWT claim set with MappedJwtClaimSetConverter.
Customizing the Conversion of a Single Claim
By default, MappedJwtClaimSetConverter will attempt to coerce claims into the following types:
Claim |
Java Type |
|
|
|
|
|
|
|
|
|
|
|
|
|
|
An individual claim’s conversion strategy can be configured using MappedJwtClaimSetConverter.withDefaults:
@Bean
JwtDecoder jwtDecoder() {
    NimbusJwtDecoder jwtDecoder = NimbusJwtDecoder.withJwkSetUri(jwkSetUri).build();

    MappedJwtClaimSetConverter converter = MappedJwtClaimSetConverter
            .withDefaults(Collections.singletonMap("sub", this::lookupUserIdBySub));
    jwtDecoder.setClaimSetConverter(converter);

    return jwtDecoder;
}@Bean
fun jwtDecoder(): JwtDecoder {
val jwtDecoder = NimbusJwtDecoder.withJwkSetUri(jwkSetUri).build()
val converter = MappedJwtClaimSetConverter
.withDefaults(mapOf("sub" to this::lookupUserIdBySub))
jwtDecoder.setClaimSetConverter(converter)
return jwtDecoder
}This will keep all the defaults, except it will override the default claim converter for sub.
Adding a Claim
MappedJwtClaimSetConverter can also be used to add a custom claim, for example, to adapt to an existing system:
MappedJwtClaimSetConverter.withDefaults(Collections.singletonMap("custom", custom -> "value"));MappedJwtClaimSetConverter.withDefaults(mapOf("custom" to Converter<Any, String> { "value" }))Removing a Claim
And removing a claim is also simple, using the same API:
MappedJwtClaimSetConverter.withDefaults(Collections.singletonMap("legacyclaim", legacy -> null));MappedJwtClaimSetConverter.withDefaults(mapOf("legacyclaim" to Converter<Any, Any> { null }))Renaming a Claim
In more sophisticated scenarios, like consulting multiple claims at once or renaming a claim, Resource Server accepts any class that implements Converter<Map<String, Object>, Map<String,Object>>:
public class UsernameSubClaimAdapter implements Converter<Map<String, Object>, Map<String, Object>> {
    private final MappedJwtClaimSetConverter delegate =
            MappedJwtClaimSetConverter.withDefaults(Collections.emptyMap());

    public Map<String, Object> convert(Map<String, Object> claims) {
        Map<String, Object> convertedClaims = this.delegate.convert(claims);

        String username = (String) convertedClaims.get("user_name");
        convertedClaims.put("sub", username);

        return convertedClaims;
    }
}class UsernameSubClaimAdapter : Converter<Map<String, Any?>, Map<String, Any?>> {
private val delegate = MappedJwtClaimSetConverter.withDefaults(Collections.emptyMap())
override fun convert(claims: Map<String, Any?>): Map<String, Any?> {
val convertedClaims = delegate.convert(claims)
val username = convertedClaims["user_name"] as String
convertedClaims["sub"] = username
return convertedClaims
}
}And then, the instance can be supplied like normal:
@Bean
JwtDecoder jwtDecoder() {
    NimbusJwtDecoder jwtDecoder = NimbusJwtDecoder.withJwkSetUri(jwkSetUri).build();
    jwtDecoder.setClaimSetConverter(new UsernameSubClaimAdapter());
    return jwtDecoder;
}@Bean
fun jwtDecoder(): JwtDecoder {
val jwtDecoder: NimbusJwtDecoder = NimbusJwtDecoder.withJwkSetUri(jwkSetUri).build()
jwtDecoder.setClaimSetConverter(UsernameSubClaimAdapter())
return jwtDecoder
}Configuring Timeouts
By default, Resource Server uses connection and socket timeouts of 30 seconds each for coordinating with the authorization server.
This may be too short in some scenarios. Further, it doesn’t take into account more sophisticated patterns like back-off and discovery.
To adjust the way in which Resource Server connects to the authorization server, NimbusJwtDecoder accepts an instance of RestOperations:
@Bean
public JwtDecoder jwtDecoder(RestTemplateBuilder builder) {
    RestOperations rest = builder
            .setConnectTimeout(Duration.ofSeconds(60))
            .setReadTimeout(Duration.ofSeconds(60))
            .build();

    NimbusJwtDecoder jwtDecoder = NimbusJwtDecoder.withJwkSetUri(jwkSetUri).restOperations(rest).build();
    return jwtDecoder;
}@Bean
fun jwtDecoder(builder: RestTemplateBuilder): JwtDecoder {
val rest: RestOperations = builder
.setConnectTimeout(Duration.ofSeconds(60))
.setReadTimeout(Duration.ofSeconds(60))
.build()
return NimbusJwtDecoder.withJwkSetUri(jwkSetUri).restOperations(rest).build()
}Also by default, Resource Server caches in-memory the authorization server’s JWK set for 5 minutes, which you may want to adjust. Further, it doesn’t take into account more sophisticated caching patterns like eviction or using a shared cache.
To adjust the way in which Resource Server caches the JWK set, NimbusJwtDecoder accepts an instance of Cache:
@Bean
public JwtDecoder jwtDecoder(CacheManager cacheManager) {
    return NimbusJwtDecoder.withJwkSetUri(jwkSetUri)
            .cache(cacheManager.getCache("jwks"))
            .build();
}@Bean
fun jwtDecoder(cacheManager: CacheManager): JwtDecoder {
return NimbusJwtDecoder.withJwkSetUri(jwkSetUri)
.cache(cacheManager.getCache("jwks"))
.build()
}When given a Cache, Resource Server will use the JWK Set Uri as the key and the JWK Set JSON as the value.
Spring isn’t a cache provider, so you’ll need to make sure to include the appropriate dependencies, like spring-boot-starter-cache and your favorite caching provider.
|
Whether it’s socket or cache timeouts, you may instead want to work with Nimbus directly.
To do so, remember that NimbusJwtDecoder ships with a constructor that takes Nimbus’s JWTProcessor.
|
Minimal Dependencies for Introspection
As described in Minimal Dependencies for JWT most of Resource Server support is collected in spring-security-oauth2-resource-server.
However unless a custom OpaqueTokenIntrospector is provided, the Resource Server will fallback to NimbusOpaqueTokenIntrospector.
Meaning that both spring-security-oauth2-resource-server and oauth2-oidc-sdk are necessary in order to have a working minimal Resource Server that supports opaque Bearer Tokens.
Please refer to spring-security-oauth2-resource-server in order to determin the correct version for oauth2-oidc-sdk.
Minimal Configuration for Introspection
Typically, an opaque token can be verified via an OAuth 2.0 Introspection Endpoint, hosted by the authorization server. This can be handy when revocation is a requirement.
When using Spring Boot, configuring an application as a resource server that uses introspection consists of two basic steps. First, include the needed dependencies and second, indicate the introspection endpoint details.
Specifying the Authorization Server
To specify where the introspection endpoint is, simply do:
security:
  oauth2:
    resourceserver:
      opaque-token:
        introspection-uri: https://idp.example.com/introspect
        client-id: client
        client-secret: secret
Where https://idp.example.com/introspect is the introspection endpoint hosted by your authorization server and client-id and client-secret are the credentials needed to hit that endpoint.
Resource Server will use these properties to further self-configure and subsequently validate incoming JWTs.
| When using introspection, the authorization server’s word is the law. If the authorization server responses that the token is valid, then it is. |
And that’s it!
Startup Expectations
When this property and these dependencies are used, Resource Server will automatically configure itself to validate Opaque Bearer Tokens.
This startup process is quite a bit simpler than for JWTs since no endpoints need to be discovered and no additional validation rules get added.
Runtime Expectations
Once the application is started up, Resource Server will attempt to process any request containing an Authorization: Bearer header:
GET / HTTP/1.1
Authorization: Bearer some-token-value # Resource Server will process this
So long as this scheme is indicated, Resource Server will attempt to process the request according to the Bearer Token specification.
Given an Opaque Token, Resource Server will
-
Query the provided introspection endpoint using the provided credentials and the token
-
Inspect the response for an
{ 'active' : true }attribute -
Map each scope to an authority with the prefix
SCOPE_
The resulting Authentication#getPrincipal, by default, is a Spring Security {security-api-url}org/springframework/security/oauth2/core/OAuth2AuthenticatedPrincipal.html[OAuth2AuthenticatedPrincipal] object, and Authentication#getName maps to the token’s sub property, if one is present.
From here, you may want to jump to:
How Opaque Token Authentication Works
Next, let’s see the architectural components that Spring Security uses to support opaque token Authentication in servlet-based applications, like the one we just saw.
{security-api-url}org/springframework/security/oauth2/server/resource/authentication/OpaqueTokenAuthenticationProvider.html[OpaqueTokenAuthenticationProvider] is an AuthenticationProvider implementation that leverages a OpaqueTokenIntrospector to authenticate an opaque token.
Let’s take a look at how OpaqueTokenAuthenticationProvider works within Spring Security.
The figure explains details of how the AuthenticationManager in figures from Reading the Bearer Token works.

OpaqueTokenAuthenticationProvider Usage![]() The authentication
The authentication Filter from Reading the Bearer Token passes a BearerTokenAuthenticationToken to the AuthenticationManager which is implemented by ProviderManager.
![]() The
The ProviderManager is configured to use an [servlet-authentication-authenticationprovider] of type OpaqueTokenAuthenticationProvider.
![]()
OpaqueTokenAuthenticationProvider introspects the opaque token and adds granted authorities using an OpaqueTokenIntrospector.
When authentication is successful, the Authentication that is returned is of type BearerTokenAuthentication and has a principal that is the OAuth2AuthenticatedPrincipal returned by the configured OpaqueTokenIntrospector.
Ultimately, the returned BearerTokenAuthentication will be set on the SecurityContextHolder by the authentication Filter.
Looking Up Attributes Post-Authentication
Once a token is authenticated, an instance of BearerTokenAuthentication is set in the SecurityContext.
This means that it’s available in @Controller methods when using @EnableWebMvc in your configuration:
@GetMapping("/foo")
public String foo(BearerTokenAuthentication authentication) {
    return authentication.getTokenAttributes().get("sub") + " is the subject";
}@GetMapping("/foo")
fun foo(authentication: BearerTokenAuthentication): String {
return authentication.tokenAttributes["sub"].toString() + " is the subject"
}Since BearerTokenAuthentication holds an OAuth2AuthenticatedPrincipal, that also means that it’s available to controller methods, too:
@GetMapping("/foo")
public String foo(@AuthenticationPrincipal OAuth2AuthenticatedPrincipal principal) {
    return principal.getAttribute("sub") + " is the subject";
}@GetMapping("/foo")
fun foo(@AuthenticationPrincipal principal: OAuth2AuthenticatedPrincipal): String {
return principal.getAttribute<Any>("sub").toString() + " is the subject"
}Looking Up Attributes Via SpEL
Of course, this also means that attributes can be accessed via SpEL.
For example, if using @EnableGlobalMethodSecurity so that you can use @PreAuthorize annotations, you can do:
@PreAuthorize("principal?.attributes['sub'] == 'foo'")
public String forFoosEyesOnly() {
    return "foo";
}@PreAuthorize("principal?.attributes['sub'] == 'foo'")
fun forFoosEyesOnly(): String {
return "foo"
}Overriding or Replacing Boot Auto Configuration
There are two @Bean s that Spring Boot generates on Resource Server’s behalf.
The first is a WebSecurityConfigurerAdapter that configures the app as a resource server.
When use Opaque Token, this WebSecurityConfigurerAdapter looks like:
protected void configure(HttpSecurity http) {
http
.authorizeRequests(authorize -> authorize
.anyRequest().authenticated()
)
.oauth2ResourceServer(OAuth2ResourceServerConfigurer::opaqueToken);
}override fun configure(http: HttpSecurity) {
http {
authorizeRequests {
authorize(anyRequest, authenticated)
}
oauth2ResourceServer {
opaqueToken { }
}
}
}If the application doesn’t expose a WebSecurityConfigurerAdapter bean, then Spring Boot will expose the above default one.
Replacing this is as simple as exposing the bean within the application:
@EnableWebSecurity
public class MyCustomSecurityConfiguration extends WebSecurityConfigurerAdapter {
protected void configure(HttpSecurity http) {
http
.authorizeRequests(authorize -> authorize
.mvcMatchers("/messages/**").hasAuthority("SCOPE_message:read")
.anyRequest().authenticated()
)
.oauth2ResourceServer(oauth2 -> oauth2
.opaqueToken(opaqueToken -> opaqueToken
.introspector(myIntrospector())
)
);
}
}@EnableWebSecurity
class MyCustomSecurityConfiguration : WebSecurityConfigurerAdapter() {
override fun configure(http: HttpSecurity) {
http {
authorizeRequests {
authorize("/messages/**", hasAuthority("SCOPE_message:read"))
authorize(anyRequest, authenticated)
}
oauth2ResourceServer {
opaqueToken {
introspector = myIntrospector()
}
}
}
}
}The above requires the scope of message:read for any URL that starts with /messages/.
Methods on the oauth2ResourceServer DSL will also override or replace auto configuration.
For example, the second @Bean Spring Boot creates is an OpaqueTokenIntrospector, which decodes String tokens into validated instances of OAuth2AuthenticatedPrincipal:
@Bean
public OpaqueTokenIntrospector introspector() {
return new NimbusOpaqueTokenIntrospector(introspectionUri, clientId, clientSecret);
}@Bean
fun introspector(): OpaqueTokenIntrospector {
return NimbusOpaqueTokenIntrospector(introspectionUri, clientId, clientSecret)
}If the application doesn’t expose a OpaqueTokenIntrospector bean, then Spring Boot will expose the above default one.
And its configuration can be overridden using introspectionUri() and introspectionClientCredentials() or replaced using introspector().
Or, if you’re not using Spring Boot at all, then both of these components - the filter chain and a OpaqueTokenIntrospector can be specified in XML.
The filter chain is specified like so:
<http>
<intercept-uri pattern="/**" access="authenticated"/>
<oauth2-resource-server>
<opaque-token introspector-ref="opaqueTokenIntrospector"/>
</oauth2-resource-server>
</http>And the OpaqueTokenIntrospector like so:
<bean id="opaqueTokenIntrospector"
class="org.springframework.security.oauth2.server.resource.introspection.NimbusOpaqueTokenIntrospector">
<constructor-arg value="${spring.security.oauth2.resourceserver.opaquetoken.introspection_uri}"/>
<constructor-arg value="${spring.security.oauth2.resourceserver.opaquetoken.client_id}"/>
<constructor-arg value="${spring.security.oauth2.resourceserver.opaquetoken.client_secret}"/>
</bean>Using introspectionUri()
An authorization server’s Introspection Uri can be configured as a configuration property or it can be supplied in the DSL:
@EnableWebSecurity
public class DirectlyConfiguredIntrospectionUri extends WebSecurityConfigurerAdapter {
protected void configure(HttpSecurity http) {
http
.authorizeRequests(authorize -> authorize
.anyRequest().authenticated()
)
.oauth2ResourceServer(oauth2 -> oauth2
.opaqueToken(opaqueToken -> opaqueToken
.introspectionUri("https://idp.example.com/introspect")
.introspectionClientCredentials("client", "secret")
)
);
}
}@EnableWebSecurity
class DirectlyConfiguredIntrospectionUri : WebSecurityConfigurerAdapter() {
override fun configure(http: HttpSecurity) {
http {
authorizeRequests {
authorize(anyRequest, authenticated)
}
oauth2ResourceServer {
opaqueToken {
introspectionUri = "https://idp.example.com/introspect"
introspectionClientCredentials("client", "secret")
}
}
}
}
}<bean id="opaqueTokenIntrospector"
class="org.springframework.security.oauth2.server.resource.introspection.NimbusOpaqueTokenIntrospector">
<constructor-arg value="https://idp.example.com/introspect"/>
<constructor-arg value="client"/>
<constructor-arg value="secret"/>
</bean>Using introspectionUri() takes precedence over any configuration property.
Using introspector()
More powerful than introspectionUri() is introspector(), which will completely replace any Boot auto configuration of OpaqueTokenIntrospector:
@EnableWebSecurity
public class DirectlyConfiguredIntrospector extends WebSecurityConfigurerAdapter {
protected void configure(HttpSecurity http) {
http
.authorizeRequests(authorize -> authorize
.anyRequest().authenticated()
)
.oauth2ResourceServer(oauth2 -> oauth2
.opaqueToken(opaqueToken -> opaqueToken
.introspector(myCustomIntrospector())
)
);
}
}@EnableWebSecurity
class DirectlyConfiguredIntrospector : WebSecurityConfigurerAdapter() {
override fun configure(http: HttpSecurity) {
http {
authorizeRequests {
authorize(anyRequest, authenticated)
}
oauth2ResourceServer {
opaqueToken {
introspector = myCustomIntrospector()
}
}
}
}
}<http>
<intercept-uri pattern="/**" access="authenticated"/>
<oauth2-resource-server>
<opaque-token introspector-ref="myCustomIntrospector"/>
</oauth2-resource-server>
</http>This is handy when deeper configuration, like authority mapping, JWT revocation, or request timeouts, is necessary.
Exposing a OpaqueTokenIntrospector @Bean
Or, exposing a OpaqueTokenIntrospector @Bean has the same effect as introspector():
@Bean
public OpaqueTokenIntrospector introspector() {
return new NimbusOpaqueTokenIntrospector(introspectionUri, clientId, clientSecret);
}Configuring Authorization
An OAuth 2.0 Introspection endpoint will typically return a scope attribute, indicating the scopes (or authorities) it’s been granted, for example:
{ …, "scope" : "messages contacts"}
When this is the case, Resource Server will attempt to coerce these scopes into a list of granted authorities, prefixing each scope with the string "SCOPE_".
This means that to protect an endpoint or method with a scope derived from an Opaque Token, the corresponding expressions should include this prefix:
@EnableWebSecurity
public class MappedAuthorities extends WebSecurityConfigurerAdapter {
protected void configure(HttpSecurity http) {
http
.authorizeRequests(authorizeRequests -> authorizeRequests
.mvcMatchers("/contacts/**").hasAuthority("SCOPE_contacts")
.mvcMatchers("/messages/**").hasAuthority("SCOPE_messages")
.anyRequest().authenticated()
)
.oauth2ResourceServer(OAuth2ResourceServerConfigurer::opaqueToken);
}
}@EnableWebSecurity
class MappedAuthorities : WebSecurityConfigurerAdapter() {
override fun configure(http: HttpSecurity) {
http {
authorizeRequests {
authorize("/contacts/**", hasAuthority("SCOPE_contacts"))
authorize("/messages/**", hasAuthority("SCOPE_messages"))
authorize(anyRequest, authenticated)
}
oauth2ResourceServer {
opaqueToken { }
}
}
}
}<http>
<intercept-uri pattern="/contacts/**" access="hasAuthority('SCOPE_contacts')"/>
<intercept-uri pattern="/messages/**" access="hasAuthority('SCOPE_messages')"/>
<oauth2-resource-server>
<opaque-token introspector-ref="opaqueTokenIntrospector"/>
</oauth2-resource-server>
</http>Or similarly with method security:
@PreAuthorize("hasAuthority('SCOPE_messages')")
public List<Message> getMessages(...) {}@PreAuthorize("hasAuthority('SCOPE_messages')")
fun getMessages(): List<Message?> {}Extracting Authorities Manually
By default, Opaque Token support will extract the scope claim from an introspection response and parse it into individual GrantedAuthority instances.
For example, if the introspection response were:
{
"active" : true,
"scope" : "message:read message:write"
}Then Resource Server would generate an Authentication with two authorities, one for message:read and the other for message:write.
This can, of course, be customized using a custom OpaqueTokenIntrospector that takes a look at the attribute set and converts in its own way:
public class CustomAuthoritiesOpaqueTokenIntrospector implements OpaqueTokenIntrospector {
private OpaqueTokenIntrospector delegate =
new NimbusOpaqueTokenIntrospector("https://idp.example.org/introspect", "client", "secret");
public OAuth2AuthenticatedPrincipal introspect(String token) {
OAuth2AuthenticatedPrincipal principal = this.delegate.introspect(token);
return new DefaultOAuth2AuthenticatedPrincipal(
principal.getName(), principal.getAttributes(), extractAuthorities(principal));
}
private Collection<GrantedAuthority> extractAuthorities(OAuth2AuthenticatedPrincipal principal) {
List<String> scopes = principal.getAttribute(OAuth2IntrospectionClaimNames.SCOPE);
return scopes.stream()
.map(SimpleGrantedAuthority::new)
.collect(Collectors.toList());
}
}class CustomAuthoritiesOpaqueTokenIntrospector : OpaqueTokenIntrospector {
private val delegate: OpaqueTokenIntrospector = NimbusOpaqueTokenIntrospector("https://idp.example.org/introspect", "client", "secret")
override fun introspect(token: String): OAuth2AuthenticatedPrincipal {
val principal: OAuth2AuthenticatedPrincipal = delegate.introspect(token)
return DefaultOAuth2AuthenticatedPrincipal(
principal.name, principal.attributes, extractAuthorities(principal))
}
private fun extractAuthorities(principal: OAuth2AuthenticatedPrincipal): Collection<GrantedAuthority> {
val scopes: List<String> = principal.getAttribute(OAuth2IntrospectionClaimNames.SCOPE)
return scopes
.map { SimpleGrantedAuthority(it) }
}
}Thereafter, this custom introspector can be configured simply by exposing it as a @Bean:
@Bean
public OpaqueTokenIntrospector introspector() {
return new CustomAuthoritiesOpaqueTokenIntrospector();
}@Bean
fun introspector(): OpaqueTokenIntrospector {
return CustomAuthoritiesOpaqueTokenIntrospector()
}Configuring Timeouts
By default, Resource Server uses connection and socket timeouts of 30 seconds each for coordinating with the authorization server.
This may be too short in some scenarios. Further, it doesn’t take into account more sophisticated patterns like back-off and discovery.
To adjust the way in which Resource Server connects to the authorization server, NimbusOpaqueTokenIntrospector accepts an instance of RestOperations:
@Bean
public OpaqueTokenIntrospector introspector(RestTemplateBuilder builder, OAuth2ResourceServerProperties properties) {
RestOperations rest = builder
.basicAuthentication(properties.getOpaquetoken().getClientId(), properties.getOpaquetoken().getClientSecret())
.setConnectTimeout(Duration.ofSeconds(60))
.setReadTimeout(Duration.ofSeconds(60))
.build();
return new NimbusOpaqueTokenIntrospector(introspectionUri, rest);
}@Bean
fun introspector(builder: RestTemplateBuilder, properties: OAuth2ResourceServerProperties): OpaqueTokenIntrospector? {
val rest: RestOperations = builder
.basicAuthentication(properties.opaquetoken.clientId, properties.opaquetoken.clientSecret)
.setConnectTimeout(Duration.ofSeconds(60))
.setReadTimeout(Duration.ofSeconds(60))
.build()
return NimbusOpaqueTokenIntrospector(introspectionUri, rest)
}Using Introspection with JWTs
A common question is whether or not introspection is compatible with JWTs. Spring Security’s Opaque Token support has been designed to not care about the format of the token — it will gladly pass any token to the introspection endpoint provided.
So, let’s say that you’ve got a requirement that requires you to check with the authorization server on each request, in case the JWT has been revoked.
Even though you are using the JWT format for the token, your validation method is introspection, meaning you’d want to do:
spring:
security:
oauth2:
resourceserver:
opaque-token:
introspection-uri: https://idp.example.org/introspection
client-id: client
client-secret: secretIn this case, the resulting Authentication would be BearerTokenAuthentication.
Any attributes in the corresponding OAuth2AuthenticatedPrincipal would be whatever was returned by the introspection endpoint.
But, let’s say that, oddly enough, the introspection endpoint only returns whether or not the token is active. Now what?
In this case, you can create a custom OpaqueTokenIntrospector that still hits the endpoint, but then updates the returned principal to have the JWTs claims as the attributes:
public class JwtOpaqueTokenIntrospector implements OpaqueTokenIntrospector {
private OpaqueTokenIntrospector delegate =
new NimbusOpaqueTokenIntrospector("https://idp.example.org/introspect", "client", "secret");
private JwtDecoder jwtDecoder = new NimbusJwtDecoder(new ParseOnlyJWTProcessor());
public OAuth2AuthenticatedPrincipal introspect(String token) {
OAuth2AuthenticatedPrincipal principal = this.delegate.introspect(token);
try {
Jwt jwt = this.jwtDecoder.decode(token);
return new DefaultOAuth2AuthenticatedPrincipal(jwt.getClaims(), NO_AUTHORITIES);
} catch (JwtException ex) {
throw new OAuth2IntrospectionException(ex);
}
}
private static class ParseOnlyJWTProcessor extends DefaultJWTProcessor<SecurityContext> {
JWTClaimsSet process(SignedJWT jwt, SecurityContext context)
throws JOSEException {
return jwt.getJWTClaimsSet();
}
}
}class JwtOpaqueTokenIntrospector : OpaqueTokenIntrospector {
private val delegate: OpaqueTokenIntrospector = NimbusOpaqueTokenIntrospector("https://idp.example.org/introspect", "client", "secret")
private val jwtDecoder: JwtDecoder = NimbusJwtDecoder(ParseOnlyJWTProcessor())
override fun introspect(token: String): OAuth2AuthenticatedPrincipal {
val principal = delegate.introspect(token)
return try {
val jwt: Jwt = jwtDecoder.decode(token)
DefaultOAuth2AuthenticatedPrincipal(jwt.claims, NO_AUTHORITIES)
} catch (ex: JwtException) {
throw OAuth2IntrospectionException(ex.message)
}
}
private class ParseOnlyJWTProcessor : DefaultJWTProcessor<SecurityContext>() {
override fun process(jwt: SignedJWT, context: SecurityContext): JWTClaimsSet {
return jwt.jwtClaimsSet
}
}
}Thereafter, this custom introspector can be configured simply by exposing it as a @Bean:
@Bean
public OpaqueTokenIntrospector introspector() {
return new JwtOpaqueTokenIntrospector();
}@Bean
fun introspector(): OpaqueTokenIntrospector {
return JwtOpaqueTokenIntrospector()
}Calling a /userinfo Endpoint
Generally speaking, a Resource Server doesn’t care about the underlying user, but instead about the authorities that have been granted.
That said, at times it can be valuable to tie the authorization statement back to a user.
If an application is also using spring-security-oauth2-client, having set up the appropriate ClientRegistrationRepository, then this is quite simple with a custom OpaqueTokenIntrospector.
This implementation below does three things:
-
Delegates to the introspection endpoint, to affirm the token’s validity
-
Looks up the appropriate client registration associated with the
/userinfoendpoint -
Invokes and returns the response from the
/userinfoendpoint
public class UserInfoOpaqueTokenIntrospector implements OpaqueTokenIntrospector {
private final OpaqueTokenIntrospector delegate =
new NimbusOpaqueTokenIntrospector("https://idp.example.org/introspect", "client", "secret");
private final OAuth2UserService oauth2UserService = new DefaultOAuth2UserService();
private final ClientRegistrationRepository repository;
// ... constructor
@Override
public OAuth2AuthenticatedPrincipal introspect(String token) {
OAuth2AuthenticatedPrincipal authorized = this.delegate.introspect(token);
Instant issuedAt = authorized.getAttribute(ISSUED_AT);
Instant expiresAt = authorized.getAttribute(EXPIRES_AT);
ClientRegistration clientRegistration = this.repository.findByRegistrationId("registration-id");
OAuth2AccessToken token = new OAuth2AccessToken(BEARER, token, issuedAt, expiresAt);
OAuth2UserRequest oauth2UserRequest = new OAuth2UserRequest(clientRegistration, token);
return this.oauth2UserService.loadUser(oauth2UserRequest);
}
}class UserInfoOpaqueTokenIntrospector : OpaqueTokenIntrospector {
private val delegate: OpaqueTokenIntrospector = NimbusOpaqueTokenIntrospector("https://idp.example.org/introspect", "client", "secret")
private val oauth2UserService = DefaultOAuth2UserService()
private val repository: ClientRegistrationRepository? = null
// ... constructor
override fun introspect(token: String): OAuth2AuthenticatedPrincipal {
val authorized = delegate.introspect(token)
val issuedAt: Instant? = authorized.getAttribute(ISSUED_AT)
val expiresAt: Instant? = authorized.getAttribute(EXPIRES_AT)
val clientRegistration: ClientRegistration = repository!!.findByRegistrationId("registration-id")
val accessToken = OAuth2AccessToken(BEARER, token, issuedAt, expiresAt)
val oauth2UserRequest = OAuth2UserRequest(clientRegistration, accessToken)
return oauth2UserService.loadUser(oauth2UserRequest)
}
}If you aren’t using spring-security-oauth2-client, it’s still quite simple.
You will simply need to invoke the /userinfo with your own instance of WebClient:
public class UserInfoOpaqueTokenIntrospector implements OpaqueTokenIntrospector {
private final OpaqueTokenIntrospector delegate =
new NimbusOpaqueTokenIntrospector("https://idp.example.org/introspect", "client", "secret");
private final WebClient rest = WebClient.create();
@Override
public OAuth2AuthenticatedPrincipal introspect(String token) {
OAuth2AuthenticatedPrincipal authorized = this.delegate.introspect(token);
return makeUserInfoRequest(authorized);
}
}class UserInfoOpaqueTokenIntrospector : OpaqueTokenIntrospector {
private val delegate: OpaqueTokenIntrospector = NimbusOpaqueTokenIntrospector("https://idp.example.org/introspect", "client", "secret")
private val rest: WebClient = WebClient.create()
override fun introspect(token: String): OAuth2AuthenticatedPrincipal {
val authorized = delegate.introspect(token)
return makeUserInfoRequest(authorized)
}
}Either way, having created your OpaqueTokenIntrospector, you should publish it as a @Bean to override the defaults:
@Bean
OpaqueTokenIntrospector introspector() {
return new UserInfoOpaqueTokenIntrospector(...);
}@Bean
fun introspector(): OpaqueTokenIntrospector {
return UserInfoOpaqueTokenIntrospector(...)
}Supporting both JWT and Opaque Token
In some cases, you may have a need to access both kinds of tokens. For example, you may support more than one tenant where one tenant issues JWTs and the other issues opaque tokens.
If this decision must be made at request-time, then you can use an AuthenticationManagerResolver to achieve it, like so:
@Bean
AuthenticationManagerResolver<HttpServletRequest> tokenAuthenticationManagerResolver() {
BearerTokenResolver bearerToken = new DefaultBearerTokenResolver();
JwtAuthenticationProvider jwt = jwt();
OpaqueTokenAuthenticationProvider opaqueToken = opaqueToken();
return request -> {
if (useJwt(request)) {
return jwt::authenticate;
} else {
return opaqueToken::authenticate;
}
}
}@Bean
fun tokenAuthenticationManagerResolver(): AuthenticationManagerResolver<HttpServletRequest> {
val bearerToken: BearerTokenResolver = DefaultBearerTokenResolver()
val jwt: JwtAuthenticationProvider = jwt()
val opaqueToken: OpaqueTokenAuthenticationProvider = opaqueToken()
return AuthenticationManagerResolver { request ->
if (useJwt(request)) {
AuthenticationManager { jwt.authenticate(it) }
} else {
AuthenticationManager { opaqueToken.authenticate(it) }
}
}
}
The implementation of useJwt(HttpServletRequest) will likely depend on custom request material like the path.
|
And then specify this AuthenticationManagerResolver in the DSL:
http
.authorizeRequests(authorize -> authorize
.anyRequest().authenticated()
)
.oauth2ResourceServer(oauth2 -> oauth2
.authenticationManagerResolver(this.tokenAuthenticationManagerResolver)
);http {
authorizeRequests {
authorize(anyRequest, authenticated)
}
oauth2ResourceServer {
authenticationManagerResolver = tokenAuthenticationManagerResolver()
}
}<http>
<oauth2-resource-server authentication-manager-resolver-ref="tokenAuthenticationManagerResolver"/>
</http>Multi-tenancy
A resource server is considered multi-tenant when there are multiple strategies for verifying a bearer token, keyed by some tenant identifier.
For example, your resource server may accept bearer tokens from two different authorization servers. Or, your authorization server may represent a multiplicity of issuers.
In each case, there are two things that need to be done and trade-offs associated with how you choose to do them:
-
Resolve the tenant
-
Propagate the tenant
Resolving the Tenant By Claim
One way to differentiate tenants is by the issuer claim. Since the issuer claim accompanies signed JWTs, this can be done with the JwtIssuerAuthenticationManagerResolver, like so:
JwtIssuerAuthenticationManagerResolver authenticationManagerResolver = new JwtIssuerAuthenticationManagerResolver
("https://idp.example.org/issuerOne", "https://idp.example.org/issuerTwo");
http
.authorizeRequests(authorize -> authorize
.anyRequest().authenticated()
)
.oauth2ResourceServer(oauth2 -> oauth2
.authenticationManagerResolver(authenticationManagerResolver)
);val customAuthenticationManagerResolver = JwtIssuerAuthenticationManagerResolver
("https://idp.example.org/issuerOne", "https://idp.example.org/issuerTwo")
http {
authorizeRequests {
authorize(anyRequest, authenticated)
}
oauth2ResourceServer {
authenticationManagerResolver = customAuthenticationManagerResolver
}
}<http>
<oauth2-resource-server authentication-manager-resolver-ref="authenticationManagerResolver"/>
</http>
<bean id="authenticationManagerResolver"
class="org.springframework.security.oauth2.server.resource.authentication.JwtIssuerAuthenticationManagerResolver">
<constructor-arg>
<list>
<value>https://idp.example.org/issuerOne</value>
<value>https://idp.example.org/issuerTwo</value>
</list>
</constructor-arg>
</bean>This is nice because the issuer endpoints are loaded lazily.
In fact, the corresponding JwtAuthenticationProvider is instantiated only when the first request with the corresponding issuer is sent.
This allows for an application startup that is independent from those authorization servers being up and available.
Dynamic Tenants
Of course, you may not want to restart the application each time a new tenant is added.
In this case, you can configure the JwtIssuerAuthenticationManagerResolver with a repository of AuthenticationManager instances, which you can edit at runtime, like so:
private void addManager(Map<String, AuthenticationManager> authenticationManagers, String issuer) {
JwtAuthenticationProvider authenticationProvider = new JwtAuthenticationProvider
(JwtDecoders.fromIssuerLocation(issuer));
authenticationManagers.put(issuer, authenticationProvider::authenticate);
}
// ...
JwtIssuerAuthenticationManagerResolver authenticationManagerResolver =
new JwtIssuerAuthenticationManagerResolver(authenticationManagers::get);
http
.authorizeRequests(authorize -> authorize
.anyRequest().authenticated()
)
.oauth2ResourceServer(oauth2 -> oauth2
.authenticationManagerResolver(authenticationManagerResolver)
);private fun addManager(authenticationManagers: MutableMap<String, AuthenticationManager>, issuer: String) {
val authenticationProvider = JwtAuthenticationProvider(JwtDecoders.fromIssuerLocation(issuer))
authenticationManagers[issuer] = AuthenticationManager {
authentication: Authentication? -> authenticationProvider.authenticate(authentication)
}
}
// ...
val customAuthenticationManagerResolver: JwtIssuerAuthenticationManagerResolver =
JwtIssuerAuthenticationManagerResolver(authenticationManagers::get)
http {
authorizeRequests {
authorize(anyRequest, authenticated)
}
oauth2ResourceServer {
authenticationManagerResolver = customAuthenticationManagerResolver
}
}In this case, you construct JwtIssuerAuthenticationManagerResolver with a strategy for obtaining the AuthenticationManager given the issuer.
This approach allows us to add and remove elements from the repository (shown as a Map in the snippet) at runtime.
It would be unsafe to simply take any issuer and construct an AuthenticationManager from it.
The issuer should be one that the code can verify from a trusted source like a list of allowed issuers.
|
Parsing the Claim Only Once
You may have observed that this strategy, while simple, comes with the trade-off that the JWT is parsed once by the AuthenticationManagerResolver and then again by the JwtDecoder later on in the request.
This extra parsing can be alleviated by configuring the JwtDecoder directly with a JWTClaimsSetAwareJWSKeySelector from Nimbus:
@Component
public class TenantJWSKeySelector
implements JWTClaimsSetAwareJWSKeySelector<SecurityContext> {
private final TenantRepository tenants; (1)
private final Map<String, JWSKeySelector<SecurityContext>> selectors = new ConcurrentHashMap<>(); (2)
public TenantJWSKeySelector(TenantRepository tenants) {
this.tenants = tenants;
}
@Override
public List<? extends Key> selectKeys(JWSHeader jwsHeader, JWTClaimsSet jwtClaimsSet, SecurityContext securityContext)
throws KeySourceException {
return this.selectors.computeIfAbsent(toTenant(jwtClaimsSet), this::fromTenant)
.selectJWSKeys(jwsHeader, securityContext);
}
private String toTenant(JWTClaimsSet claimSet) {
return (String) claimSet.getClaim("iss");
}
private JWSKeySelector<SecurityContext> fromTenant(String tenant) {
return Optional.ofNullable(this.tenantRepository.findById(tenant)) (3)
.map(t -> t.getAttrbute("jwks_uri"))
.map(this::fromUri)
.orElseThrow(() -> new IllegalArgumentException("unknown tenant"));
}
private JWSKeySelector<SecurityContext> fromUri(String uri) {
try {
return JWSAlgorithmFamilyJWSKeySelector.fromJWKSetURL(new URL(uri)); (4)
} catch (Exception ex) {
throw new IllegalArgumentException(ex);
}
}
}@Component
class TenantJWSKeySelector(tenants: TenantRepository) : JWTClaimsSetAwareJWSKeySelector<SecurityContext> {
private val tenants: TenantRepository (1)
private val selectors: MutableMap<String, JWSKeySelector<SecurityContext>> = ConcurrentHashMap() (2)
init {
this.tenants = tenants
}
fun selectKeys(jwsHeader: JWSHeader?, jwtClaimsSet: JWTClaimsSet, securityContext: SecurityContext): List<Key?> {
return selectors.computeIfAbsent(toTenant(jwtClaimsSet)) { tenant: String -> fromTenant(tenant) }
.selectJWSKeys(jwsHeader, securityContext)
}
private fun toTenant(claimSet: JWTClaimsSet): String {
return claimSet.getClaim("iss") as String
}
private fun fromTenant(tenant: String): JWSKeySelector<SecurityContext> {
return Optional.ofNullable(this.tenants.findById(tenant)) (3)
.map { t -> t.getAttrbute("jwks_uri") }
.map { uri: String -> fromUri(uri) }
.orElseThrow { IllegalArgumentException("unknown tenant") }
}
private fun fromUri(uri: String): JWSKeySelector<SecurityContext?> {
return try {
JWSAlgorithmFamilyJWSKeySelector.fromJWKSetURL(URL(uri)) (4)
} catch (ex: Exception) {
throw IllegalArgumentException(ex)
}
}
}| 1 | A hypothetical source for tenant information |
| 2 | A cache for `JWKKeySelector`s, keyed by tenant identifier |
| 3 | Looking up the tenant is more secure than simply calculating the JWK Set endpoint on the fly - the lookup acts as a list of allowed tenants |
| 4 | Create a JWSKeySelector via the types of keys that come back from the JWK Set endpoint - the lazy lookup here means that you don’t need to configure all tenants at startup |
The above key selector is a composition of many key selectors.
It chooses which key selector to use based on the iss claim in the JWT.
| To use this approach, make sure that the authorization server is configured to include the claim set as part of the token’s signature. Without this, you have no guarantee that the issuer hasn’t been altered by a bad actor. |
Next, we can construct a JWTProcessor:
@Bean
JWTProcessor jwtProcessor(JWTClaimSetJWSKeySelector keySelector) {
ConfigurableJWTProcessor<SecurityContext> jwtProcessor =
new DefaultJWTProcessor();
jwtProcessor.setJWTClaimSetJWSKeySelector(keySelector);
return jwtProcessor;
}@Bean
fun jwtProcessor(keySelector: JWTClaimsSetAwareJWSKeySelector<SecurityContext>): JWTProcessor<SecurityContext> {
val jwtProcessor = DefaultJWTProcessor<SecurityContext>()
jwtProcessor.jwtClaimsSetAwareJWSKeySelector = keySelector
return jwtProcessor
}As you are already seeing, the trade-off for moving tenant-awareness down to this level is more configuration. We have just a bit more.
Next, we still want to make sure you are validating the issuer. But, since the issuer may be different per JWT, then you’ll need a tenant-aware validator, too:
@Component
public class TenantJwtIssuerValidator implements OAuth2TokenValidator<Jwt> {
private final TenantRepository tenants;
private final Map<String, JwtIssuerValidator> validators = new ConcurrentHashMap<>();
public TenantJwtIssuerValidator(TenantRepository tenants) {
this.tenants = tenants;
}
@Override
public OAuth2TokenValidatorResult validate(Jwt token) {
return this.validators.computeIfAbsent(toTenant(token), this::fromTenant)
.validate(token);
}
private String toTenant(Jwt jwt) {
return jwt.getIssuer();
}
private JwtIssuerValidator fromTenant(String tenant) {
return Optional.ofNullable(this.tenants.findById(tenant))
.map(t -> t.getAttribute("issuer"))
.map(JwtIssuerValidator::new)
.orElseThrow(() -> new IllegalArgumentException("unknown tenant"));
}
}@Component
class TenantJwtIssuerValidator(tenants: TenantRepository) : OAuth2TokenValidator<Jwt> {
private val tenants: TenantRepository
private val validators: MutableMap<String, JwtIssuerValidator> = ConcurrentHashMap()
override fun validate(token: Jwt): OAuth2TokenValidatorResult {
return validators.computeIfAbsent(toTenant(token)) { tenant: String -> fromTenant(tenant) }
.validate(token)
}
private fun toTenant(jwt: Jwt): String {
return jwt.issuer.toString()
}
private fun fromTenant(tenant: String): JwtIssuerValidator {
return Optional.ofNullable(tenants.findById(tenant))
.map({ t -> t.getAttribute("issuer") })
.map({ JwtIssuerValidator() })
.orElseThrow({ IllegalArgumentException("unknown tenant") })
}
init {
this.tenants = tenants
}
}Now that we have a tenant-aware processor and a tenant-aware validator, we can proceed with creating our JwtDecoder:
@Bean
JwtDecoder jwtDecoder(JWTProcessor jwtProcessor, OAuth2TokenValidator<Jwt> jwtValidator) {
NimbusJwtDecoder decoder = new NimbusJwtDecoder(processor);
OAuth2TokenValidator<Jwt> validator = new DelegatingOAuth2TokenValidator<>
(JwtValidators.createDefault(), this.jwtValidator);
decoder.setJwtValidator(validator);
return decoder;
}@Bean
fun jwtDecoder(jwtProcessor: JWTProcessor<SecurityContext>?, jwtValidator: OAuth2TokenValidator<Jwt>?): JwtDecoder {
val decoder = NimbusJwtDecoder(jwtProcessor)
val validator: OAuth2TokenValidator<Jwt> = DelegatingOAuth2TokenValidator(JwtValidators.createDefault(), jwtValidator)
decoder.setJwtValidator(validator)
return decoder
}We’ve finished talking about resolving the tenant.
If you’ve chosen to resolve the tenant by something other than a JWT claim, then you’ll need to make sure you address your downstream resource servers in the same way. For example, if you are resolving it by subdomain, you may need to address the downstream resource server using the same subdomain.
However, if you resolve it by a claim in the bearer token, read on to learn about Spring Security’s support for bearer token propagation.
Bearer Token Resolution
By default, Resource Server looks for a bearer token in the Authorization header.
This, however, can be customized in a handful of ways.
Reading the Bearer Token from a Custom Header
For example, you may have a need to read the bearer token from a custom header.
To achieve this, you can expose a DefaultBearerTokenResolver as a bean, or wire an instance into the DSL, as you can see in the following example:
@Bean
BearerTokenResolver bearerTokenResolver() {
DefaultBearerTokenResolver bearerTokenResolver = new DefaultBearerTokenResolver();
bearerTokenResolver.setBearerTokenHeaderName(HttpHeaders.PROXY_AUTHORIZATION);
return bearerTokenResolver;
}@Bean
fun bearerTokenResolver(): BearerTokenResolver {
val bearerTokenResolver = DefaultBearerTokenResolver()
bearerTokenResolver.setBearerTokenHeaderName(HttpHeaders.PROXY_AUTHORIZATION)
return bearerTokenResolver
}<http>
<oauth2-resource-server bearer-token-resolver-ref="bearerTokenResolver"/>
</http>
<bean id="bearerTokenResolver"
class="org.springframework.security.oauth2.server.resource.web.DefaultBearerTokenResolver">
<property name="bearerTokenHeaderName" value="Proxy-Authorization"/>
</bean>Or, in circumstances where a provider is using both a custom header and value, you can use HeaderBearerTokenResolver instead.
Reading the Bearer Token from a Form Parameter
Or, you may wish to read the token from a form parameter, which you can do by configuring the DefaultBearerTokenResolver, as you can see below:
DefaultBearerTokenResolver resolver = new DefaultBearerTokenResolver();
resolver.setAllowFormEncodedBodyParameter(true);
http
.oauth2ResourceServer(oauth2 -> oauth2
.bearerTokenResolver(resolver)
);val resolver = DefaultBearerTokenResolver()
resolver.setAllowFormEncodedBodyParameter(true)
http {
oauth2ResourceServer {
bearerTokenResolver = resolver
}
}<http>
<oauth2-resource-server bearer-token-resolver-ref="bearerTokenResolver"/>
</http>
<bean id="bearerTokenResolver"
class="org.springframework.security.oauth2.server.resource.web.HeaderBearerTokenResolver">
<property name="allowFormEncodedBodyParameter" value="true"/>
</bean>Bearer Token Propagation
Now that you’re resource server has validated the token, it might be handy to pass it to downstream services.
This is quite simple with {security-api-url}org/springframework/security/oauth2/server/resource/web/reactive/function/client/ServletBearerExchangeFilterFunction.html[ServletBearerExchangeFilterFunction], which you can see in the following example:
@Bean
public WebClient rest() {
return WebClient.builder()
.filter(new ServletBearerExchangeFilterFunction())
.build();
}@Bean
fun rest(): WebClient {
return WebClient.builder()
.filter(ServletBearerExchangeFilterFunction())
.build()
}When the above WebClient is used to perform requests, Spring Security will look up the current Authentication and extract any {security-api-url}org/springframework/security/oauth2/core/AbstractOAuth2Token.html[AbstractOAuth2Token] credential.
Then, it will propagate that token in the Authorization header.
For example:
this.rest.get()
.uri("https://other-service.example.com/endpoint")
.retrieve()
.bodyToMono(String.class)
.block()this.rest.get()
.uri("https://other-service.example.com/endpoint")
.retrieve()
.bodyToMono<String>()
.block()Will invoke the https://other-service.example.com/endpoint, adding the bearer token Authorization header for you.
In places where you need to override this behavior, it’s a simple matter of supplying the header yourself, like so:
this.rest.get()
.uri("https://other-service.example.com/endpoint")
.headers(headers -> headers.setBearerAuth(overridingToken))
.retrieve()
.bodyToMono(String.class)
.block()this.rest.get()
.uri("https://other-service.example.com/endpoint")
.headers{ headers -> headers.setBearerAuth(overridingToken)}
.retrieve()
.bodyToMono<String>()
.block()In this case, the filter will fall back and simply forward the request onto the rest of the web filter chain.
| Unlike the {security-api-url}org/springframework/security/oauth2/client/web/reactive/function/client/ServletOAuth2AuthorizedClientExchangeFilterFunction.html[OAuth 2.0 Client filter function], this filter function makes no attempt to renew the token, should it be expired. To obtain this level of support, please use the OAuth 2.0 Client filter. |
RestTemplate support
There is no RestTemplate equivalent for ServletBearerExchangeFilterFunction at the moment, but you can propagate the request’s bearer token quite simply with your own interceptor:
@Bean
RestTemplate rest() {
RestTemplate rest = new RestTemplate();
rest.getInterceptors().add((request, body, execution) -> {
Authentication authentication = SecurityContextHolder.getContext().getAuthentication();
if (authentication == null) {
return execution.execute(request, body);
}
if (!(authentication.getCredentials() instanceof AbstractOAuth2Token)) {
return execution.execute(request, body);
}
AbstractOAuth2Token token = (AbstractOAuth2Token) authentication.getCredentials();
request.getHeaders().setBearerAuth(token.getTokenValue());
return execution.execute(request, body);
});
return rest;
}@Bean
fun rest(): RestTemplate {
val rest = RestTemplate()
rest.interceptors.add(ClientHttpRequestInterceptor { request, body, execution ->
val authentication: Authentication? = SecurityContextHolder.getContext().authentication
if (authentication != null) {
execution.execute(request, body)
}
if (authentication!!.credentials !is AbstractOAuth2Token) {
execution.execute(request, body)
}
val token: AbstractOAuth2Token = authentication.credentials as AbstractOAuth2Token
request.headers.setBearerAuth(token.tokenValue)
execution.execute(request, body)
})
return rest
}| Unlike the {security-api-url}org/springframework/security/oauth2/client/OAuth2AuthorizedClientManager.html[OAuth 2.0 Authorized Client Manager], this filter interceptor makes no attempt to renew the token, should it be expired. To obtain this level of support, please create an interceptor using the OAuth 2.0 Authorized Client Manager. |
Bearer Token Failure
A bearer token may be invalid for a number of reasons. For example, the token may no longer be active.
In these circumstances, Resource Server throws an InvalidBearerTokenException.
Like other exceptions, this results in an OAuth 2.0 Bearer Token error response:
HTTP/1.1 401 Unauthorized
WWW-Authenticate: Bearer error_code="invalid_token", error_description="Unsupported algorithm of none", error_uri="https://tools.ietf.org/html/rfc6750#section-3.1"Additionally, it is published as an AuthenticationFailureBadCredentialsEvent, which you can listen for in your application like so:
@Component
public class FailureEvents {
@EventListener
public void onFailure(AuthenticationFailureBadCredentialsEvent badCredentials) {
if (badCredentials.getAuthentication() instanceof BearerTokenAuthenticationToken) {
// ... handle
}
}
}@Component
class FailureEvents {
@EventListener
fun onFailure(badCredentials: AuthenticationFailureBadCredentialsEvent) {
if (badCredentials.authentication is BearerTokenAuthenticationToken) {
// ... handle
}
}
}SAML2
SAML 2.0 Login
The SAML 2.0 Login feature provides an application with the capability to act as a SAML 2.0 Relying Party, having users log in to the application by using their existing account at a SAML 2.0 Asserting Party (Okta, ADFS, etc).
| SAML 2.0 Login is implemented by using the Web Browser SSO Profile, as specified in SAML 2 Profiles. |
Since 2009, support for relying parties has existed as an extension project. In 2019, the process began to port that into Spring Security proper. This process is similar to the one started in 2017 for Spring Security’s OAuth 2.0 support.
|
A working sample for {gh-samples-url}/servlet/spring-boot/java/saml2-login[SAML 2.0 Login] is available in the {gh-samples-url}[Spring Security Samples repository]. |
Let’s take a look at how SAML 2.0 Relying Party Authentication works within Spring Security. First, we see that, like OAuth 2.0 Login, Spring Security takes the user to a third-party for performing authentication. It does this through a series of redirects.
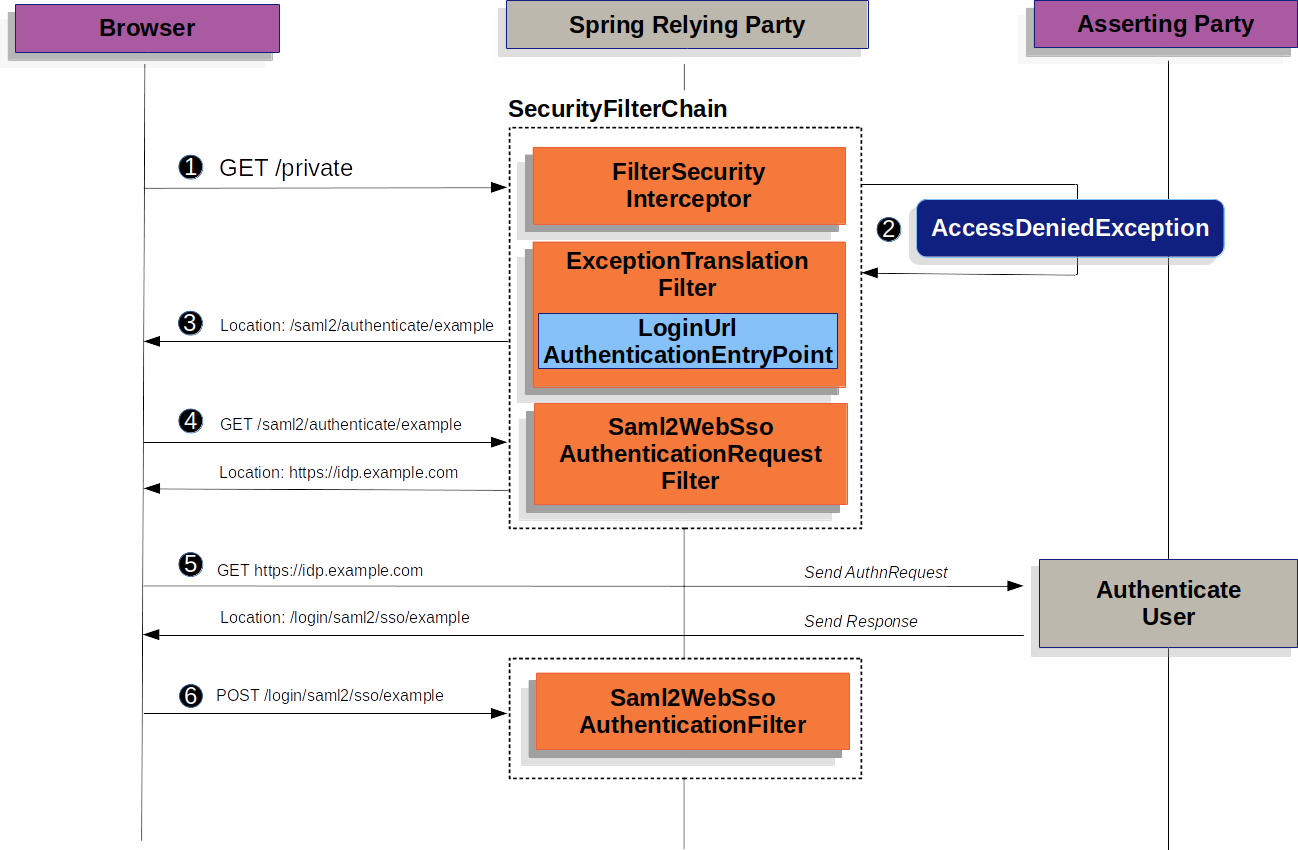
The figure above builds off our SecurityFilterChain and AbstractAuthenticationProcessingFilter diagrams:
![]() First, a user makes an unauthenticated request to the resource
First, a user makes an unauthenticated request to the resource /private for which it is not authorized.
![]() Spring Security’s
Spring Security’s FilterSecurityInterceptor indicates that the unauthenticated request is Denied by throwing an AccessDeniedException.
![]() Since the user lacks authorization, the
Since the user lacks authorization, the ExceptionTranslationFilter initiates Start Authentication.
The configured AuthenticationEntryPoint is an instance of {security-api-url}org/springframework/security/web/authentication/LoginUrlAuthenticationEntryPoint.html[LoginUrlAuthenticationEntryPoint] which redirects to the <saml2:AuthnRequest> generating endpoint, Saml2WebSsoAuthenticationRequestFilter.
Or, if you’ve configured more than one asserting party, it will first redirect to a picker page.
![]() Next, the
Next, the Saml2WebSsoAuthenticationRequestFilter creates, signs, serializes, and encodes a <saml2:AuthnRequest> using its configured Saml2AuthenticationRequestFactory.
![]() Then, the browser takes this
Then, the browser takes this <saml2:AuthnRequest> and presents it to the asserting party.
The asserting party attempts to authentication the user.
If successful, it will return a <saml2:Response> back to the browser.
![]() The browser then POSTs the
The browser then POSTs the <saml2:Response> to the assertion consumer service endpoint.
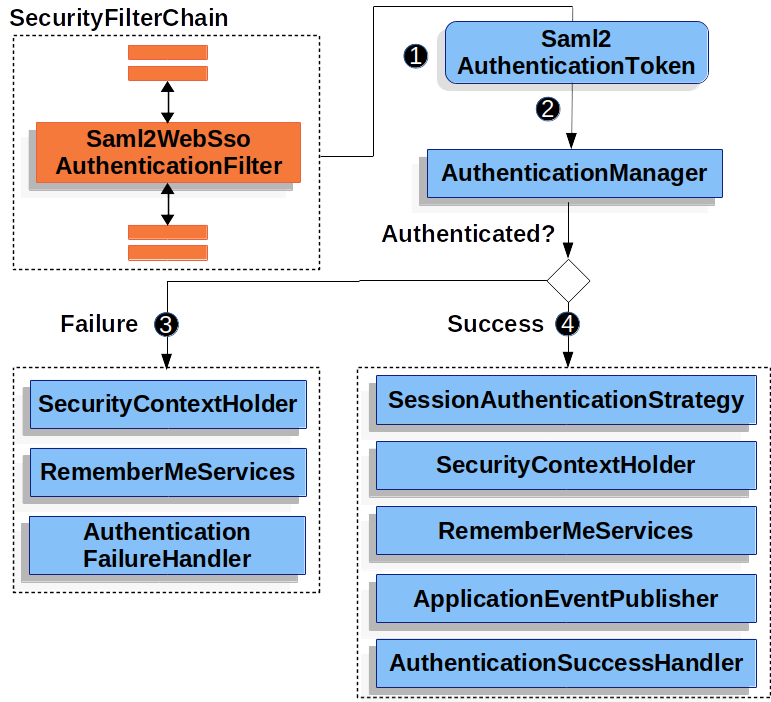
<saml2:Response>The figure builds off our SecurityFilterChain diagram.
![]() When the browser submits a
When the browser submits a <saml2:Response> to the application, it delegates to Saml2WebSsoAuthenticationFilter.
This filter calls its configured AuthenticationConverter to create a Saml2AuthenticationToken by extracting the response from the HttpServletRequest.
This converter additionally resolves the RelyingPartyRegistration and supplies it to Saml2AuthenticationToken.
![]() Next, the filter passes the token to its configured
Next, the filter passes the token to its configured AuthenticationManager.
By default, it will use the OpenSamlAuthenticationProvider.
![]() If authentication fails, then Failure
If authentication fails, then Failure
-
The
SecurityContextHolderis cleared out. -
The
AuthenticationEntryPointis invoked to restart the authentication process.
![]() If authentication is successful, then Success.
If authentication is successful, then Success.
-
The
Authenticationis set on theSecurityContextHolder. -
The
Saml2WebSsoAuthenticationFilterinvokesFilterChain#doFilter(request,response)to continue with the rest of the application logic.
Minimal Dependencies
SAML 2.0 service provider support resides in spring-security-saml2-service-provider.
It builds off of the OpenSAML library.
Minimal Configuration
When using Spring Boot, configuring an application as a service provider consists of two basic steps. First, include the needed dependencies and second, indicate the necessary asserting party metadata.
| Also, this presupposes that you’ve already registered the relying party with your asserting party. |
Specifying Identity Provider Metadata
In a Spring Boot application, to specify an identity provider’s metadata, simply do:
spring:
security:
saml2:
relyingparty:
registration:
adfs:
identityprovider:
entity-id: https://idp.example.com/issuer
verification.credentials:
- certificate-location: "classpath:idp.crt"
singlesignon.url: https://idp.example.com/issuer/sso
singlesignon.sign-request: falsewhere
-
https://idp.example.com/issueris the value contained in theIssuerattribute of the SAML responses that the identity provider will issue -
classpath:idp.crtis the location on the classpath for the identity provider’s certificate for verifying SAML responses, and -
https://idp.example.com/issuer/ssois the endpoint where the identity provider is expectingAuthnRequests.
And that’s it!
| Identity Provider and Asserting Party are synonymous, as are Service Provider and Relying Party. These are frequently abbreviated as AP and RP, respectively. |
Runtime Expectations
As configured above, the application processes any POST /login/saml2/sso/{registrationId} request containing a SAMLResponse parameter:
POST /login/saml2/sso/adfs HTTP/1.1
SAMLResponse=PD94bWwgdmVyc2lvbj0iMS4wIiBlbmNvZGluZ...There are two ways to see induce your asserting party to generate a SAMLResponse:
-
First, you can navigate to your asserting party. It likely has some kind of link or button for each registered relying party that you can click to send the
SAMLResponse. -
Second, you can navigate to a protected page in your app, for example,
http://localhost:8080. Your app then redirects to the configured asserting party which then sends theSAMLResponse.
From here, consider jumping to:
How SAML 2.0 Login Integrates with OpenSAML
Spring Security’s SAML 2.0 support has a couple of design goals:
-
First, rely on a library for SAML 2.0 operations and domain objects. To achieve this, Spring Security uses OpenSAML.
-
Second, ensure this library is not required when using Spring Security’s SAML support. To achieve this, any interfaces or classes where Spring Security uses OpenSAML in the contract remain encapsulated. This makes it possible for you to switch out OpenSAML for some other library or even an unsupported version of OpenSAML.
As a natural outcome of the above two goals, Spring Security’s SAML API is quite small relative to other modules.
Instead, classes like OpenSamlAuthenticationRequestFactory and OpenSamlAuthenticationProvider expose Converter s that customize various steps in the authentication process.
For example, once your application receives a SAMLResponse and delegates to Saml2WebSsoAuthenticationFilter, the filter will delegate to OpenSamlAuthenticationProvider.
Response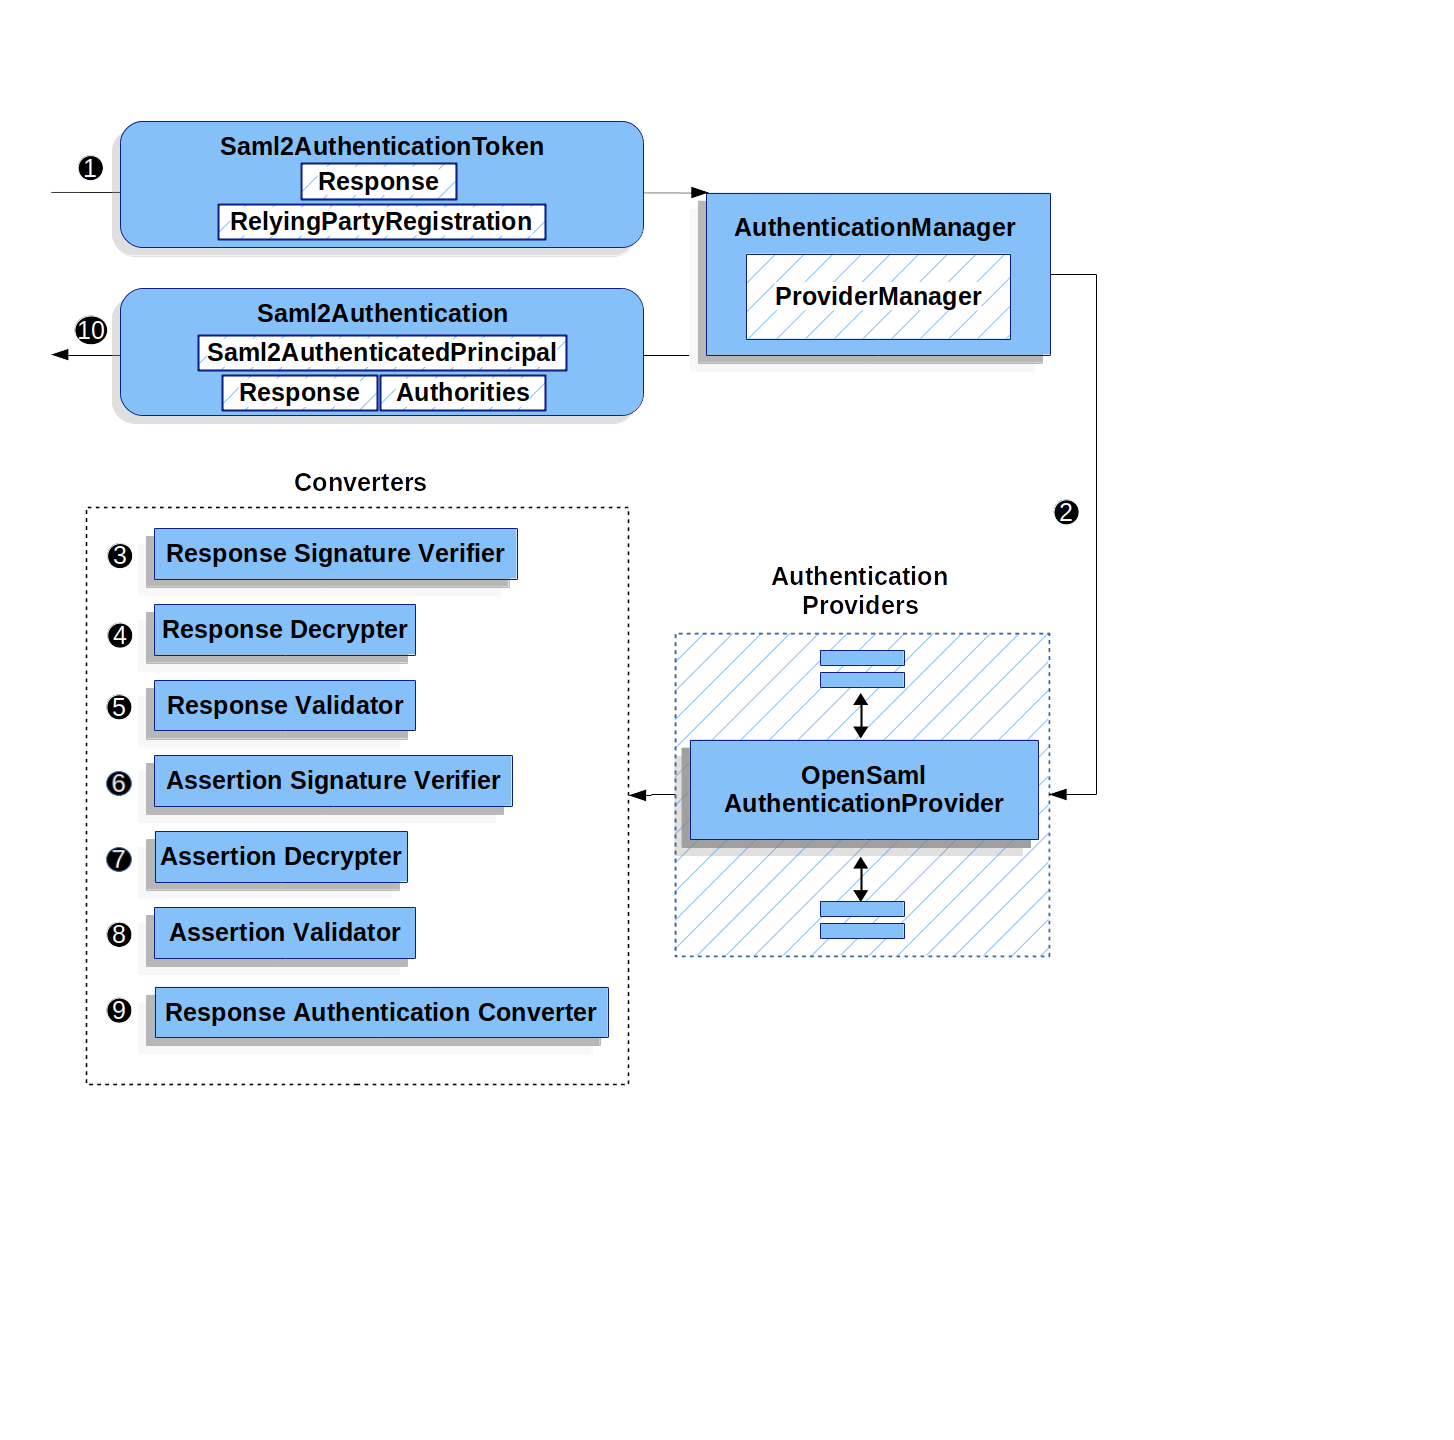
This figure builds off of the Saml2WebSsoAuthenticationFilter diagram.
![]() The
The Saml2WebSsoAuthenticationFilter formulates the Saml2AuthenticationToken and invokes the AuthenticationManager.
![]() The
The AuthenticationManager invokes the OpenSamlAuthenticationProvider.
![]() The authentication provider deserializes the response into an OpenSAML
The authentication provider deserializes the response into an OpenSAML Response and checks its signature.
If the signature is invalid, authentication fails.
![]() Then, the provider decrypts any
Then, the provider decrypts any EncryptedAssertion elements.
If any decryptions fail, authentication fails.
![]() Next, the provider validates the response’s
Next, the provider validates the response’s Issuer and Destination values.
If they don’t match what’s in the RelyingPartyRegistration, authentication fails.
![]() After that, the provider verifies the signature of each
After that, the provider verifies the signature of each Assertion.
If any signature is invalid, authentication fails.
Also, if neither the response nor the assertions have signatures, authentication fails.
Either the response or all the assertions must have signatures.
![]() Then, the provider decrypts any
Then, the provider decrypts any EncryptedID or EncryptedAttribute elements.
If any decryptions fail, authentication fails.
![]() Next, the provider validates each assertion’s
Next, the provider validates each assertion’s ExpiresAt and NotBefore timestamps, the <Subject> and any <AudienceRestriction> conditions.
If any validations fail, authentication fails.
![]() Following that, the provider takes the first assertion’s
Following that, the provider takes the first assertion’s AttributeStatement and maps it to a Map<String, List<Object>>.
It also grants the ROLE_USER granted authority.
![]() And finally, it takes the
And finally, it takes the NameID from the first assertion, the Map of attributes, and the GrantedAuthority and constructs a Saml2AuthenticatedPrincipal.
Then, it places that principal and the authorities into a Saml2Authentication.
The resulting Authentication#getPrincipal is a Spring Security Saml2AuthenticatedPrincipal object, and Authentication#getName maps to the first assertion’s NameID element.
Customizing OpenSAML Configuration
Any class that uses both Spring Security and OpenSAML should statically initialize OpenSamlInitializationService at the beginning of the class, like so:
static {
OpenSamlInitializationService.initialize();
}This replaces OpenSAML’s InitializationService#initialize.
Occasionally, it can be valuable to customize how OpenSAML builds, marshalls, and unmarshalls SAML objects.
In these circumstances, you may instead want to call OpenSamlInitializationService#requireInitialize(Consumer) that gives you access to OpenSAML’s XMLObjectProviderFactory.
For example, when sending an unsigned AuthNRequest, you may want to force reauthentication.
In that case, you can register your own AuthnRequestMarshaller, like so:
static {
OpenSamlInitializationService.requireInitialize(factory -> {
AuthnRequestMarshaller marshaller = new AuthnRequestMarshaller() {
@Override
public Element marshall(XMLObject object, Element element) throws MarshallingException {
configureAuthnRequest((AuthnRequest) object);
return super.marshall(object, element);
}
public Element marshall(XMLObject object, Document document) throws MarshallingException {
configureAuthnRequest((AuthnRequest) object);
return super.marshall(object, document);
}
private void configureAuthnRequest(AuthnRequest authnRequest) {
authnRequest.setForceAuthN(true);
}
}
factory.getMarshallerFactory().registerMarshaller(AuthnRequest.DEFAULT_ELEMENT_NAME, marshaller);
});
}The requireInitialize method may only be called once per application instance.
Overriding or Replacing Boot Auto Configuration
There are two @Bean s that Spring Boot generates for a relying party.
The first is a WebSecurityConfigurerAdapter that configures the app as a relying party.
When including spring-security-saml2-service-provider, the WebSecurityConfigurerAdapter looks like:
protected void configure(HttpSecurity http) {
http
.authorizeRequests(authorize -> authorize
.anyRequest().authenticated()
)
.saml2Login(withDefaults());
}fun configure(http: HttpSecurity) {
http {
authorizeRequests {
authorize(anyRequest, authenticated)
}
saml2Login { }
}
}If the application doesn’t expose a WebSecurityConfigurerAdapter bean, then Spring Boot will expose the above default one.
You can replace this by exposing the bean within the application:
@EnableWebSecurity
public class MyCustomSecurityConfiguration extends WebSecurityConfigurerAdapter {
protected void configure(HttpSecurity http) {
http
.authorizeRequests(authorize -> authorize
.mvcMatchers("/messages/**").hasAuthority("ROLE_USER")
.anyRequest().authenticated()
)
.saml2Login(withDefaults());
}
}@EnableWebSecurity
class MyCustomSecurityConfiguration : WebSecurityConfigurerAdapter() {
override fun configure(http: HttpSecurity) {
http {
authorizeRequests {
authorize("/messages/**", hasAuthority("ROLE_USER"))
authorize(anyRequest, authenticated)
}
saml2Login {
}
}
}
}The above requires the role of USER for any URL that starts with /messages/.
The second @Bean Spring Boot creates is a {security-api-url}org/springframework/security/saml2/provider/service/registration/RelyingPartyRegistrationRepository.html[RelyingPartyRegistrationRepository], which represents the asserting party and relying party metadata.
This includes things like the location of the SSO endpoint the relying party should use when requesting authentication from the asserting party.
You can override the default by publishing your own RelyingPartyRegistrationRepository bean.
For example, you can look up the asserting party’s configuration by hitting its metadata endpoint like so:
@Value("${metadata.location}")
String assertingPartyMetadataLocation;
@Bean
public RelyingPartyRegistrationRepository relyingPartyRegistrations() {
RelyingPartyRegistration registration = RelyingPartyRegistrations
.fromMetadataLocation(assertingPartyMetadataLocation)
.registrationId("example")
.build();
return new InMemoryRelyingPartyRegistrationRepository(registration);
}Or you can provide each detail manually, as you can see below:
@Value("${verification.key}")
File verificationKey;
@Bean
public RelyingPartyRegistrationRepository relyingPartyRegistrations() throws Exception {
X509Certificate certificate = X509Support.decodeCertificate(this.verificationKey);
Saml2X509Credential credential = Saml2X509Credential.verification(certificate);
RelyingPartyRegistration registration = RelyingPartyRegistration
.withRegistrationId("example")
.assertingPartyDetails(party -> party
.entityId("https://idp.example.com/issuer")
.singleSignOnServiceLocation("https://idp.example.com/SSO.saml2")
.wantAuthnRequestsSigned(false)
.verificationX509Credentials(c -> c.add(credential))
)
.build();
return new InMemoryRelyingPartyRegistrationRepository(registration);
}
Note that X509Support is an OpenSAML class, used here in the snippet for brevity
|
Alternatively, you can directly wire up the repository using the DSL, which will also override the auto-configured WebSecurityConfigurerAdapter:
@EnableWebSecurity
public class MyCustomSecurityConfiguration extends WebSecurityConfigurerAdapter {
protected void configure(HttpSecurity http) {
http
.authorizeRequests(authorize -> authorize
.mvcMatchers("/messages/**").hasAuthority("ROLE_USER")
.anyRequest().authenticated()
)
.saml2Login(saml2 -> saml2
.relyingPartyRegistrationRepository(relyingPartyRegistrations())
);
}
}@EnableWebSecurity
class MyCustomSecurityConfiguration : WebSecurityConfigurerAdapter() {
override fun configure(http: HttpSecurity) {
http {
authorizeRequests {
authorize("/messages/**", hasAuthority("ROLE_USER"))
authorize(anyRequest, authenticated)
}
saml2Login {
relyingPartyRegistrationRepository = relyingPartyRegistrations()
}
}
}
}
A relying party can be multi-tenant by registering more than one relying party in the RelyingPartyRegistrationRepository.
|
RelyingPartyRegistration
A {security-api-url}org/springframework/security/saml2/provider/service/registration/RelyingPartyRegistration.html[RelyingPartyRegistration]
instance represents a link between an relying party and assering party’s metadata.
In a RelyingPartyRegistration, you can provide relying party metadata like its Issuer value, where it expects SAML Responses to be sent to, and any credentials that it owns for the purposes of signing or decrypting payloads.
Also, you can provide asserting party metadata like its Issuer value, where it expects AuthnRequests to be sent to, and any public credentials that it owns for the purposes of the relying party verifying or encrypting payloads.
The following RelyingPartyRegistration is the minimum required for most setups:
RelyingPartyRegistration relyingPartyRegistration = RelyingPartyRegistrations
.fromMetadataLocation("https://ap.example.org/metadata")
.registrationId("my-id")
.build();Though a more sophisticated setup is also possible, like so:
RelyingPartyRegistration relyingPartyRegistration = RelyingPartyRegistration.withRegistrationId("my-id")
.entityId("{baseUrl}/{registrationId}")
.decryptionX509Credentials(c -> c.add(relyingPartyDecryptingCredential()))
.assertionConsumerServiceLocation("/my-login-endpoint/{registrationId}")
.assertingParty(party -> party
.entityId("https://ap.example.org")
.verificationX509Credentials(c -> c.add(assertingPartyVerifyingCredential()))
.singleSignOnServiceLocation("https://ap.example.org/SSO.saml2")
);
The top-level metadata methods are details about the relying party.
The methods inside assertingPartyDetails are details about the asserting party.
|
| The location where a relying party is expecting SAML Responses is the Assertion Consumer Service Location. |
The default for the relying party’s entityId is {baseUrl}/saml2/service-provider-metadata/{registrationId}.
This is this value needed when configuring the asserting party to know about your relying party.
The default for the assertionConsumerServiceLocation is /login/saml2/sso/{registrationId}.
It’s mapped by default to Saml2WebSsoAuthenticationFilter in the filter chain.
URI Patterns
You probably noticed in the above examples the {baseUrl} and {registrationId} placeholders.
These are useful for generating URIs. As such, the relying party’s entityId and assertionConsumerServiceLocation support the following placeholders:
-
baseUrl- the scheme, host, and port of a deployed application -
registrationId- the registration id for this relying party -
baseScheme- the scheme of a deployed application -
baseHost- the host of a deployed application -
basePort- the port of a deployed application
For example, the assertionConsumerServiceLocation defined above was:
/my-login-endpoint/{registrationId}
which in a deployed application would translate to
/my-login-endpoint/adfs
The entityId above was defined as:
{baseUrl}/{registrationId}
which in a deployed application would translate to
https://rp.example.com/adfs
Credentials
You also likely noticed the credential that was used.
Oftentimes, a relying party will use the same key to sign payloads as well as decrypt them. Or it will use the same key to verify payloads as well as encrypt them.
Because of this, Spring Security ships with Saml2X509Credential, a SAML-specific credential that simplifies configuring the same key for different use cases.
At a minimum, it’s necessary to have a certificate from the asserting party so that the asserting party’s signed responses can be verified.
To construct a Saml2X509Credential that you’ll use to verify assertions from the asserting party, you can load the file and use
the CertificateFactory like so:
Resource resource = new ClassPathResource("ap.crt");
try (InputStream is = resource.getInputStream()) {
X509Certificate certificate = (X509Certificate)
CertificateFactory.getInstance("X.509").generateCertificate(is);
return Saml2X509Credential.verification(certificate);
}Let’s say that the asserting party is going to also encrypt the assertion. In that case, the relying party will need a private key to be able to decrypt the encrypted value.
In that case, you’ll need an RSAPrivateKey as well as its corresponding X509Certificate.
You can load the first using Spring Security’s RsaKeyConverters utility class and the second as you did before:
X509Certificate certificate = relyingPartyDecryptionCertificate();
Resource resource = new ClassPathResource("rp.crt");
try (InputStream is = resource.getInputStream()) {
RSAPrivateKey rsa = RsaKeyConverters.pkcs8().convert(is);
return Saml2X509Credential.decryption(rsa, certificate);
}| When you specify the locations of these files as the appropriate Spring Boot properties, then Spring Boot will perform these conversions for you. |
Resolving the Relying Party from the Request
As seen so far, Spring Security resolves the RelyingPartyRegistration by looking for the registration id in the URI path.
There are a number of reasons you may want to customize. Among them:
-
You may know that you will never be a multi-tenant application and so want to have a simpler URL scheme
-
You may identify tenants in a way other than by the URI path
To customize the way that a RelyingPartyRegistration is resolved, you can configure a custom Converter<HttpServletRequest, RelyingPartyRegistration>.
The default looks up the registration id from the URI’s last path element and looks it up in your RelyingPartyRegistrationRepository.
You can provide a simpler resolver that, for example, always returns the same relying party:
public class SingleRelyingPartyRegistrationResolver
implements Converter<HttpServletRequest, RelyingPartyRegistration> {
@Override
public RelyingPartyRegistration convert(HttpServletRequest request) {
return this.relyingParty;
}
}Then, you can provide this resolver to the appropriate filters that produce <saml2:AuthnRequest> s, authenticate <saml2:Response> s, and produce <saml2:SPSSODescriptor> metadata.
Remember that if you have any placeholders in your RelyingPartyRegistration, your resolver implementation should resolve them.
|
Duplicated Relying Party Configurations
When an application uses multiple asserting parties, some configuration is duplicated between RelyingPartyRegistration instances:
-
The relying party’s
entityId -
Its
assertionConsumerServiceLocation, and -
Its credentials, for example its signing or decryption credentials
What’s nice about this setup is credentials may be more easily rotated for some identity providers vs others.
The duplication can be alleviated in a few different ways.
First, in YAML this can be alleviated with references, like so:
spring:
security:
saml2:
relyingparty:
okta:
signing.credentials: &relying-party-credentials
- private-key-location: classpath:rp.key
- certificate-location: classpath:rp.crt
identityprovider:
entity-id: ...
azure:
signing.credentials: *relying-party-credentials
identityprovider:
entity-id: ...Second, in a database, it’s not necessary to replicate RelyingPartyRegistration 's model.
Third, in Java, you can create a custom configuration method, like so:
private RelyingPartyRegistration.Builder
addRelyingPartyDetails(RelyingPartyRegistration.Builder builder) {
Saml2X509Credential signingCredential = ...
builder.signingX509Credentials(c -> c.addAll(signingCredential));
// ... other relying party configurations
}
@Bean
public RelyingPartyRegistrationRepository relyingPartyRegistrations() {
RelyingPartyRegistration okta = addRelyingPartyDetails(
RelyingPartyRegistration
.fromMetadataLocation(oktaMetadataUrl)
.registrationId("okta")).build();
RelyingPartyRegistration azure = addRelyingPartyDetails(
RelyingPartyRegistration
.fromMetadataLocation(oktaMetadataUrl)
.registrationId("azure")).build();
return new InMemoryRelyingPartyRegistrationRepository(okta, azure);
}Producing <saml2:AuthnRequest> s
As stated earlier, Spring Security’s SAML 2.0 support produces a <saml2:AuthnRequest> to commence authentication with the asserting party.
Spring Security achieves this in part by registering the Saml2WebSsoAuthenticationRequestFilter in the filter chain.
This filter by default responds to endpoint /saml2/authenticate/{registrationId}.
For example, if you were deployed to https://rp.example.com and you gave your registration an ID of okta, you could navigate to:
and the result would be a redirect that included a SAMLRequest parameter containing the signed, deflated, and encoded <saml2:AuthnRequest>.
Changing How the <saml2:AuthnRequest> Gets Sent
By default, Spring Security signs each <saml2:AuthnRequest> and send it as a GET to the asserting party.
Many asserting parties don’t require a signed <saml2:AuthnRequest>.
This can be configured automatically via RelyingPartyRegistrations, or you can supply it manually, like so:
spring:
security:
saml2:
relyingparty:
okta:
identityprovider:
entity-id: ...
singlesignon.sign-request: falseRelyingPartyRegistration relyingPartyRegistration = RelyingPartyRegistration.withRegistrationId("okta")
// ...
.assertingPartyDetails(party -> party
// ...
.wantAuthnRequestsSigned(false)
);Otherwise, you will need to specify a private key to RelyingPartyRegistration#signingX509Credentials so that Spring Security can sign the <saml2:AuthnRequest> before sending.
By default, Spring Security will sign the <saml2:AuthnRequest> using rsa-sha256, though some asserting parties will require a different algorithm, as indicated in their metadata.
You can configure the algorithm based on the asserting party’s metadata using RelyingPartyRegistrations.
Or, you can provide it manually:
String metadataLocation = "classpath:asserting-party-metadata.xml";
RelyingPartyRegistration relyingPartyRegistration = RelyingPartyRegistrations.fromMetadataLocation(metadataLocation)
// ...
.assertingPartyDetails((party) -> party
// ...
.signingAlgorithms((sign) -> sign.add(SignatureConstants.ALGO_ID_SIGNATURE_RSA_SHA512))
);
The snippet above uses the OpenSAML SignatureConstants class to supply the algorithm name.
But, that’s just for convenience.
Since the datatype is String, you can supply the name of the algorithm directly.
|
Some asserting parties require that the <saml2:AuthnRequest> be POSTed.
This can be configured automatically via RelyingPartyRegistrations, or you can supply it manually, like so:
RelyingPartyRegistration relyingPartyRegistration = RelyingPartyRegistration.withRegistrationId("okta")
// ...
.assertingPartyDetails(party -> party
// ...
.singleSignOnServiceBinding(Saml2MessageType.POST)
);Customizing OpenSAML’s AuthnRequest Instance
There are a number of reasons that you may want to adjust an AuthnRequest.
For example, you may want ForceAuthN to be set to true, which Spring Security sets to false by default.
If you don’t need information from the HttpServletRequest to make your decision, then the easiest way is to register a custom AuthnRequestMarshaller with OpenSAML.
This will give you access to post-process the AuthnRequest instance before it’s serialized.
But, if you do need something from the request, then you can use create a custom Saml2AuthenticationRequestContext implementation and then a Converter<Saml2AuthenticationRequestContext, AuthnRequest> to build an AuthnRequest yourself, like so:
@Component
public class AuthnRequestConverter implements
Converter<MySaml2AuthenticationRequestContext, AuthnRequest> {
private final AuthnRequestBuilder authnRequestBuilder;
private final IssuerBuilder issuerBuilder;
// ... constructor
public AuthnRequest convert(Saml2AuthenticationRequestContext context) {
MySaml2AuthenticationRequestContext myContext = (MySaml2AuthenticationRequestContext) context;
Issuer issuer = issuerBuilder.buildObject();
issuer.setValue(myContext.getIssuer());
AuthnRequest authnRequest = authnRequestBuilder.buildObject();
authnRequest.setIssuer(iss);
authnRequest.setDestination(myContext.getDestination());
authnRequest.setAssertionConsumerServiceURL(myContext.getAssertionConsumerServiceUrl());
// ... additional settings
authRequest.setForceAuthn(myContext.getForceAuthn());
return authnRequest;
}
}Then, you can construct your own Saml2AuthenticationRequestContextResolver and Saml2AuthenticationRequestFactory and publish them as @Bean s:
@Bean
Saml2AuthenticationRequestContextResolver authenticationRequestContextResolver() {
Saml2AuthenticationRequestContextResolver resolver =
new DefaultSaml2AuthenticationRequestContextResolver();
return request -> {
Saml2AuthenticationRequestContext context = resolver.resolve(request);
return new MySaml2AuthenticationRequestContext(context, request.getParameter("force") != null);
};
}
@Bean
Saml2AuthenticationRequestFactory authenticationRequestFactory(
AuthnRequestConverter authnRequestConverter) {
OpenSamlAuthenticationRequestFactory authenticationRequestFactory =
new OpenSamlAuthenticationRequestFactory();
authenticationRequestFactory.setAuthenticationRequestContextConverter(authnRequestConverter);
return authenticationRequestFactory;
}Authenticating <saml2:Response> s
To verify SAML 2.0 Responses, Spring Security uses OpenSamlAuthenticationProvider by default.
You can configure this in a number of ways including:
-
Setting a clock skew to timestamp validation
-
Mapping the response to a list of
GrantedAuthorityinstances -
Customizing the strategy for validating assertions
-
Customizing the strategy for decrypting response and assertion elements
To configure these, you’ll use the saml2Login#authenticationManager method in the DSL.
Setting a Clock Skew
It’s not uncommon for the asserting and relying parties to have system clocks that aren’t perfectly synchronized.
For that reason, you can configure OpenSamlAuthenticationProvider 's default assertion validator with some tolerance:
@EnableWebSecurity
public class SecurityConfig extends WebSecurityConfigurerAdapter {
@Override
protected void configure(HttpSecurity http) throws Exception {
OpenSamlAuthenticationProvider authenticationProvider = new OpenSamlAuthenticationProvider();
authenticationProvider.setAssertionValidator(OpenSamlAuthenticationProvider
.createDefaultAssertionValidator(assertionToken -> {
Map<String, Object> params = new HashMap<>();
params.put(CLOCK_SKEW, Duration.ofMinutes(10).toMillis());
// ... other validation parameters
return new ValidationContext(params);
})
);
http
.authorizeRequests(authz -> authz
.anyRequest().authenticated()
)
.saml2Login(saml2 -> saml2
.authenticationManager(new ProviderManager(authenticationProvider))
);
}
}Coordinating with a UserDetailsService
Or, perhaps you would like to include user details from a legacy UserDetailsService.
In that case, the response authentication converter can come in handy, as can be seen below:
@EnableWebSecurity
public class SecurityConfig extends WebSecurityConfigurerAdapter {
@Autowired
UserDetailsService userDetailsService;
@Override
protected void configure(HttpSecurity http) throws Exception {
OpenSamlAuthenticationProvider authenticationProvider = new OpenSamlAuthenticationProvider();
authenticationProvider.setResponseAuthenticationConverter(responseToken -> {
Saml2Authentication authentication = OpenSamlAuthenticationProvider
.createDefaultResponseAuthenticationConverter() (1)
.convert(responseToken);
Assertion assertion = responseToken.getResponse().getAssertions().get(0);
String username = assertion.getSubject().getNameID().getValue();
UserDetails userDetails = this.userDetailsService.loadUserByUsername(username); (2)
return MySaml2Authentication(userDetails, authentication); (3)
});
http
.authorizeRequests(authz -> authz
.anyRequest().authenticated()
)
.saml2Login(saml2 -> saml2
.authenticationManager(new ProviderManager(authenticationProvider))
);
}
}| 1 | First, call the default converter, which extracts attributes and authorities from the response |
| 2 | Second, call the UserDetailsService using the relevant information |
| 3 | Third, return a custom authentication that includes the user details |
It’s not required to call OpenSamlAuthenticationProvider 's default authentication converter.
It returns a Saml2AuthenticatedPrincipal containing the attributes it extracted from AttributeStatement s as well as the single ROLE_USER authority.
|
Performing Additional Validation
OpenSamlAuthenticationProvider performs minimal validation on SAML 2.0 Assertions.
After verifying the signature, it will:
-
Validate
<AudienceRestriction>and<DelegationRestriction>conditions -
Validate
<SubjectConfirmation>s, expect for any IP address information
To perform additional validation, you can configure your own assertion validator that delegates to OpenSamlAuthenticationProvider 's default and then performs its own.
For example, you can use OpenSAML’s OneTimeUseConditionValidator to also validate a <OneTimeUse> condition, like so:
OpenSamlAuthenticationProvider provider = new OpenSamlAuthenticationProvider();
OneTimeUseConditionValidator validator = ...;
provider.setAssertionValidator(assertionToken -> {
Saml2ResponseValidatorResult result = OpenSamlAuthenticationProvider
.createDefaultAssertionValidator()
.convert(assertionToken);
Assertion assertion = assertionToken.getAssertion();
OneTimeUse oneTimeUse = assertion.getConditions().getOneTimeUse();
ValidationContext context = new ValidationContext();
try {
if (validator.validate(oneTimeUse, assertion, context) == ValidationResult.VALID) {
return result;
}
} catch (Exception e) {
return result.concat(new Saml2Error(INVALID_ASSERTION, e.getMessage()));
}
return result.contact(new Saml2Error(INVALID_ASSERTION, context.getValidationFailureMessage()));
});
While recommended, it’s not necessary to call OpenSamlAuthenticationProvider 's default assertion validator.
A circumstance where you would skip it would be if you don’t need it to check the <AudienceRestriction> or the <SubjectConfirmation> since you are doing those yourself.
|
Customizing Decryption
Spring Security decrypts <saml2:EncryptedAssertion>, <saml2:EncryptedAttribute>, and <saml2:EncryptedID> elements automatically by using the decryption Saml2X509Credential instances registered in the RelyingPartyRegistration.
OpenSamlAuthenticationProvider exposes two decryption strategies.
The response decrypter is for decrypting encrypted elements of the <saml2:Response>, like <saml2:EncryptedAssertion>.
The assertion decrypter is for decrypting encrypted elements of the <saml2:Assertion>, like <saml2:EncryptedAttribute> and <saml2:EncryptedID>.
You can replace OpenSamlAuthenticationProvider’s default decryption strategy with your own.
For example, if you have a separate service that decrypts the assertions in a `<saml2:Response>, you can use it instead like so:
MyDecryptionService decryptionService = ...;
OpenSamlAuthenticationProvider provider = new OpenSamlAuthenticationProvider();
provider.setResponseElementsDecrypter((responseToken) -> decryptionService.decrypt(responseToken.getResponse()));If you are also decrypting individual elements in a <saml2:Assertion>, you can customize the assertion decrypter, too:
provider.setAssertionElementsDecrypter((assertionToken) -> decryptionService.decrypt(assertionToken.getAssertion()));| There are two separate decrypters since assertions can be signed separately from responses. Trying to decrypt a signed assertion’s elements before signature verification may invalidate the signature. If your asserting party signs the response only, then it’s safe to decrypt all elements using only the response decrypter. |
Using a Custom Authentication Manager
Of course, the authenticationManager DSL method can be also used to perform a completely custom SAML 2.0 authentication.
This authentication manager should expect a Saml2AuthenticationToken object containing the SAML 2.0 Response XML data.
@EnableWebSecurity
public class SecurityConfig extends WebSecurityConfigurerAdapter {
@Override
protected void configure(HttpSecurity http) throws Exception {
AuthenticationManager authenticationManager = new MySaml2AuthenticationManager(...);
http
.authorizeRequests(authorize -> authorize
.anyRequest().authenticated()
)
.saml2Login(saml2 -> saml2
.authenticationManager(authenticationManager)
)
;
}
}Using Saml2AuthenticatedPrincipal
With the relying party correctly configured for a given asserting party, it’s ready to accept assertions.
Once the relying party validates an assertion, the result is a Saml2Authentication with a Saml2AuthenticatedPrincipal.
This means that you can access the principal in your controller like so:
@Controller
public class MainController {
@GetMapping("/")
public String index(@AuthenticationPrincipal Saml2AuthenticatedPrincipal principal, Model model) {
String email = principal.getFirstAttribute("email");
model.setAttribute("email", email);
return "index";
}
}
Because the SAML 2.0 specification allows for each attribute to have multiple values, you can either call getAttribute to get the list of attributes or getFirstAttribute to get the first in the list.
getFirstAttribute is quite handy when you know that there is only one value.
|
Producing <saml2:SPSSODescriptor> Metadata
You can publish a metadata endpoint by adding the Saml2MetadataFilter to the filter chain, as you’ll see below:
Converter<HttpServletRequest, RelyingPartyRegistration> relyingPartyRegistrationResolver =
new DefaultRelyingPartyRegistrationResolver(this.relyingPartyRegistrationRepository);
Saml2MetadataFilter filter = new Saml2MetadataFilter(
relyingPartyRegistrationResolver,
new OpenSamlMetadataResolver());
http
// ...
.saml2Login(withDefaults())
.addFilterBefore(new Saml2MetadataFilter(r), Saml2WebSsoAuthenticationFilter.class);You can use this metadata endpoint to register your relying party with your asserting party. This is often as simple as finding the correct form field to supply the metadata endpoint.
By default, the metadata endpoint is /saml2/service-provider-metadata/{registrationId}.
You can change this by calling the setRequestMatcher method on the filter:
filter.setRequestMatcher(new AntPathRequestMatcher("/saml2/metadata/{registrationId}", "GET"));ensuring that the registrationId hint is at the end of the path.
Or, if you have registered a custom relying party registration resolver in the constructor, then you can specify a path without a registrationId hint, like so:
filter.setRequestMatcher(new AntPathRequestMatcher("/saml2/metadata", "GET"));Performing Single Logout
Spring Security does not yet support single logout.
Generally speaking, though, you can achieve this by creating and registering a custom LogoutSuccessHandler and RequestMatcher:
http
// ...
.logout(logout -> logout
.logoutSuccessHandler(myCustomSuccessHandler())
.logoutRequestMatcher(myRequestMatcher())
)The success handler will send logout requests to the asserting party.
The request matcher will detect logout requests from the asserting party.
Protection Against Exploits
This section discusses protection against servlet exploits.
Unresolved include directive in modules/ROOT/pages/servlet/index.adoc - include::integrations/index.adoc[]
Java Configuration
General support for Java Configuration was added to Spring Framework in Spring 3.1. Since Spring Security 3.2 there has been Spring Security Java Configuration support which enables users to easily configure Spring Security without the use of any XML.
If you are familiar with the Security Namespace Configuration then you should find quite a few similarities between it and the Security Java Configuration support.
| Spring Security provides lots of sample applications which demonstrate the use of Spring Security Java Configuration. |
Hello Web Security Java Configuration
The first step is to create our Spring Security Java Configuration.
The configuration creates a Servlet Filter known as the springSecurityFilterChain which is responsible for all the security (protecting the application URLs, validating submitted username and passwords, redirecting to the log in form, etc) within your application.
You can find the most basic example of a Spring Security Java Configuration below:
import org.springframework.beans.factory.annotation.Autowired;
import org.springframework.context.annotation.*;
import org.springframework.security.config.annotation.authentication.builders.*;
import org.springframework.security.config.annotation.web.configuration.*;
@EnableWebSecurity
public class WebSecurityConfig {
@Bean
public UserDetailsService userDetailsService() {
InMemoryUserDetailsManager manager = new InMemoryUserDetailsManager();
manager.createUser(User.withDefaultPasswordEncoder().username("user").password("password").roles("USER").build());
return manager;
}
}There really isn’t much to this configuration, but it does a lot. You can find a summary of the features below:
-
Require authentication to every URL in your application
-
Generate a login form for you
-
Allow the user with the Username user and the Password password to authenticate with form based authentication
-
Allow the user to logout
-
CSRF attack prevention
-
Session Fixation protection
-
Security Header integration
-
HTTP Strict Transport Security for secure requests
-
X-Content-Type-Options integration
-
Cache Control (can be overridden later by your application to allow caching of your static resources)
-
X-XSS-Protection integration
-
X-Frame-Options integration to help prevent Clickjacking
-
-
Integrate with the following Servlet API methods
AbstractSecurityWebApplicationInitializer
The next step is to register the springSecurityFilterChain with the war.
This can be done in Java Configuration with Spring’s WebApplicationInitializer support in a Servlet 3.0+ environment.
Not suprisingly, Spring Security provides a base class AbstractSecurityWebApplicationInitializer that will ensure the springSecurityFilterChain gets registered for you.
The way in which we use AbstractSecurityWebApplicationInitializer differs depending on if we are already using Spring or if Spring Security is the only Spring component in our application.
-
[abstractsecuritywebapplicationinitializer-without-existing-spring] - Use these instructions if you are not using Spring already
-
[abstractsecuritywebapplicationinitializer-with-spring-mvc] - Use these instructions if you are already using Spring
AbstractSecurityWebApplicationInitializer without Existing Spring
If you are not using Spring or Spring MVC, you will need to pass in the WebSecurityConfig into the superclass to ensure the configuration is picked up.
You can find an example below:
import org.springframework.security.web.context.*;
public class SecurityWebApplicationInitializer
extends AbstractSecurityWebApplicationInitializer {
public SecurityWebApplicationInitializer() {
super(WebSecurityConfig.class);
}
}The SecurityWebApplicationInitializer will do the following things:
-
Automatically register the springSecurityFilterChain Filter for every URL in your application
-
Add a ContextLoaderListener that loads the WebSecurityConfig.
AbstractSecurityWebApplicationInitializer with Spring MVC
If we were using Spring elsewhere in our application we probably already had a WebApplicationInitializer that is loading our Spring Configuration.
If we use the previous configuration we would get an error.
Instead, we should register Spring Security with the existing ApplicationContext.
For example, if we were using Spring MVC our SecurityWebApplicationInitializer would look something like the following:
import org.springframework.security.web.context.*;
public class SecurityWebApplicationInitializer
extends AbstractSecurityWebApplicationInitializer {
}This would simply only register the springSecurityFilterChain Filter for every URL in your application.
After that we would ensure that WebSecurityConfig was loaded in our existing ApplicationInitializer.
For example, if we were using Spring MVC it would be added in the getRootConfigClasses()
public class MvcWebApplicationInitializer extends
AbstractAnnotationConfigDispatcherServletInitializer {
@Override
protected Class<?>[] getRootConfigClasses() {
return new Class[] { WebSecurityConfig.class };
}
// ... other overrides ...
}HttpSecurity
Thus far our WebSecurityConfig only contains information about how to authenticate our users.
How does Spring Security know that we want to require all users to be authenticated?
How does Spring Security know we want to support form based authentication?
Actually, there is a configuration class that is being invoked behind the scenes called WebSecurityConfigurerAdapter.
It has a method called configure with the following default implementation:
protected void configure(HttpSecurity http) throws Exception {
http
.authorizeRequests(authorize -> authorize
.anyRequest().authenticated()
)
.formLogin(withDefaults())
.httpBasic(withDefaults());
}The default configuration above:
-
Ensures that any request to our application requires the user to be authenticated
-
Allows users to authenticate with form based login
-
Allows users to authenticate with HTTP Basic authentication
You will notice that this configuration is quite similar the XML Namespace configuration:
<http>
<intercept-url pattern="/**" access="authenticated"/>
<form-login />
<http-basic />
</http>Multiple HttpSecurity
We can configure multiple HttpSecurity instances just as we can have multiple <http> blocks.
The key is to extend the WebSecurityConfigurerAdapter multiple times.
For example, the following is an example of having a different configuration for URL’s that start with /api/.
@EnableWebSecurity
public class MultiHttpSecurityConfig {
@Bean (1)
public UserDetailsService userDetailsService() throws Exception {
// ensure the passwords are encoded properly
UserBuilder users = User.withDefaultPasswordEncoder();
InMemoryUserDetailsManager manager = new InMemoryUserDetailsManager();
manager.createUser(users.username("user").password("password").roles("USER").build());
manager.createUser(users.username("admin").password("password").roles("USER","ADMIN").build());
return manager;
}
@Configuration
@Order(1) (2)
public static class ApiWebSecurityConfigurationAdapter extends WebSecurityConfigurerAdapter {
protected void configure(HttpSecurity http) throws Exception {
http
.antMatcher("/api/**") (3)
.authorizeRequests(authorize -> authorize
.anyRequest().hasRole("ADMIN")
)
.httpBasic(withDefaults());
}
}
@Configuration (4)
public static class FormLoginWebSecurityConfigurerAdapter extends WebSecurityConfigurerAdapter {
@Override
protected void configure(HttpSecurity http) throws Exception {
http
.authorizeRequests(authorize -> authorize
.anyRequest().authenticated()
)
.formLogin(withDefaults());
}
}
}| 1 | Configure Authentication as normal |
| 2 | Create an instance of WebSecurityConfigurerAdapter that contains @Order to specify which WebSecurityConfigurerAdapter should be considered first. |
| 3 | The http.antMatcher states that this HttpSecurity will only be applicable to URLs that start with /api/ |
| 4 | Create another instance of WebSecurityConfigurerAdapter.
If the URL does not start with /api/ this configuration will be used.
This configuration is considered after ApiWebSecurityConfigurationAdapter since it has an @Order value after 1 (no @Order defaults to last). |
Custom DSLs
You can provide your own custom DSLs in Spring Security. For example, you might have something that looks like this:
public class MyCustomDsl extends AbstractHttpConfigurer<MyCustomDsl, HttpSecurity> {
private boolean flag;
@Override
public void init(HttpSecurity http) throws Exception {
// any method that adds another configurer
// must be done in the init method
http.csrf().disable();
}
@Override
public void configure(HttpSecurity http) throws Exception {
ApplicationContext context = http.getSharedObject(ApplicationContext.class);
// here we lookup from the ApplicationContext. You can also just create a new instance.
MyFilter myFilter = context.getBean(MyFilter.class);
myFilter.setFlag(flag);
http.addFilterBefore(myFilter, UsernamePasswordAuthenticationFilter.class);
}
public MyCustomDsl flag(boolean value) {
this.flag = value;
return this;
}
public static MyCustomDsl customDsl() {
return new MyCustomDsl();
}
}
This is actually how methods like HttpSecurity.authorizeRequests() are implemented.
|
The custom DSL can then be used like this:
@EnableWebSecurity
public class Config extends WebSecurityConfigurerAdapter {
@Override
protected void configure(HttpSecurity http) throws Exception {
http
.apply(customDsl())
.flag(true)
.and()
...;
}
}The code is invoked in the following order:
-
Code in `Config`s configure method is invoked
-
Code in `MyCustomDsl`s init method is invoked
-
Code in `MyCustomDsl`s configure method is invoked
If you want, you can have WebSecurityConfigurerAdapter add MyCustomDsl by default by using SpringFactories.
For example, you would create a resource on the classpath named META-INF/spring.factories with the following contents:
org.springframework.security.config.annotation.web.configurers.AbstractHttpConfigurer = sample.MyCustomDsl
Users wishing to disable the default can do so explicitly.
@EnableWebSecurity
public class Config extends WebSecurityConfigurerAdapter {
@Override
protected void configure(HttpSecurity http) throws Exception {
http
.apply(customDsl()).disable()
...;
}
}Post Processing Configured Objects
Spring Security’s Java Configuration does not expose every property of every object that it configures. This simplifies the configuration for a majority of users. Afterall, if every property was exposed, users could use standard bean configuration.
While there are good reasons to not directly expose every property, users may still need more advanced configuration options.
To address this Spring Security introduces the concept of an ObjectPostProcessor which can be used to modify or replace many of the Object instances created by the Java Configuration.
For example, if you wanted to configure the filterSecurityPublishAuthorizationSuccess property on FilterSecurityInterceptor you could use the following:
@Override
protected void configure(HttpSecurity http) throws Exception {
http
.authorizeRequests(authorize -> authorize
.anyRequest().authenticated()
.withObjectPostProcessor(new ObjectPostProcessor<FilterSecurityInterceptor>() {
public <O extends FilterSecurityInterceptor> O postProcess(
O fsi) {
fsi.setPublishAuthorizationSuccess(true);
return fsi;
}
})
);
}Kotlin Configuration
Spring Security Kotlin Configuration support has been available since Spring Security 5.3. It enables users to easily configure Spring Security using a native Kotlin DSL.
| Spring Security provides a sample application which demonstrates the use of Spring Security Kotlin Configuration. |
HttpSecurity
How does Spring Security know that we want to require all users to be authenticated?
How does Spring Security know we want to support form based authentication?
There is a configuration class that is being invoked behind the scenes called WebSecurityConfigurerAdapter.
It has a method called configure with the following default implementation:
fun configure(http: HttpSecurity) {
http {
authorizeRequests {
authorize(anyRequest, authenticated)
}
formLogin { }
httpBasic { }
}
}The default configuration above:
-
Ensures that any request to our application requires the user to be authenticated
-
Allows users to authenticate with form based login
-
Allows users to authenticate with HTTP Basic authentication
You will notice that this configuration is quite similar the XML Namespace configuration:
<http>
<intercept-url pattern="/**" access="authenticated"/>
<form-login />
<http-basic />
</http>Multiple HttpSecurity
We can configure multiple HttpSecurity instances just as we can have multiple <http> blocks.
The key is to extend the WebSecurityConfigurerAdapter multiple times.
For example, the following is an example of having a different configuration for URL’s that start with /api/.
@EnableWebSecurity
class MultiHttpSecurityConfig {
@Bean (1)
public fun userDetailsService(): UserDetailsService {
val users: User.UserBuilder = User.withDefaultPasswordEncoder()
val manager = InMemoryUserDetailsManager()
manager.createUser(users.username("user").password("password").roles("USER").build())
manager.createUser(users.username("admin").password("password").roles("USER","ADMIN").build())
return manager
}
@Configuration
@Order(1) (2)
class ApiWebSecurityConfigurationAdapter: WebSecurityConfigurerAdapter() {
override fun configure(http: HttpSecurity) {
http {
securityMatcher("/api/**") (3)
authorizeRequests {
authorize(anyRequest, hasRole("ADMIN"))
}
httpBasic { }
}
}
}
@Configuration (4)
class FormLoginWebSecurityConfigurerAdapter: WebSecurityConfigurerAdapter() {
override fun configure(http: HttpSecurity) {
http {
authorizeRequests {
authorize(anyRequest, authenticated)
}
formLogin { }
}
}
}
}| 1 | Configure Authentication as normal |
| 2 | Create an instance of WebSecurityConfigurerAdapter that contains @Order to specify which WebSecurityConfigurerAdapter should be considered first. |
| 3 | The http.antMatcher states that this HttpSecurity will only be applicable to URLs that start with /api/ |
| 4 | Create another instance of WebSecurityConfigurerAdapter.
If the URL does not start with /api/ this configuration will be used.
This configuration is considered after ApiWebSecurityConfigurationAdapter since it has an @Order value after 1 (no @Order defaults to last). |
Security Namespace Configuration
Introduction
Namespace configuration has been available since version 2.0 of the Spring Framework. It allows you to supplement the traditional Spring beans application context syntax with elements from additional XML schema. You can find more information in the Spring Reference Documentation. A namespace element can be used simply to allow a more concise way of configuring an individual bean or, more powerfully, to define an alternative configuration syntax which more closely matches the problem domain and hides the underlying complexity from the user. A simple element may conceal the fact that multiple beans and processing steps are being added to the application context. For example, adding the following element from the security namespace to an application context will start up an embedded LDAP server for testing use within the application:
<security:ldap-server />This is much simpler than wiring up the equivalent Apache Directory Server beans.
The most common alternative configuration requirements are supported by attributes on the ldap-server element and the user is isolated from worrying about which beans they need to create and what the bean property names are.
[1].
Use of a good XML editor while editing the application context file should provide information on the attributes and elements that are available.
We would recommend that you try out the Eclipse IDE with Spring Tools as it has special features for working with standard Spring namespaces.
To start using the security namespace in your application context, you need to have the spring-security-config jar on your classpath.
Then all you need to do is add the schema declaration to your application context file:
<beans xmlns="http://www.springframework.org/schema/beans"
xmlns:security="http://www.springframework.org/schema/security"
xmlns:xsi="http://www.w3.org/2001/XMLSchema-instance"
xsi:schemaLocation="http://www.springframework.org/schema/beans
https://www.springframework.org/schema/beans/spring-beans-3.0.xsd
http://www.springframework.org/schema/security
https://www.springframework.org/schema/security/spring-security.xsd">
...
</beans>In many of the examples you will see (and in the sample applications), we will often use "security" as the default namespace rather than "beans", which means we can omit the prefix on all the security namespace elements, making the content easier to read. You may also want to do this if you have your application context divided up into separate files and have most of your security configuration in one of them. Your security application context file would then start like this
<beans:beans xmlns="http://www.springframework.org/schema/security"
xmlns:beans="http://www.springframework.org/schema/beans"
xmlns:xsi="http://www.w3.org/2001/XMLSchema-instance"
xsi:schemaLocation="http://www.springframework.org/schema/beans
https://www.springframework.org/schema/beans/spring-beans-3.0.xsd
http://www.springframework.org/schema/security
https://www.springframework.org/schema/security/spring-security.xsd">
...
</beans:beans>We’ll assume this syntax is being used from now on in this chapter.
Design of the Namespace
The namespace is designed to capture the most common uses of the framework and provide a simplified and concise syntax for enabling them within an application. The design is based around the large-scale dependencies within the framework, and can be divided up into the following areas:
-
Web/HTTP Security - the most complex part. Sets up the filters and related service beans used to apply the framework authentication mechanisms, to secure URLs, render login and error pages and much more.
-
Business Object (Method) Security - options for securing the service layer.
-
AuthenticationManager - handles authentication requests from other parts of the framework.
-
AccessDecisionManager - provides access decisions for web and method security. A default one will be registered, but you can also choose to use a custom one, declared using normal Spring bean syntax.
-
AuthenticationProviders - mechanisms against which the authentication manager authenticates users. The namespace provides supports for several standard options and also a means of adding custom beans declared using a traditional syntax.
-
UserDetailsService - closely related to authentication providers, but often also required by other beans.
We’ll see how to configure these in the following sections.
Getting Started with Security Namespace Configuration
In this section, we’ll look at how you can build up a namespace configuration to use some of the main features of the framework. Let’s assume you initially want to get up and running as quickly as possible and add authentication support and access control to an existing web application, with a few test logins. Then we’ll look at how to change over to authenticating against a database or other security repository. In later sections we’ll introduce more advanced namespace configuration options.
web.xml Configuration
The first thing you need to do is add the following filter declaration to your web.xml file:
<filter>
<filter-name>springSecurityFilterChain</filter-name>
<filter-class>org.springframework.web.filter.DelegatingFilterProxy</filter-class>
</filter>
<filter-mapping>
<filter-name>springSecurityFilterChain</filter-name>
<url-pattern>/*</url-pattern>
</filter-mapping>This provides a hook into the Spring Security web infrastructure.
DelegatingFilterProxy is a Spring Framework class which delegates to a filter implementation which is defined as a Spring bean in your application context.
In this case, the bean is named "springSecurityFilterChain", which is an internal infrastructure bean created by the namespace to handle web security.
Note that you should not use this bean name yourself.
Once you’ve added this to your web.xml, you’re ready to start editing your application context file.
Web security services are configured using the <http> element.
A Minimal <http> Configuration
All you need to enable web security to begin with is
<http>
<intercept-url pattern="/**" access="hasRole('USER')" />
<form-login />
<logout />
</http>Which says that we want all URLs within our application to be secured, requiring the role ROLE_USER to access them, we want to log in to the application using a form with username and password, and that we want a logout URL registered which will allow us to log out of the application.
<http> element is the parent for all web-related namespace functionality.
The <intercept-url> element defines a pattern which is matched against the URLs of incoming requests using an ant path style syntax [2].
You can also use regular-expression matching as an alternative (see the namespace appendix for more details).
The access attribute defines the access requirements for requests matching the given pattern.
With the default configuration, this is typically a comma-separated list of roles, one of which a user must have to be allowed to make the request.
The prefix "ROLE_" is a marker which indicates that a simple comparison with the user’s authorities should be made.
In other words, a normal role-based check should be used.
Access-control in Spring Security is not limited to the use of simple roles (hence the use of the prefix to differentiate between different types of security attributes).
We’ll see later how the interpretation can vary [3].
In Spring Security 3.0, the attribute can also be populated with an EL expression.
|
You can use multiple |
To add some users, you can define a set of test data directly in the namespace:
<authentication-manager>
<authentication-provider>
<user-service>
<!-- Password is prefixed with {noop} to indicate to DelegatingPasswordEncoder that
NoOpPasswordEncoder should be used. This is not safe for production, but makes reading
in samples easier. Normally passwords should be hashed using BCrypt -->
<user name="jimi" password="{noop}jimispassword" authorities="ROLE_USER, ROLE_ADMIN" />
<user name="bob" password="{noop}bobspassword" authorities="ROLE_USER" />
</user-service>
</authentication-provider>
</authentication-manager>This is an example of a secure way of storing the same passwords.
The password is prefixed with {bcrypt} to instruct DelegatingPasswordEncoder, which supports any configured PasswordEncoder for matching, that the passwords are hashed using BCrypt:
<authentication-manager>
<authentication-provider>
<user-service>
<user name="jimi" password="{bcrypt}$2a$10$ddEWZUl8aU0GdZPPpy7wbu82dvEw/pBpbRvDQRqA41y6mK1CoH00m"
authorities="ROLE_USER, ROLE_ADMIN" />
<user name="bob" password="{bcrypt}$2a$10$/elFpMBnAYYig6KRR5bvOOYeZr1ie1hSogJryg9qDlhza4oCw1Qka"
authorities="ROLE_USER" />
<user name="jimi" password="{noop}jimispassword" authorities="ROLE_USER, ROLE_ADMIN" />
<user name="bob" password="{noop}bobspassword" authorities="ROLE_USER" />
</user-service>
</authentication-provider>
</authentication-manager>The configuration above defines two users, their passwords and their roles within the application (which will be used for access control).
It is also possible to load user information from a standard properties file using the properties attribute on user-service.
See the section on in-memory authentication for more details on the file format.
Using the <authentication-provider> element means that the user information will be used by the authentication manager to process authentication requests.
You can have multiple <authentication-provider> elements to define different authentication sources and each will be consulted in turn.
At this point you should be able to start up your application and you will be required to log in to proceed. Try it out, or try experimenting with the "tutorial" sample application that comes with the project.
Setting a Default Post-Login Destination
If a form login isn’t prompted by an attempt to access a protected resource, the default-target-url option comes into play.
This is the URL the user will be taken to after successfully logging in, and defaults to "/".
You can also configure things so that the user always ends up at this page (regardless of whether the login was "on-demand" or they explicitly chose to log in) by setting the always-use-default-target attribute to "true".
This is useful if your application always requires that the user starts at a "home" page, for example:
<http pattern="/login.htm*" security="none"/>
<http use-expressions="false">
<intercept-url pattern='/**' access='ROLE_USER' />
<form-login login-page='/login.htm' default-target-url='/home.htm'
always-use-default-target='true' />
</http>For even more control over the destination, you can use the authentication-success-handler-ref attribute as an alternative to default-target-url.
The referenced bean should be an instance of AuthenticationSuccessHandler.
Advanced Web Features
Adding in Your Own Filters
If you’ve used Spring Security before, you’ll know that the framework maintains a chain of filters in order to apply its services.
You may want to add your own filters to the stack at particular locations or use a Spring Security filter for which there isn’t currently a namespace configuration option (CAS, for example).
Or you might want to use a customized version of a standard namespace filter, such as the UsernamePasswordAuthenticationFilter which is created by the <form-login> element, taking advantage of some of the extra configuration options which are available by using the bean explicitly.
How can you do this with namespace configuration, since the filter chain is not directly exposed?
The order of the filters is always strictly enforced when using the namespace. When the application context is being created, the filter beans are sorted by the namespace handling code and the standard Spring Security filters each have an alias in the namespace and a well-known position.
|
In previous versions, the sorting took place after the filter instances had been created, during post-processing of the application context.
In version 3.0+ the sorting is now done at the bean metadata level, before the classes have been instantiated.
This has implications for how you add your own filters to the stack as the entire filter list must be known during the parsing of the |
The filters, aliases and namespace elements/attributes which create the filters are shown in Standard Filter Aliases and Ordering. The filters are listed in the order in which they occur in the filter chain.
| Alias | Filter Class | Namespace Element or Attribute |
|---|---|---|
CHANNEL_FILTER |
|
|
SECURITY_CONTEXT_FILTER |
|
|
CONCURRENT_SESSION_FILTER |
|
|
HEADERS_FILTER |
|
|
CSRF_FILTER |
|
|
LOGOUT_FILTER |
|
|
X509_FILTER |
|
|
PRE_AUTH_FILTER |
|
N/A |
CAS_FILTER |
|
N/A |
FORM_LOGIN_FILTER |
|
|
BASIC_AUTH_FILTER |
|
|
SERVLET_API_SUPPORT_FILTER |
|
|
JAAS_API_SUPPORT_FILTER |
|
|
REMEMBER_ME_FILTER |
|
|
ANONYMOUS_FILTER |
|
|
SESSION_MANAGEMENT_FILTER |
|
|
EXCEPTION_TRANSLATION_FILTER |
|
|
FILTER_SECURITY_INTERCEPTOR |
|
|
SWITCH_USER_FILTER |
|
N/A |
You can add your own filter to the stack, using the custom-filter element and one of these names to specify the position your filter should appear at:
<http>
<custom-filter position="FORM_LOGIN_FILTER" ref="myFilter" />
</http>
<beans:bean id="myFilter" class="com.mycompany.MySpecialAuthenticationFilter"/>You can also use the after or before attributes if you want your filter to be inserted before or after another filter in the stack.
The names "FIRST" and "LAST" can be used with the position attribute to indicate that you want your filter to appear before or after the entire stack, respectively.
|
Avoiding filter position conflicts
If you are inserting a custom filter which may occupy the same position as one of the standard filters created by the namespace then it’s important that you don’t include the namespace versions by mistake. Remove any elements which create filters whose functionality you want to replace. Note that you can’t replace filters which are created by the use of the |
If you’re replacing a namespace filter which requires an authentication entry point (i.e. where the authentication process is triggered by an attempt by an unauthenticated user to access to a secured resource), you will need to add a custom entry point bean too.
Method Security
From version 2.0 onwards Spring Security has improved support substantially for adding security to your service layer methods.
It provides support for JSR-250 annotation security as well as the framework’s original @Secured annotation.
From 3.0 you can also make use of new expression-based annotations.
You can apply security to a single bean, using the intercept-methods element to decorate the bean declaration, or you can secure multiple beans across the entire service layer using the AspectJ style pointcuts.
The Default AccessDecisionManager
This section assumes you have some knowledge of the underlying architecture for access-control within Spring Security. If you don’t you can skip it and come back to it later, as this section is only really relevant for people who need to do some customization in order to use more than simple role-based security.
When you use a namespace configuration, a default instance of AccessDecisionManager is automatically registered for you and will be used for making access decisions for method invocations and web URL access, based on the access attributes you specify in your intercept-url and protect-pointcut declarations (and in annotations if you are using annotation secured methods).
The default strategy is to use an AffirmativeBased AccessDecisionManager with a RoleVoter and an AuthenticatedVoter.
You can find out more about these in the chapter on authorization.
Customizing the AccessDecisionManager
If you need to use a more complicated access control strategy then it is easy to set an alternative for both method and web security.
For method security, you do this by setting the access-decision-manager-ref attribute on global-method-security to the id of the appropriate AccessDecisionManager bean in the application context:
<global-method-security access-decision-manager-ref="myAccessDecisionManagerBean">
...
</global-method-security>The syntax for web security is the same, but on the http element:
<http access-decision-manager-ref="myAccessDecisionManagerBean">
...
</http>Unresolved include directive in modules/ROOT/pages/servlet/index.adoc - include::test/index.adoc[]
Unresolved include directive in modules/ROOT/pages/servlet/index.adoc - include::crypto/index.adoc[]
Unresolved include directive in modules/ROOT/pages/servlet/index.adoc - include::appendix/index.adoc[]
ldap-server element in the chapter on [servlet-authentication-ldap].
access attribute depends on the implementation of the AccessDecisionManager which is used.